Computerprobleme treten ab und zu auf, daher müssen Sie in jedem Szenario darauf vorbereitet sein, Maßnahmen zu ergreifen. Wenn beispielsweise kein Ton von Ihrem Windows 10-PC kommt , kann dies durch verschiedene Probleme verursacht werden, z. B. durch den Audio-Renderer-Fehler. Es besteht jedoch kein Grund zur Panik, da Sie dieses Problem beheben können, indem Sie die folgenden Anweisungen befolgen.
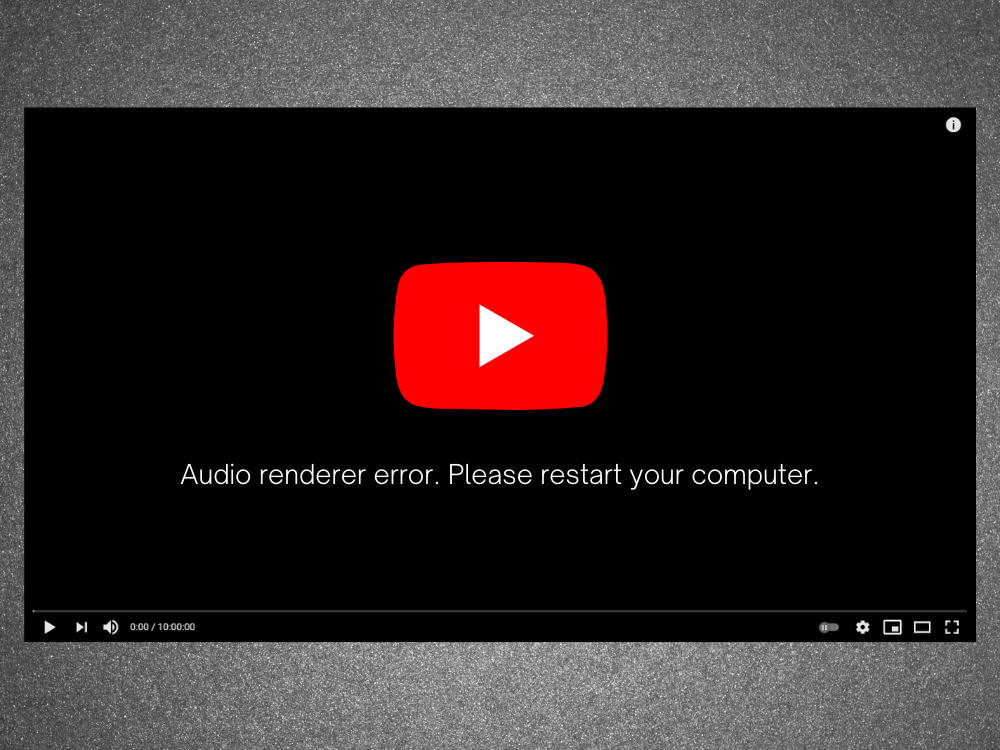
Audio-Renderer-Fehler: Bitte starten Sie Ihren Computer neu!
Audio-Renderer-Fehler, bitte Computer neu starten ist eine Fehlermeldung, die auf dem Bildschirm angezeigt wird, wenn Ihr Computer keine Audiotracks abspielen kann. Es kann überall auftreten, egal ob Sie versuchen, ein Video auf YouTube oder einen Film in Ihrem Mediaplayer anzusehen.
Das Verhalten ist seltsam. Manchmal wird Audio ohne Probleme abgespielt, bis der Fehler plötzlich auftritt und alle Sounds von Ihrem Computer deaktiviert werden. Es fordert Sie freundlich auf, Ihren Computer neu zu starten, was das Problem zu lösen scheint.
Der Neustart des PCs ist jedoch nur eine vorübergehende Problemumgehung, da der Fehler irgendwann wieder auftritt. An diesem Punkt sind Sie gezwungen, eine Computer-Neustartschleife einzugeben, nur um den Ton am Laufen zu halten. Es ist leicht zu verstehen, warum dies für Benutzer so frustrierend ist, insbesondere wenn die Ursache des Problems nicht klar ist.
Wir haben dieses Problem getestet, mit verschiedenen Benutzern gechattet und eine Liste möglicher Lösungen zusammengestellt, die den Audio-Renderer-Fehler auf den meisten PCs mit Windows 10 beheben.
So beheben Sie den Audio-Renderer-Fehler unter Windows 10
Der Audio-Rendering-Fehler kann durch ein Problem mit Ihrem Webbrowser oder Computereinstellungen verursacht werden. Es ist wichtig, sich mit Geduld zu wappnen, denn es kann eine Weile dauern, bis Sie alle Optionen ausgeschöpft haben.
Bevor Sie mit der Behebung dieses lästigen Problems beginnen, ist es ratsam, einen Systemwiederherstellungspunkt einzurichten . Es ermöglicht Ihnen, Windows 10 in einen stabilen Zustand zurückzusetzen, falls Sie unterwegs auf weitere Probleme stoßen.
1. Browser-Cache löschen
Viele Benutzer berichten, dass sie den Audio-Renderer-Fehler auf YouTube erhalten. Dies kann durch ein Browserproblem verursacht werden, z. B. durch gespeicherte Caches und Cookies. Eine einfache Möglichkeit, das Problem zu beheben, besteht darin, Ihren Webbrowser zu aktualisieren . Wählen Sie dazu einfach den YouTube-Tab aus und drücken Sie Strg + Umschalt + R . Überprüfen Sie dann, ob der Fehler weiterhin auftritt.
Dies ist jedoch nur eine vorübergehende Lösung, da Sie den Browser-Cache immer noch auf herkömmliche Weise löschen müssen.
So leeren Sie den Chrome-Cache:
- Starten Sie Chrome und öffnen Sie das Menü Mehr in der oberen rechten Ecke
- Gehe zu Einstellungen
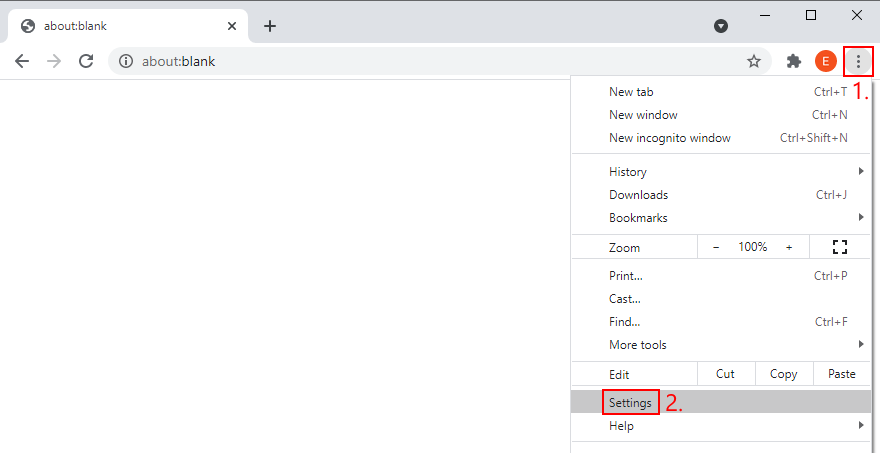
- Springe auf der linken Seite zu Datenschutz und Sicherheit
- Klicken Sie auf Browserdaten löschen . Alternativ können Sie die
chrome://settings/clearBrowserDataAdresse eingeben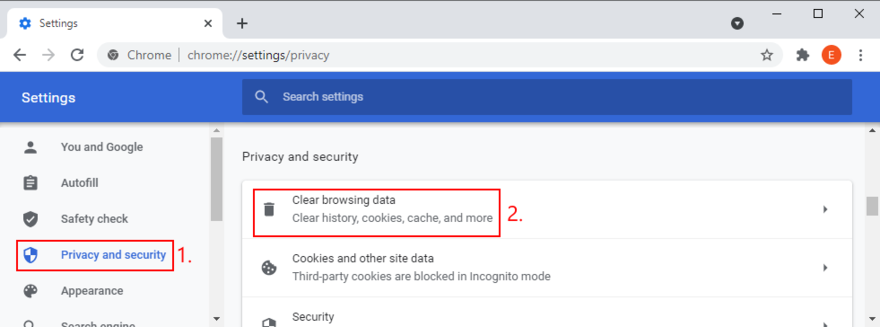
- Bleiben Sie in dem Basisabschnitt
- Stellen Sie den Zeitraum auf Alle Zeiten
- Stellen Sie sicher, dass die folgenden Optionen aktiviert sind:
- Browser-Verlauf
- Cookies und andere Websitedaten
- Zwischengespeicherte Bilder und Dateien
- Klicken Sie auf Daten löschen
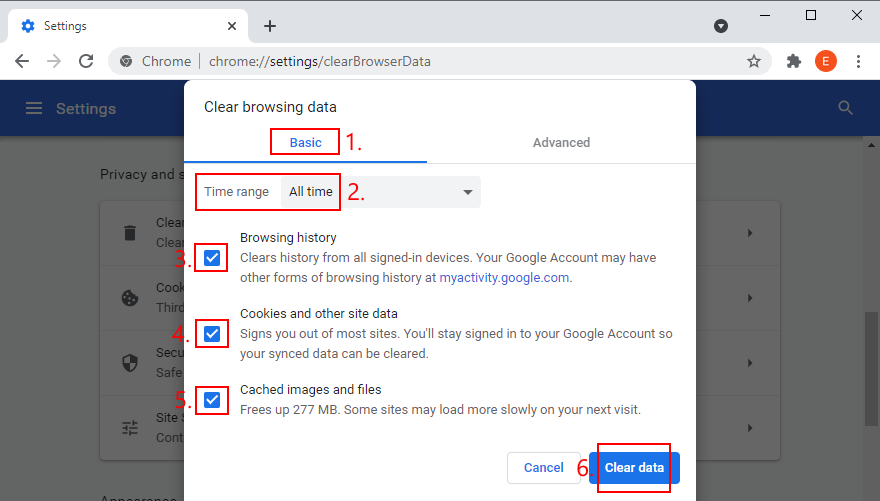
- Starten Sie Chrome neu und versuchen Sie jetzt, YouTube zu sehen
So leeren Sie den Firefox-Cache:
- Öffnen Sie Firefox und klicken Sie auf den ≡ Hamburger-Button
- Wählen Sie Optionen
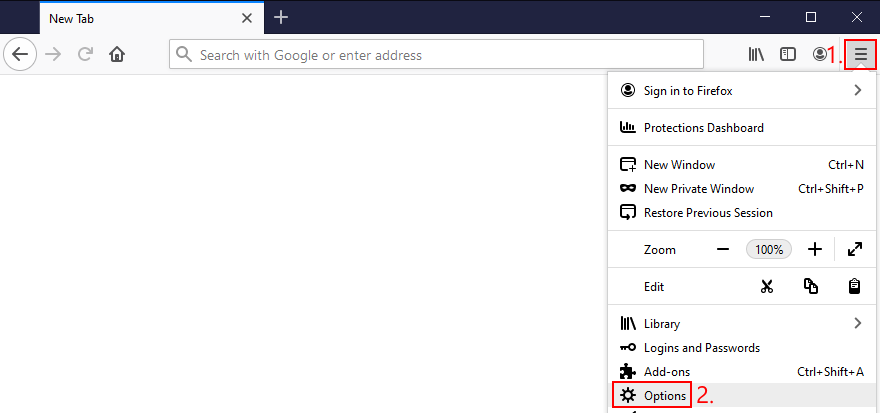
- Wechseln Sie zu Datenschutz und Sicherheit und klicken Sie auf Daten löschen
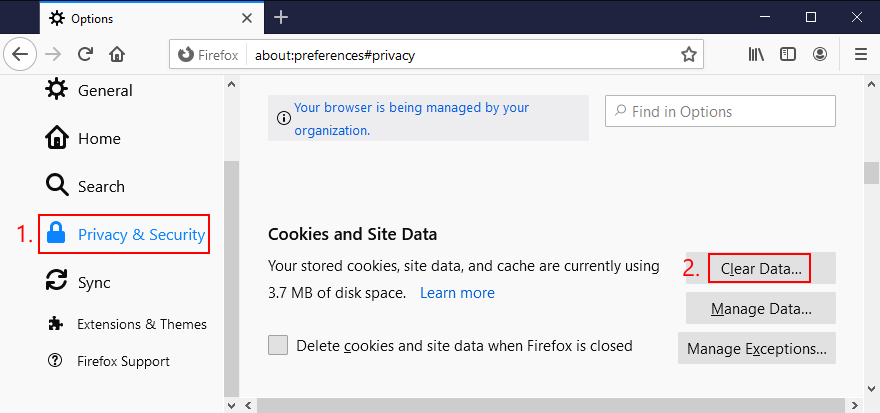
- Überprüfen Sie, ob die nächsten Einstellungen ausgewählt sind:
- Cookies und Site-Daten
- Zwischengespeicherter Webinhalt
- Klicken Sie auf Löschen
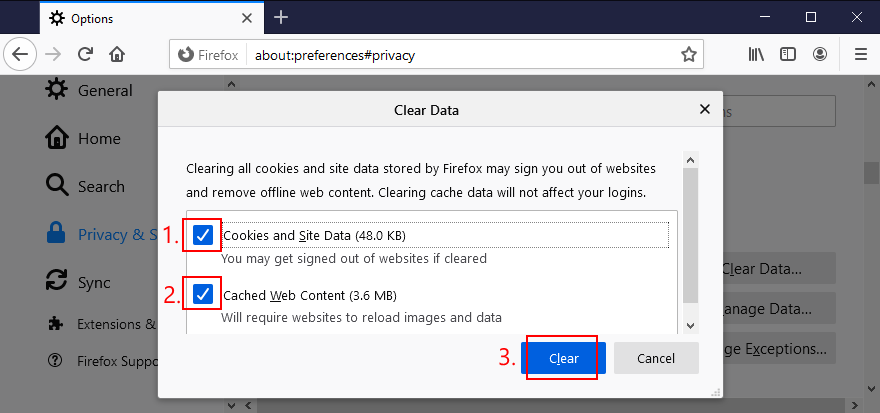
- Starten Sie Firefox neu und suchen Sie nach Audiofehlern
So löschen Sie den Microsoft Edge-Cache:
- Starten Sie Microsoft Edge
- Klicken Sie oben rechts auf die Schaltfläche Mehr
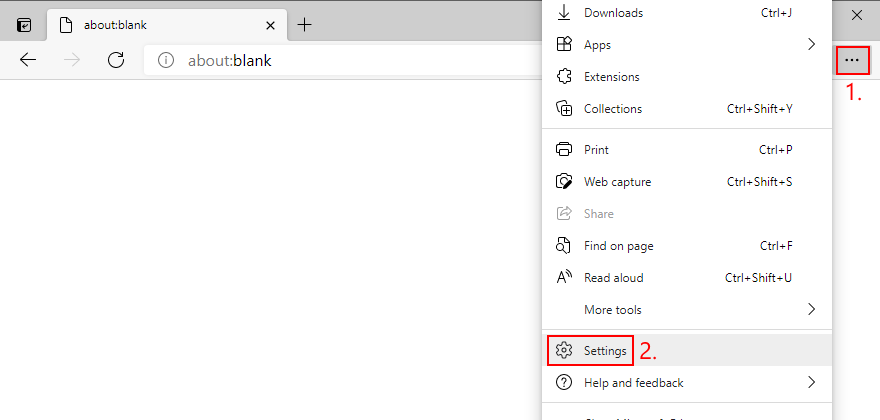
- Wählen Sie Einstellungen
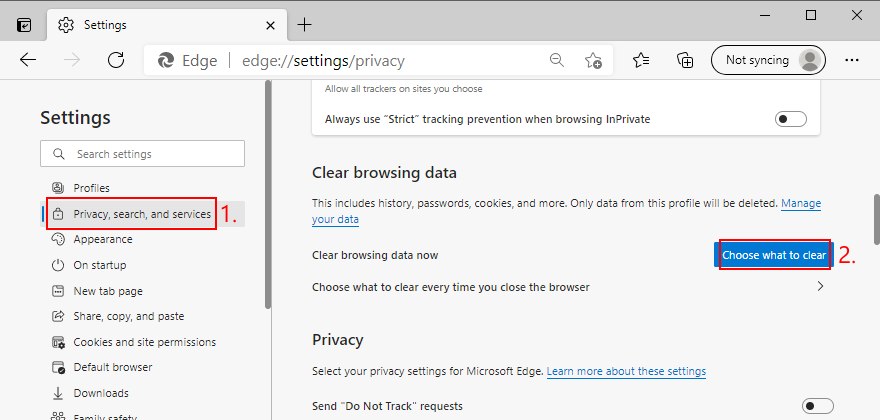
- Wechseln Sie zu Datenschutz, Suche und Dienste . Andernfalls können Sie die
edge://settings/privacyAdresse verwenden
- Bei Daten löschen jetzt gerade , klicken Sie , was passieren löschen
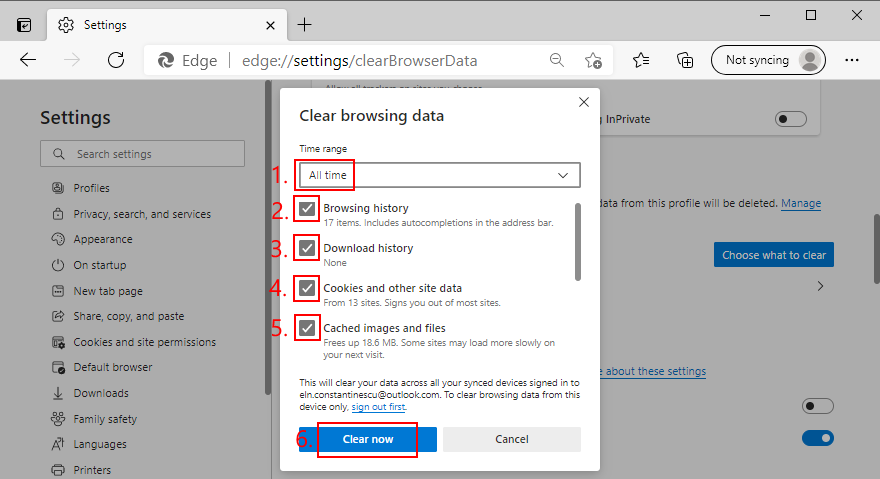
- Stellen Sie den Zeitraum auf Alle Zeiten
- Aktivieren Sie die Kontrollkästchen der folgenden Optionen:
- Browser-Verlauf
- Verlauf herunterladen
- Cookies und andere Websitedaten
- Zwischengespeicherte Bilder und Dateien
- Klicken Sie auf Jetzt löschen
- Starten Sie Edge neu und versuchen Sie, YouTube ohne Audioprobleme zu genießen
2. Führen Sie die Audio-Fehlerbehebung aus
Windows 10 wird mit einer integrierten Problembehandlung geliefert, die häufige Audioprobleme behebt. Es ist einen Versuch wert, wenn Sie es satt haben, sich mit dem Audio-Renderer-Fehler zu befassen.
- Klicken Sie mit der rechten Maustaste auf die Schaltfläche Start von Windows 10 und gehen Sie zu Einstellungen
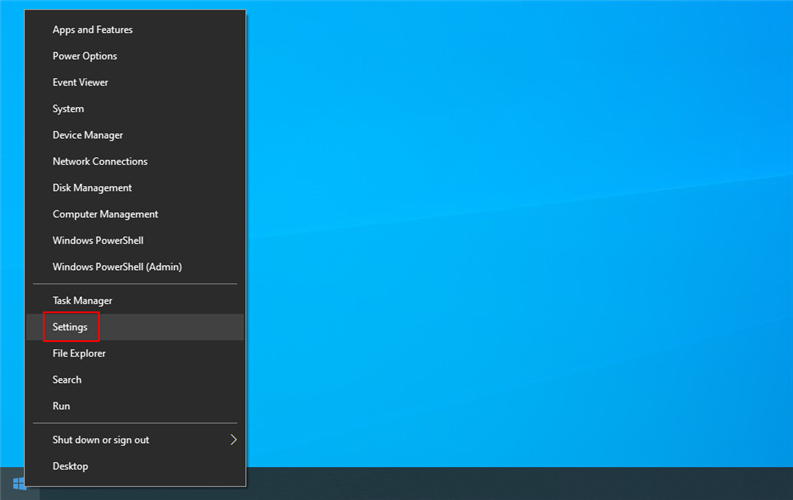
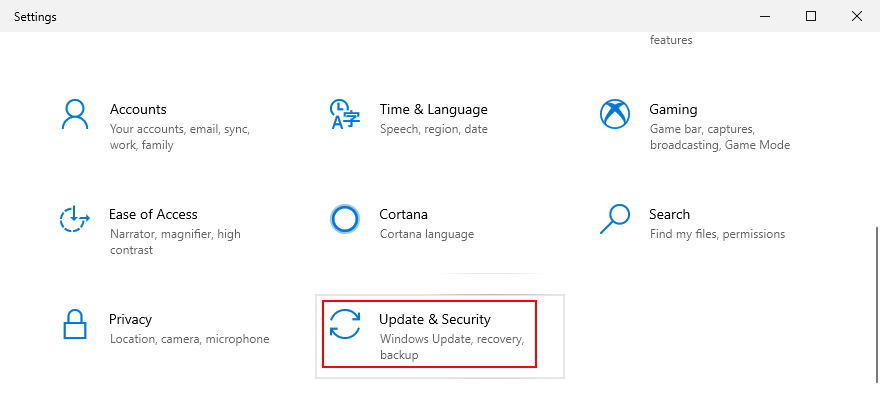
- Wählen Sie Update & Sicherheit
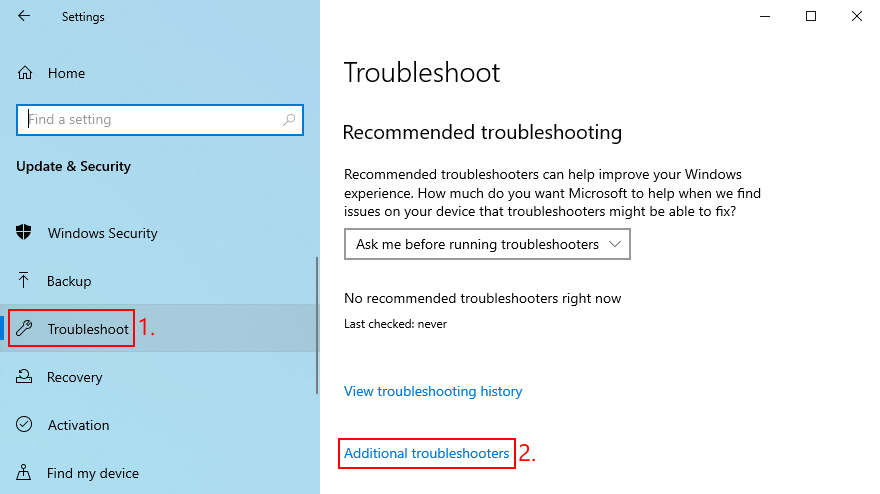
- Gehen Sie zu Fehlerbehebung auf der linken Seite
- Klicken Sie auf Weitere Fehlerbehebungen
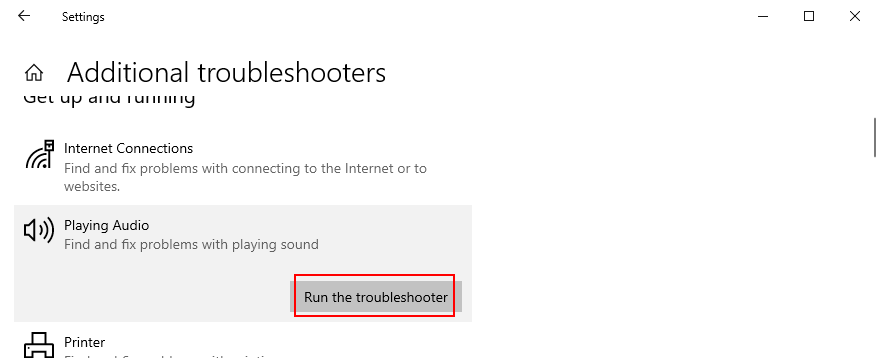
- Wählen Sie Audio abspielen und klicken Sie auf Problembehandlung ausführen
- Folge den Anweisungen auf dem Bildschirm
- Auf Audiofehler prüfen
3. Aktivieren Sie das Audiogerät
Wenn Sie mehrere Audiogeräte an Ihren Computer angeschlossen haben, haben Sie möglicherweise unwissentlich die Einstellungen des Audiogeräts durcheinander gebracht und den primären Audioadapter deaktiviert. So aktivieren Sie es wieder:
- Klicken Sie auf die Schaltfläche Start , geben Sie Systemsteuerung ein und öffnen Sie diese App
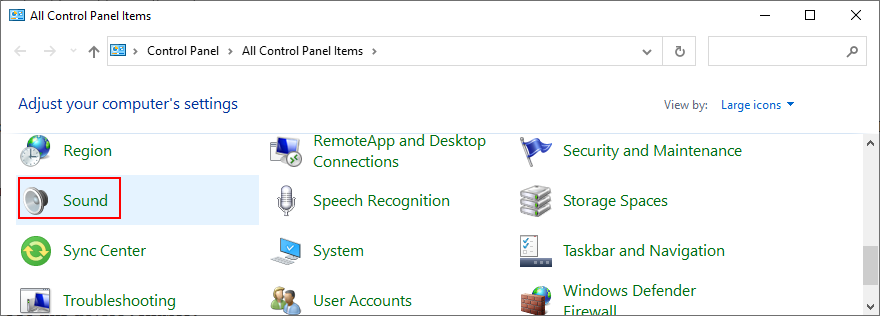
- Gehen Sie zum Abschnitt Ton
- Wechseln Sie zur Registerkarte Wiedergabe
- Wählen Sie Ihr Audiogerät aus der Liste aus
- Klicken Sie auf Eigenschaften
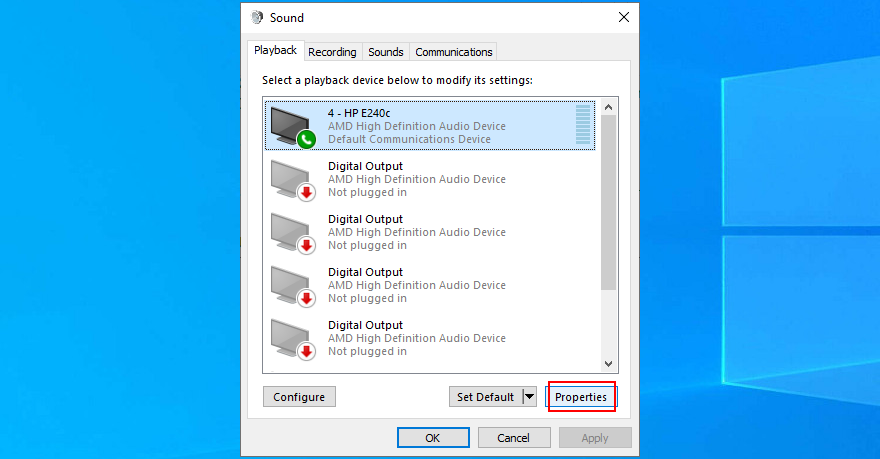
- Im Allgemeinen Registerkarte Set Geräteverwendung zu Verwenden Sie dieses Gerät (aktiviert)
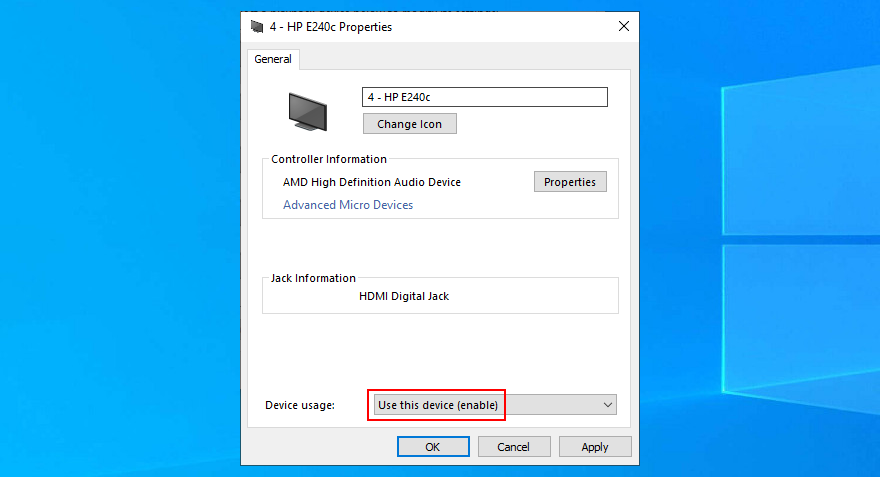
- Klicken Sie auf Übernehmen und beenden
- Jetzt auf Audioprobleme prüfen
4. Starten Sie den Windows Audio-Dienst neu
Alle Sounds, die aus Ihrem Computer kommen, werden von einem Hintergrunddienst betrieben. Wenn dieser Dienst derzeit nicht ausgeführt wird, häufig unterbrochen wird oder beim Booten von Windows nicht automatisch gestartet wird, sollten Sie mit Problemen wie dem Audio-Renderer-Fehler rechnen.
Sie können dieses Problem jedoch beheben, indem Sie den Windows-Audiodienst neu starten. Hier ist wie:
- Drücken Sie die Windows- Taste, geben Sie Dienste ein und öffnen Sie diese App
- Suchen Sie Windows Audio und klicken Sie mit der rechten Maustaste darauf
- Gehe zu Eigenschaften
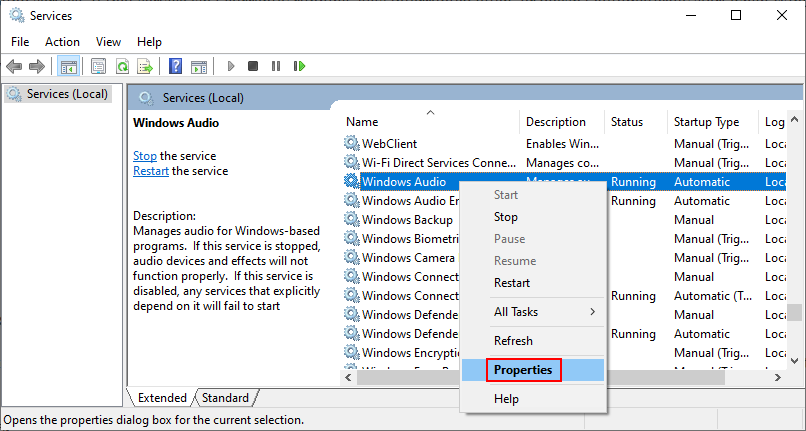
- Bleiben Sie auf der Registerkarte Allgemein
- Stellen Sie den Starttyp auf Automatisch
- Wenn Statusdienst sagt Gestoppt , klicken Sie auf die Start - Schaltfläche
- Klicken Sie auf Übernehmen und beenden
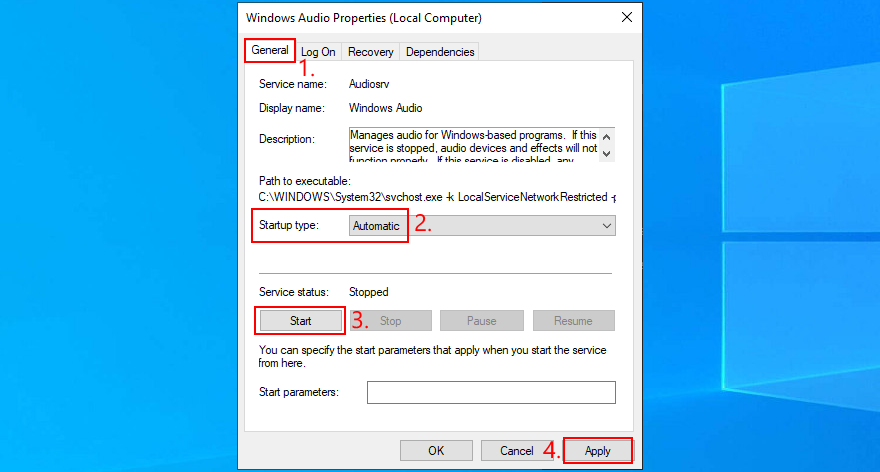
- Auf Audioprobleme prüfen
5. Synchronisieren Sie die Audiofrequenz (ASIO-Treiber)
Benutzer mit ASIO4ALL-Treibern haben Konflikte mit den Audioeinstellungen des Systems gemeldet. Genauer gesagt, wenn die Abtastrate in beiden Teilen nicht auf den gleichen Wert eingestellt ist, treten beim Computer Soundprobleme auf. So lösen Sie dieses Problem ganz einfach:
- Klicken Sie auf die Schaltfläche Start , geben Sie Systemsteuerung ein und drücken Sie die Eingabetaste
- Wählen Sie den Bereich Sound

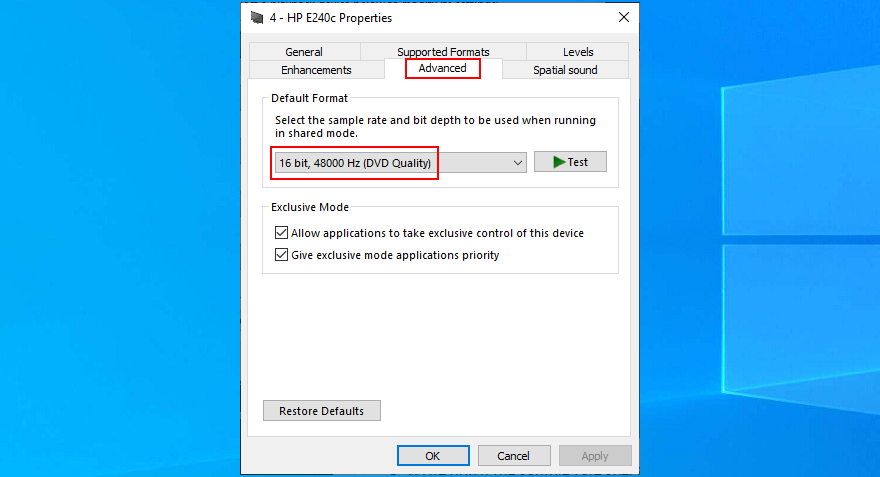
- In der Wiedergabe - Registerkarte wählen Sie Ihre Audio-Gerät und klicken Sie auf Eigenschaften

- Wechseln Sie zur Registerkarte Erweitert
- Notieren Sie die unter Standardformat angegebene Abtastrate
- Verlasse diesen Bereich
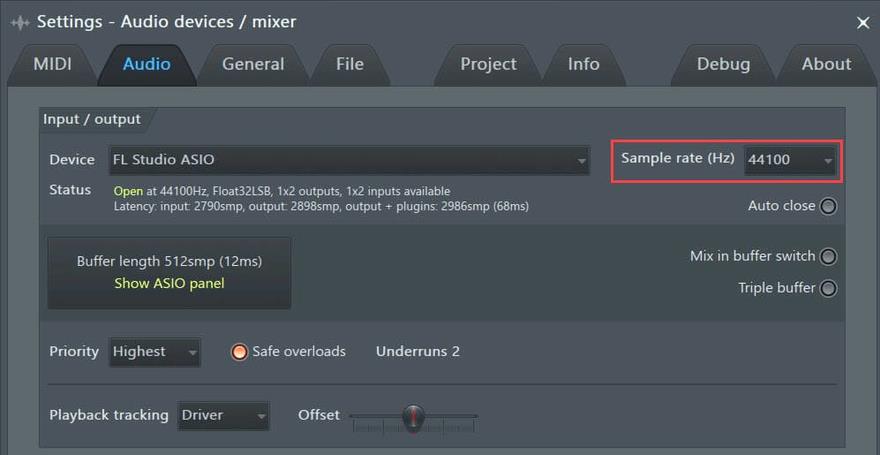
- Öffnen Sie das ASIO-Dienstprogramm
- Wechseln Sie zur Registerkarte Audio
- Setzen Sie die Abtastrate auf den gleichen Wert wie in Windows
- Starten Sie Ihren PC neu und überprüfen Sie die Ergebnisse
6. Führen Sie Audiotests durch (HP-Laptops)
HP-Benutzer können sich an ein Audiodiagnosetool namens HP PC Hardware Diagnostics (UEFI) wenden. So verwenden Sie es:
- Starten Sie Ihren HP-Laptop neu
- Drücken Sie während des Neustarts schnell die Taste, die Ihnen den Zugriff auf HP PC Hardware Diagnostics (UEFI) gewährt.
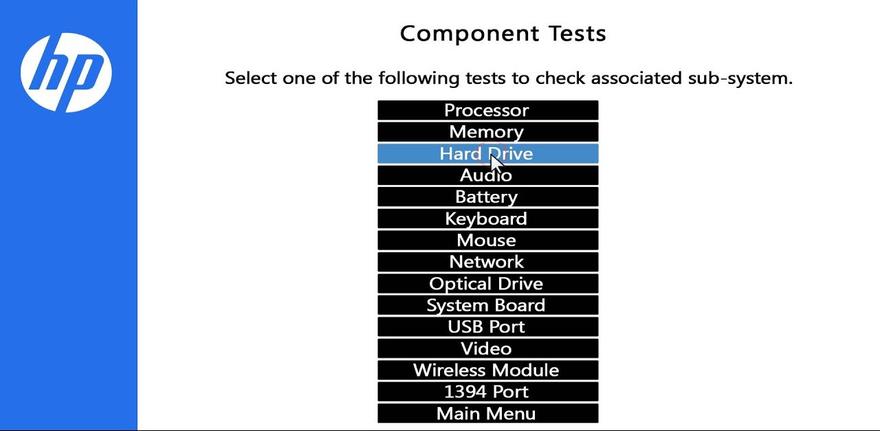
- Gehen Sie zum Abschnitt Audio
- Klicken Sie einmal auf Ausführen , um mit der Evaluierung Ihrer Audiogeräte zu beginnen
- Wählen Sie Lautsprecher und befolgen Sie die Anweisungen auf dem Bildschirm
- Führen Sie den Test durch und starten Sie Windows
- Auf Audioprobleme prüfen
Sie können HP Audio Check auch von der offiziellen Website herunterladen und damit zusätzliche Tests durchführen.
7. Legen Sie das Standard-Audiogerät fest
Windows hat manchmal Probleme, das Standard-Audiogerät zu identifizieren. Und das ist auch der Grund, warum es den Audio-Renderer-Fehler anzeigen kann, egal ob Sie ihn auf YouTube oder anderswo bekommen. Um dieses lästige Problem zu beheben, müssen Sie nur Ihr bevorzugtes Audiogerät erneut als Standard festlegen. Hier ist wie:
- Drücken Sie die Win- Taste, geben Sie Systemsteuerung ein und öffnen Sie diese App
- Klicken Sie auf Ton

- Choose your audio device from the Playback tab
- Click Set Default
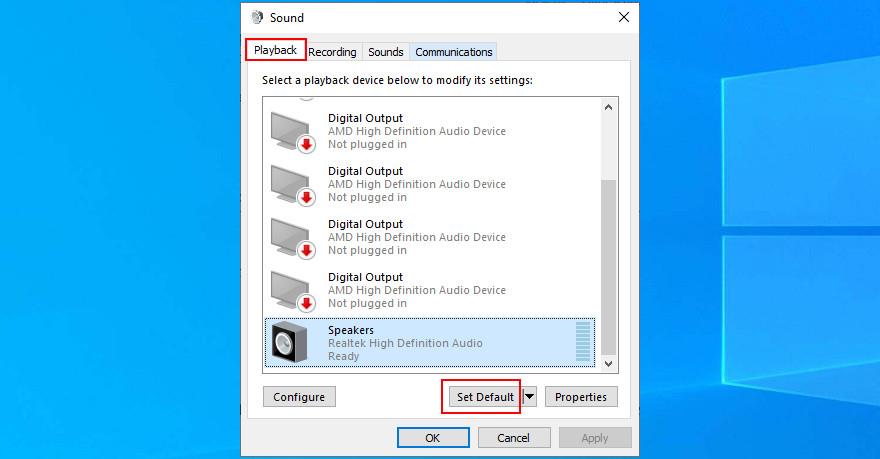
- If the Set Default button is greyed out, select any other device to set it as default, then go back to your first option
- Click Apply and exit this area
- Check for audio issues
8. Reinstall the audio adapter
Your audio adapter might not be properly connected to your computer. However, you can effortlessly reinstall it without harming your PC in the process. Here’s what you need to do:
- Right-click the Start button and select Device Manager
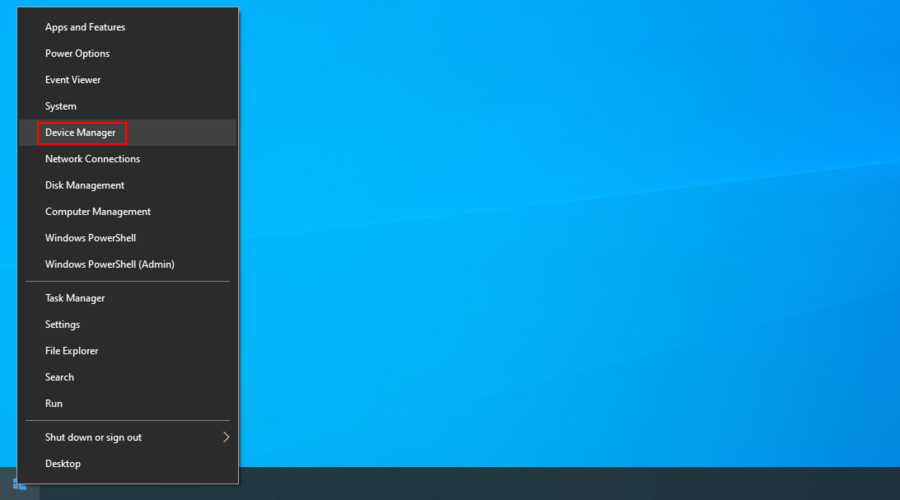
- Extend the Audio inputs and outputs group
- Identify your main audio device, right-click it, and select Uninstall device
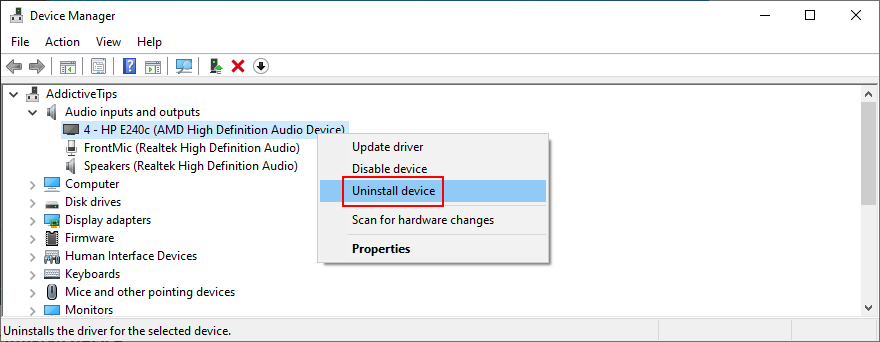
- Select any entry from the list
- Open the Action menu and click Scan for hardware changes
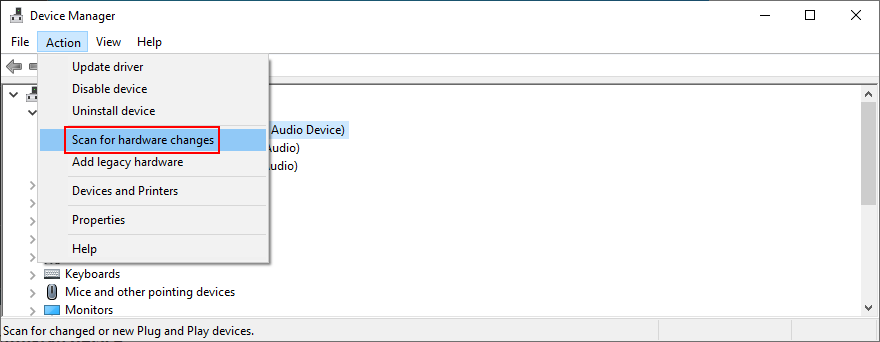
- Restart your computer. Windows will auto-reinstall the missing audio driver
- Check for sound problems
9. Update the audio driver
Even if your sound adapter is correctly installed, perhaps it’s equipped with an obsolete driver that’s no longer supported by Windows 10. It would certainly explain the audio renderer error. However, you can easily update the audio driver:
- Click the Start button, type Device Manager, and press Enter
- Expand the Audio inputs and outputs category
- Right-click your primary audio adapter and select Update driver
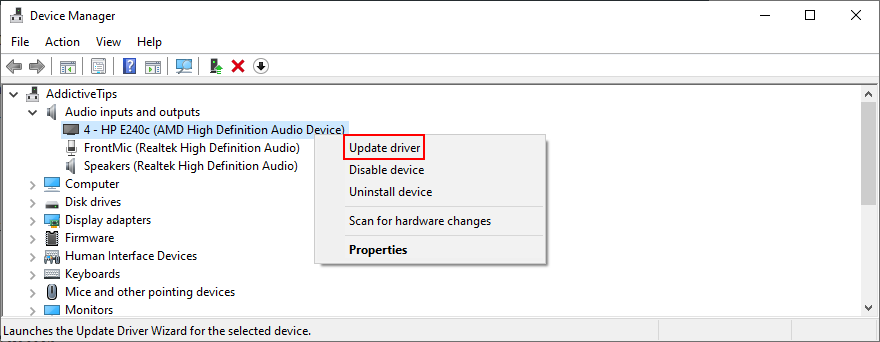
- Click Search automatically for updated driver software
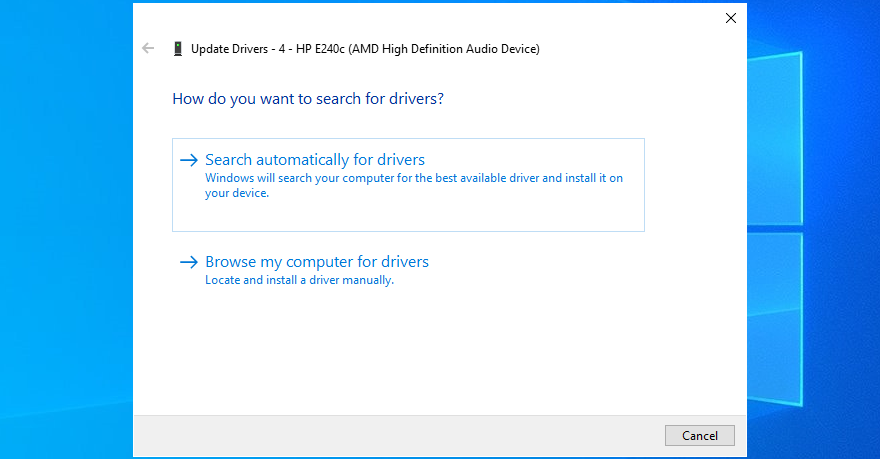
- If you see the The best drivers for your device are already installed message, click Search for updated drivers on Windows Update
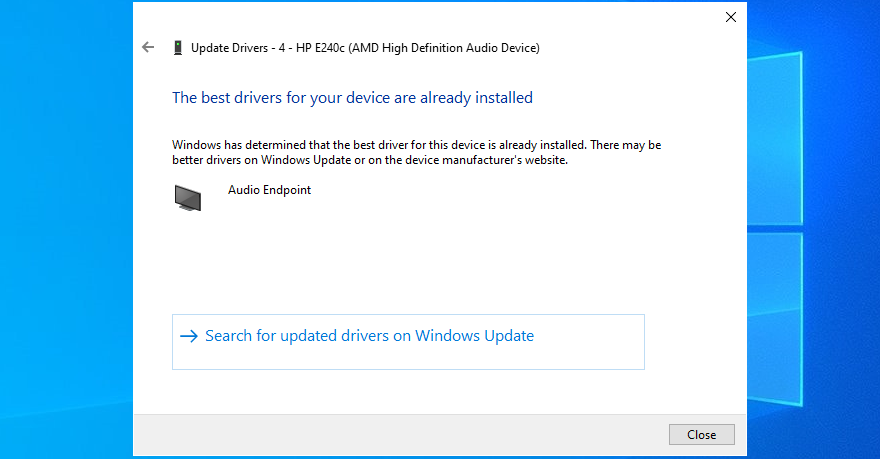
- Reboot your PC and check for additional audio issues
It’s possible that Microsoft fails to find a newer audio driver using Windows Update. In that case, you should head over to the manufacturer website of your sound adapter, then find, download, and install a newer driver that’s compatible with your OS configuration.
However, if you don’t want to go through that trouble as well as risk installing an incompatible driver that could cause more problems, we suggest opting for a driver updating software solution. You can use it to keep all your device drivers in check.
10. Roll back the audio driver
If you have recently updated your sound driver, perhaps you installed an incompatible version that’s throwing you the audio renderer error. To fix it, you should roll back to the previous driver version. Here’s how:
- Head over to Device Manager
- Right-click your audio device and go to Properties
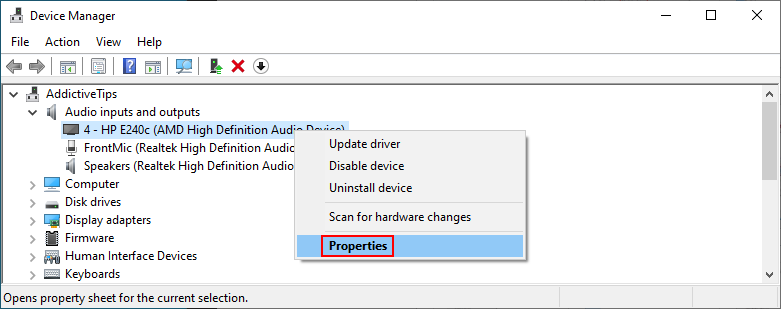
- Select the Driver tab
- Click Roll Back Driver and follow the given instructions
- If the button is greyed out, it means that your operating system doesn’t have the previous driver version, so you can skip this solution
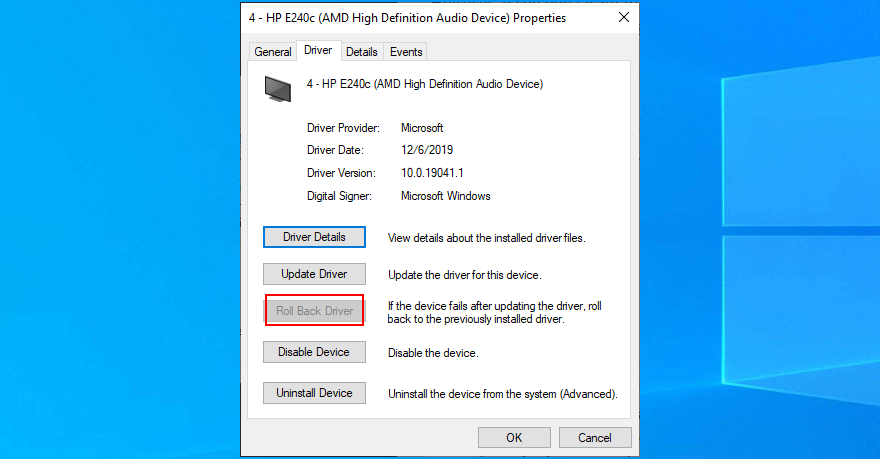
- Restart your computer and inspect results
11. Check the audio cable
It’s a good idea to check your audio cable to see if there’s anything wrong with it since hardware problems can cause audio renderer errors, too. If you have multiple audio inputs on your computer, try sticking the audio jack somewhere else in case you have malfunctioning jacks.
In fact, if you have several external playback devices plugged into your machine, it’s a good idea to remove the ones you’re not currently using. Furthermore, make sure that you didn’t accidentally swap the audio and microphone jacks in the process.
12. Disable audio mixing software
Certain audio mixing tools are not fully compatible with the Windows 10 sound drivers, resulting in conflicts and the audio renderer error message. As soon as you start an audio mixing tool and configure sound drivers, the application overrides the system settings, causing various problems.
To fix this problem, you just need to disable your audio mixing tools when trying to watch a movie offline or a clip on YouTube.
13. Update your web browser
If you’re getting the audio renderer error message on YouTube when trying to enjoy a video, it’s a good idea to update your web browser to the latest version.
How to update Google Chrome:
- Open the More menu on the top-right corner
- Visit the Help submenu and click About Google Chrome. Alternatively, you can visit the
chrome://settings/help address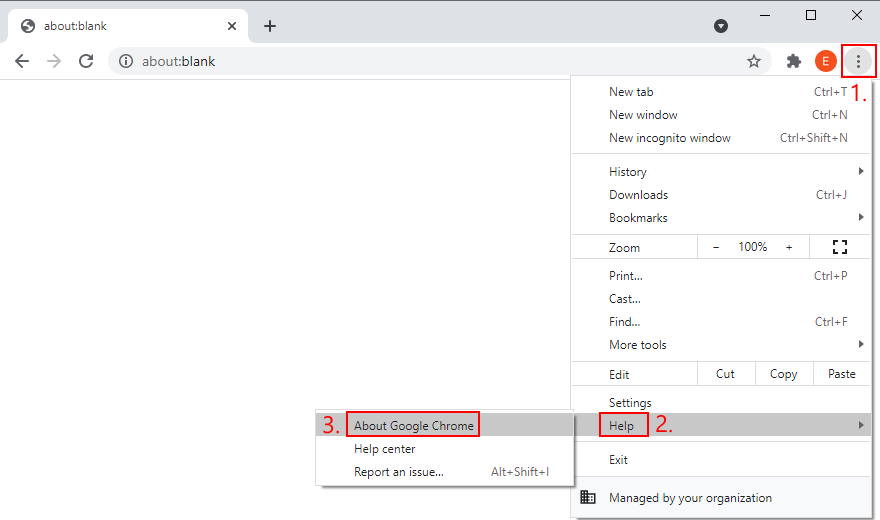
- Wait until Chrome downloads and installs any available updates
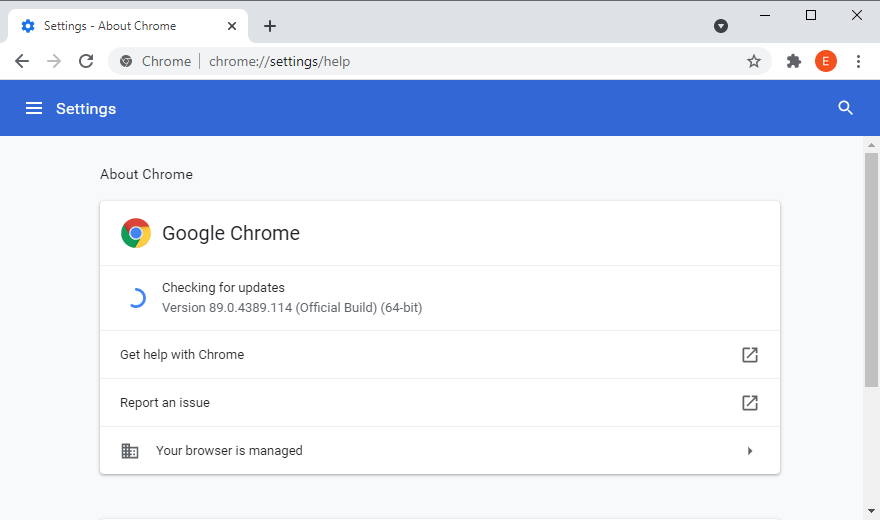
- Click Relaunch and try to watch YouTube
How to update Mozilla Firefox:
- Open the ≡ hamburger menu on the upper-right corner
- Select the Help section and click About Firefox
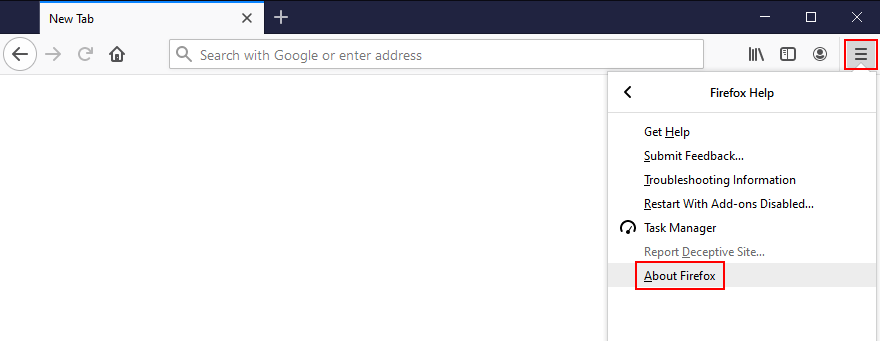
- If Firefox finds any updates, give it time to install them
- When it’s over, restart the web browser and check for audio issues
How to update Microsoft Edge:
- Click the More button on the top-right corner
- Go to the Help & feedback menu and click About Microsoft Edge
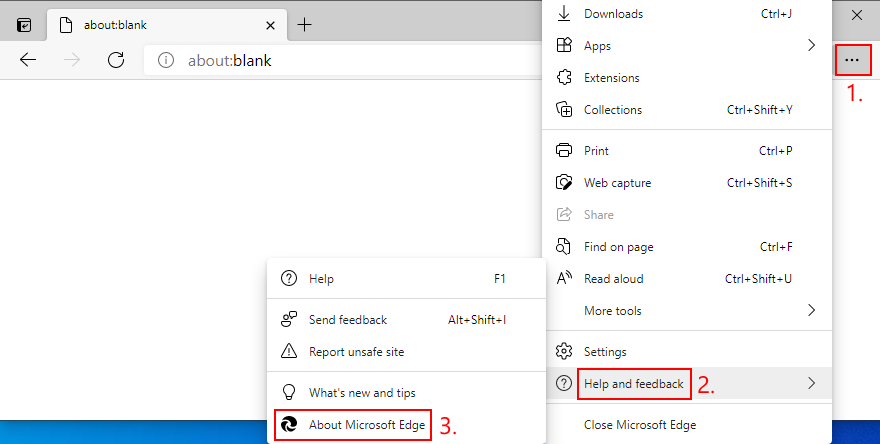
- Else, you can go to the
edge://settings/help address
- Wait until Edge finds and installs any updates
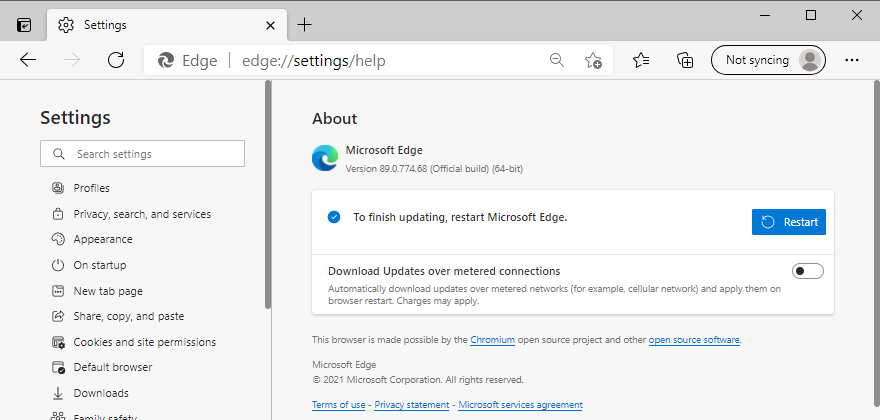
- Restart the browser and inspect results
14. Disable hardware acceleration
Modern web browsers take advantage of your computer’s hardware acceleration to improve the page loading speed and enhance your overall browsing experience. However, users report that it has interfered with the audio driver, causing rendering errors. To fix this issue, you have to turn off hardware acceleration for each browser.
How to disable hardware acceleration in Google Chrome:
- Open the More button and go to Settings

- Scroll down to the bottom of the page and click Advanced
- At System, turn off Use hardware acceleration when available

- Relaunch Chrome and check for audio errors
How to disable hardware acceleration in Mozilla Firefox:
- Click the ≡ hamburger button and go to Options (or visit the
about:preferences address)
- In the General tab, scroll down to Performance
- Uncheck Use recommended performance settings
- Also uncheck Use hardware acceleration when available
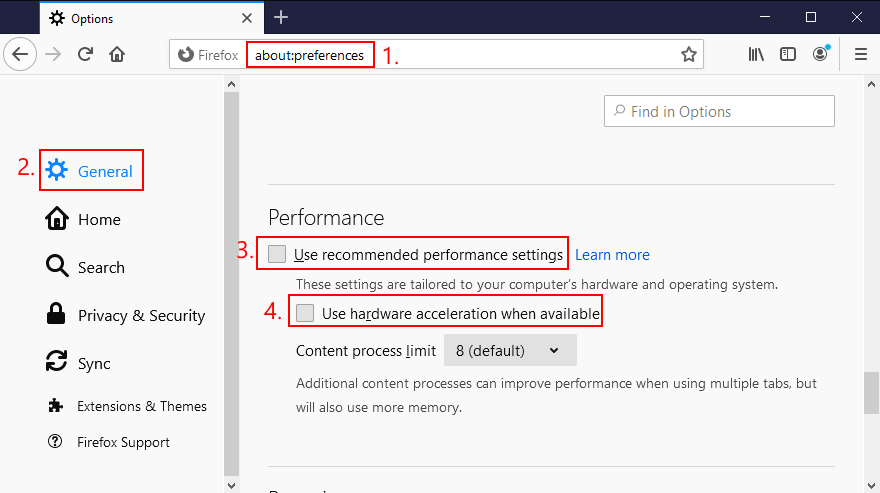
- Restart Firefox and check for audio errors
How to disable hardware acceleration in Microsoft Edge:
- Open the More menu and head over to Settings

- Jump to the System section on the left side (or visit
edge://settings/system)
- Turn off Use hardware acceleration when available
- Click the Restart button

- Watch YouTube and check for audio errors
15. Disable your ad blocker
Many YouTube users who have encountered the audio renderer error said that they managed to fix this problem by deactivating the ad blocker built into the web browser. Otherwise, you should whitelist YouTube to make sure that video ads are permitted.
For example, if you’re using Adblock Plus, here’s how you can whitelist YouTube:
- Go to the Adblock Plus settings panel
- Jump to the Whitelisted websites area
- Type
youtube.com and click Add website
- Go to YouTube and check for audio rendering issues
16. Try using a different web browser
An unforeseen number of browser settings can interfere with multimedia features, so it’s a good idea to change your web browser. Switch to an application that has default settings. You can import your bookmarks and other website data, but make sure to leave the browser configuration untouched.
Then, head over to YouTube or the platform that throws the audio renderer error to test it out. If it works, you can stick to the new browser for audio and use your preferred application for everything else.
17. Update Windows 10
It’s essential to keep Windows 10 updated to the latest edition so that you can take advantage of the newest features, hotfixes, and security patches. If there’s a known problem with the audio, it will likely get fixed in the upcoming system update.
How to run Windows Update:
- Press the Win key, type Check for updates, and press Enter
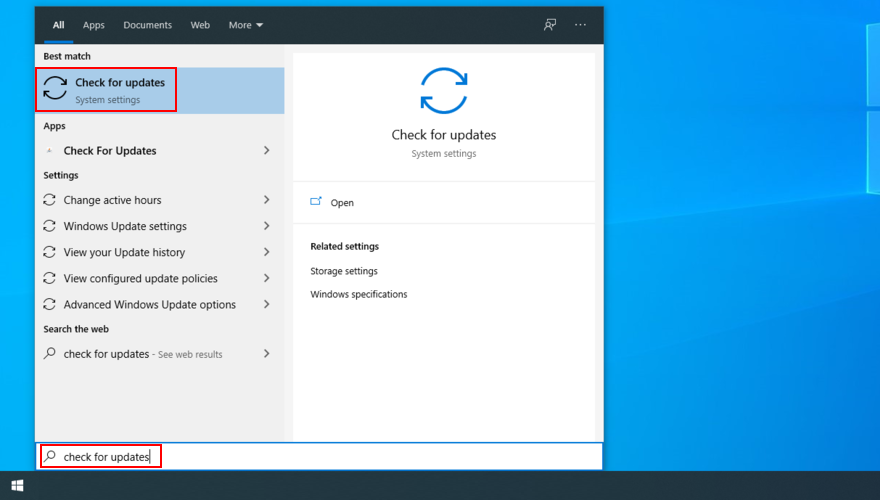
- Click Check for updates and wait
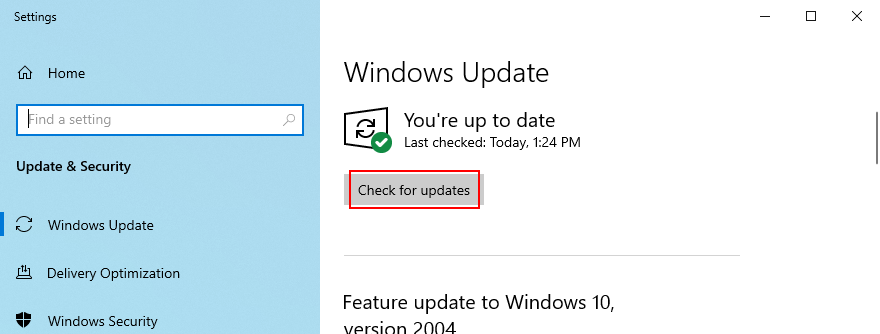
- If it finds any updates, click Download
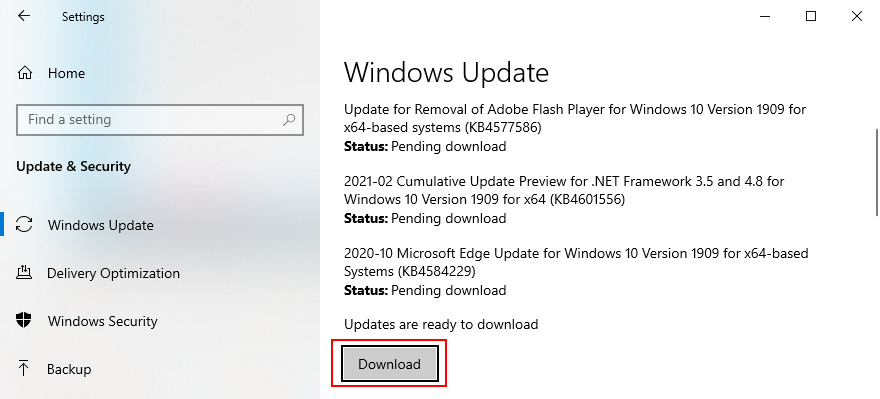
- Leave your PC unattended while it’s busy with updates. It might restart several times
- Check for audio rendering issues
18. Uninstall system updates
On the other hand, a recent Windows update may have compromised your entire operating system, causing various problems like the audio renderer error. When this happens, you have to uninstall the malfunctioning update. Here’s how:
- Press the Win key, type control panel, and hit Enter
- Go to Programs and Features
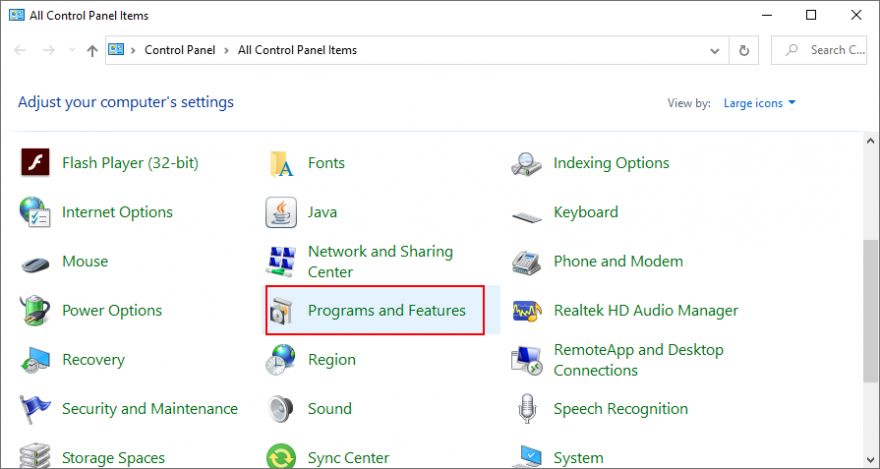
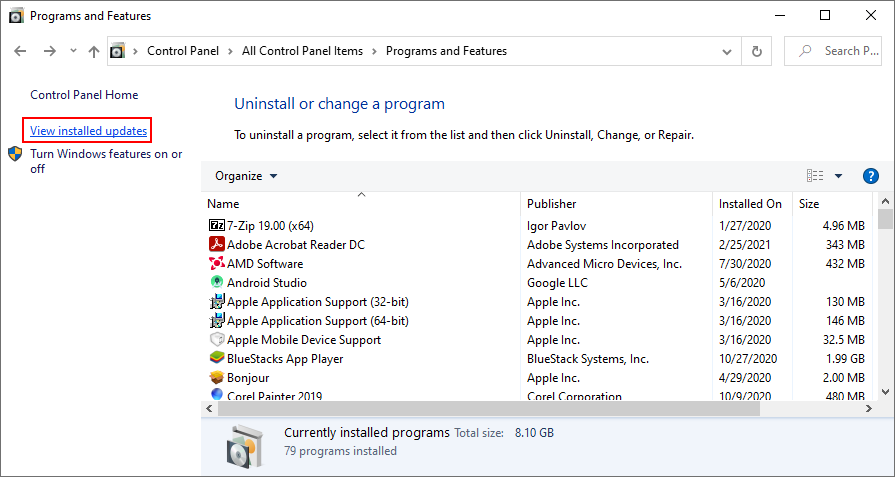
- Click View installed updates on the left side
- Click the Installed On column to sort the updates (newest first)
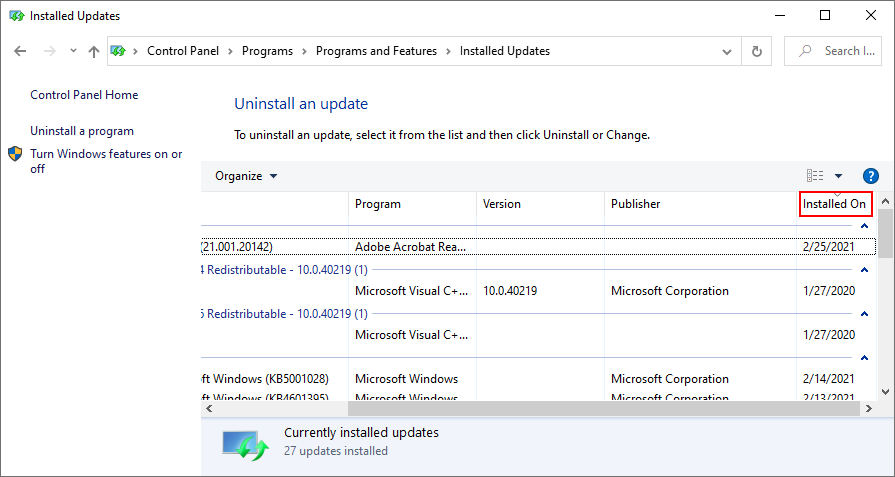
- Right-click the first update in the list and select Uninstall
- Click Yes to confirm
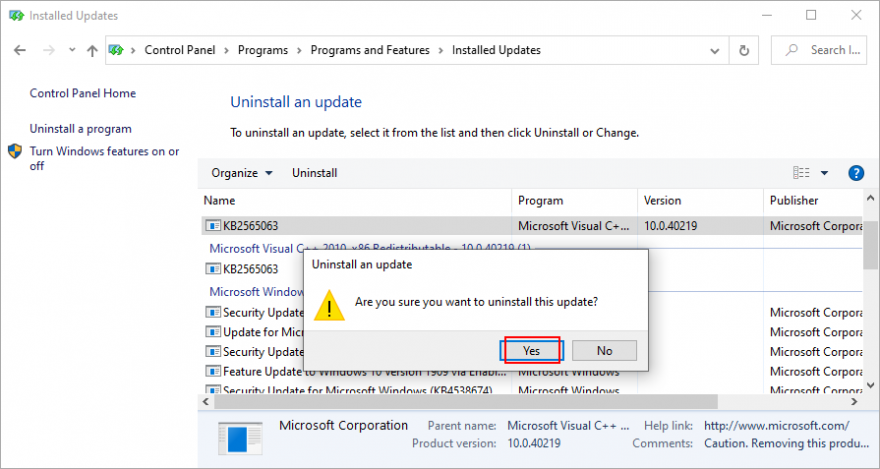
- Restart your PC and check for audio errors
19. Sign in with a different PC account
Windows 10 sometimes experiences issues due a lack of permissions caused by your account. To solve this problem, you can try signing in with a different profile. For example, if you’re currently logged in with the Microsoft account, switch to a local user account (or the other way around).
How to sign in with a Microsoft account:
- Right-click the Start button and select Settings
- Go to Accounts
- Click Login to your Microsoft account
- Enter your email address and password
- Click Verify to confirm your identity
- Log out of Windows 10
- Log back in using the Microsoft account
- Check for audio renderer errors
How to create a local user account:
- Right-click the Start button and go to Settings

- Select Accounts
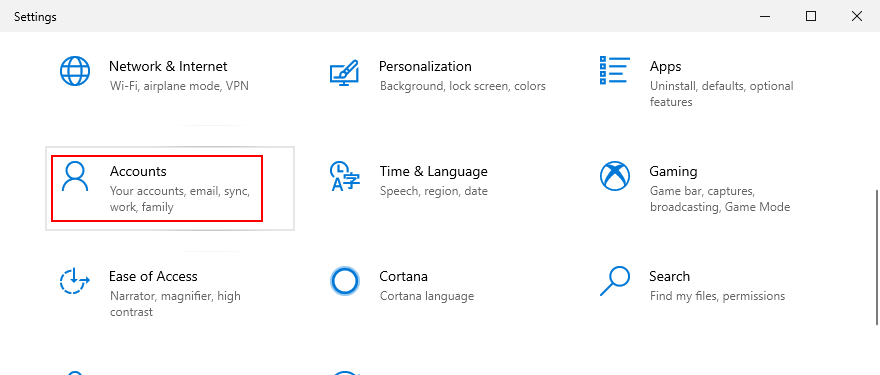
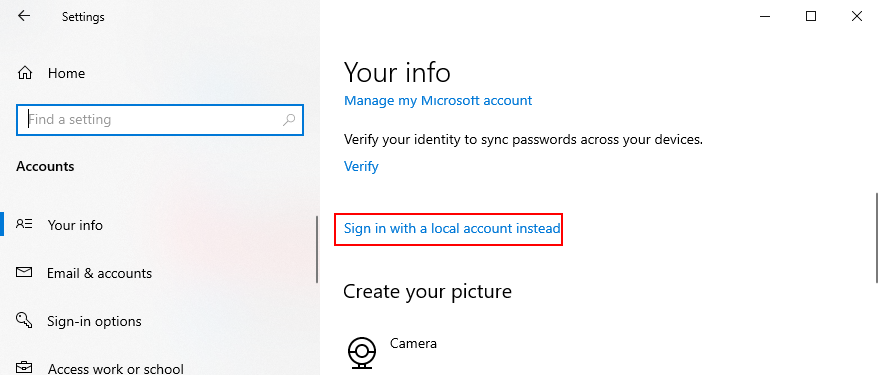
- Click Sign in with a local account instead
- Specify your computer password or PIN
- At Enter your local account info, set a new username and password
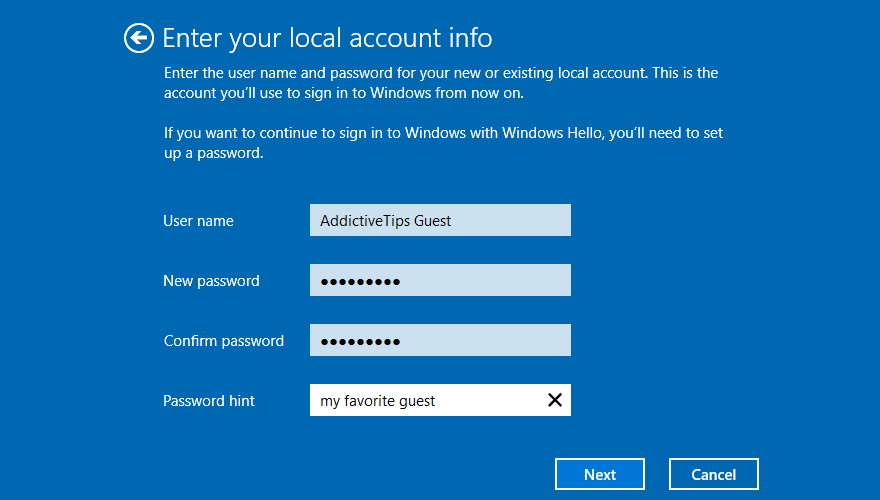
- Click Next and then Sign out and finish
- Log back in to Windows 10 using the new local account
- Check for audio issues
20. Reset BIOS
DELL users have reported that they were experiencing the audio renderer error due to incorrect BIOS settings. And they were able to solve it by restoring BIOS to default settings. Here’s how you can easily do that:
- Restart your computer
- During reboot, rapidly press the key displayed on the screen to access BIOS
- Locate and access the advanced BIOS options
- Enable the setting that resets BIOS configuration data
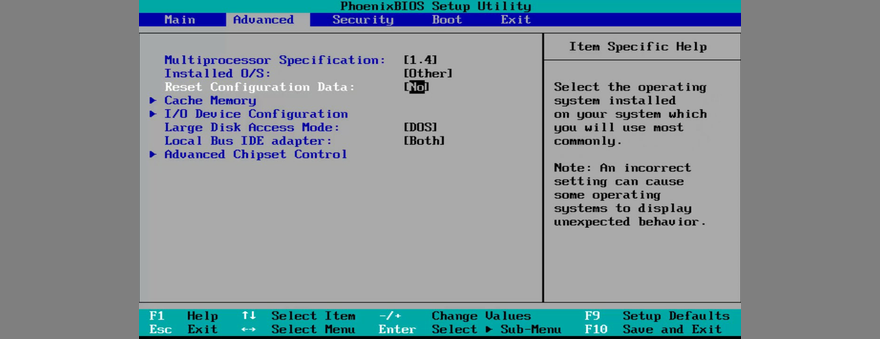
- Save the current BIOS settings and exit
- Wait until Windows boots, then check for audio issues
21. Update BIOS
Another way to deal with BIOS issues on DELL systems is by updating it to the latest version since an obsolete BIOS is known to cause system stability and even audio problems. Here’s how:
- Press the Win key, type System Information, and open this app
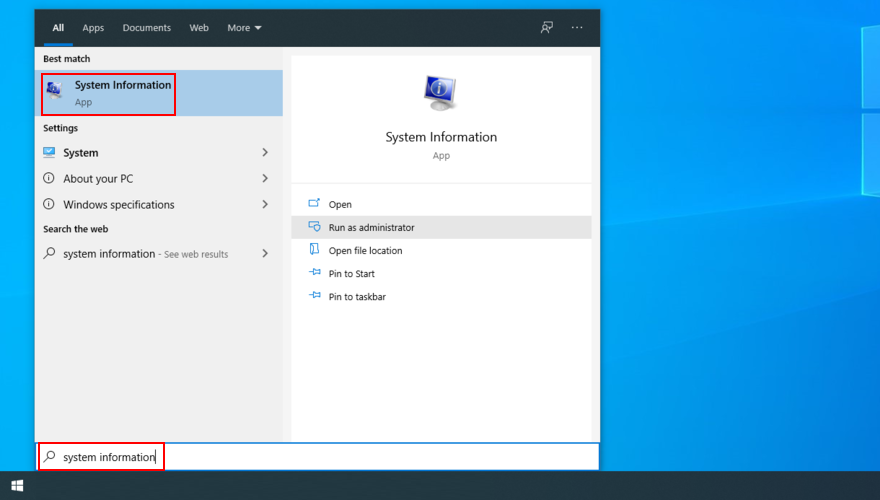
- Go to the System Summary section
- Write down the info displayed at BIOS Version/Date
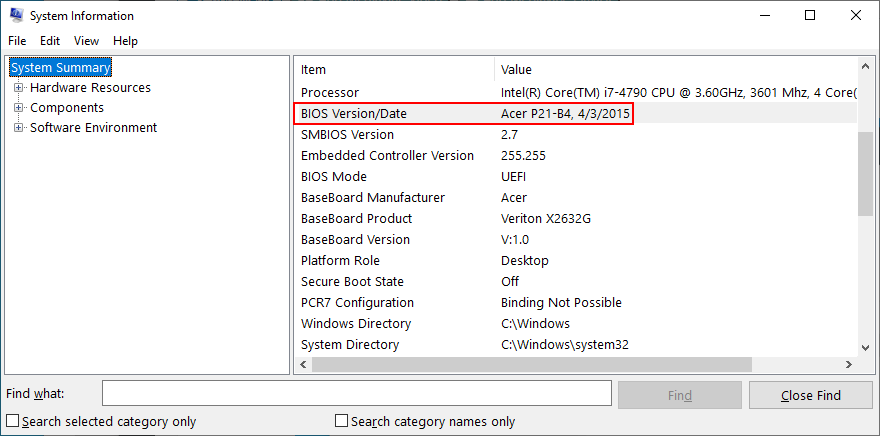
- Go to the website of your BIOS manufacturer
- Find and download a newer BIOS version that’s compatible with your PC
- Unzip the BIOS setup file to a USB flash drive
- Restart your computer and access BIOS
- Back up the current BIOS version to the pen drive
- Start BIOS setup
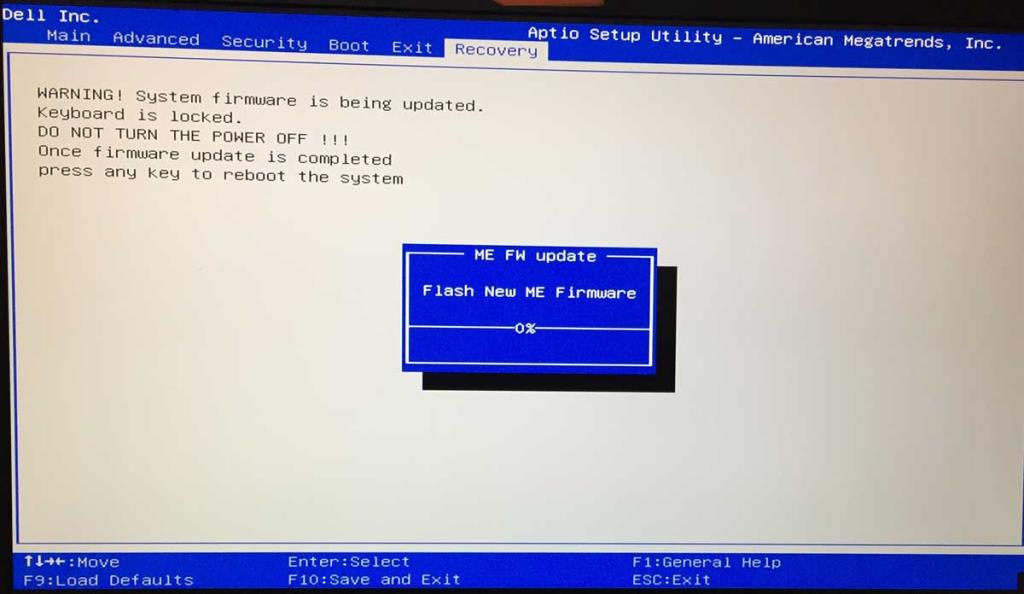
- Don’t turn off or restart your PC during setup
- Boot Windows as normal and check for audio issues
22. Use System Restore
If the audio renderer error was caused by a software event that you can’t pinpoint, you can fix it by rolling back Windows 10 to a previous restore point. Here’s how to do its easily:
- Make sure you’re logged in to Windows 10 with admin rights
- Press Win key + R, type control panel, and press Enter
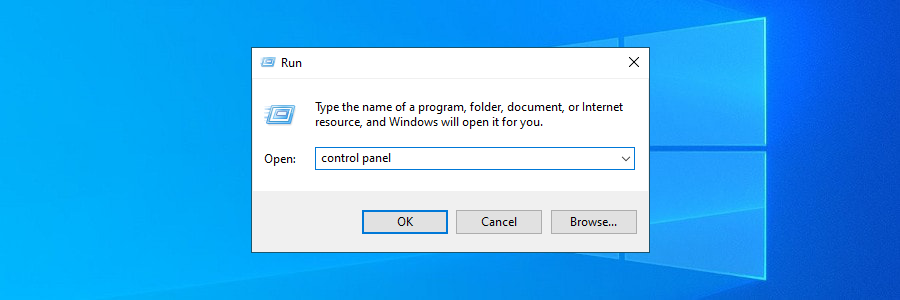
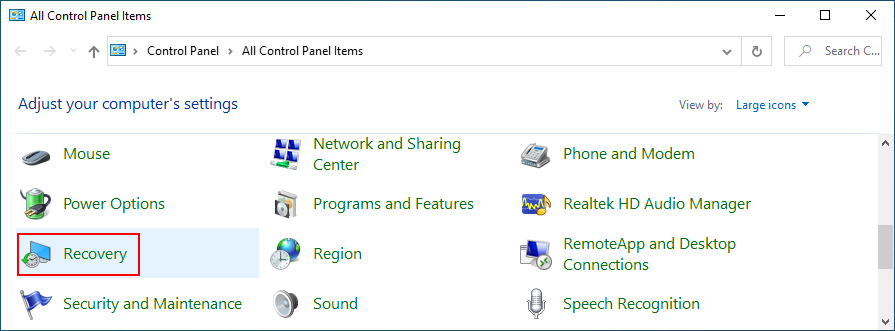
- Go to the Recovery area
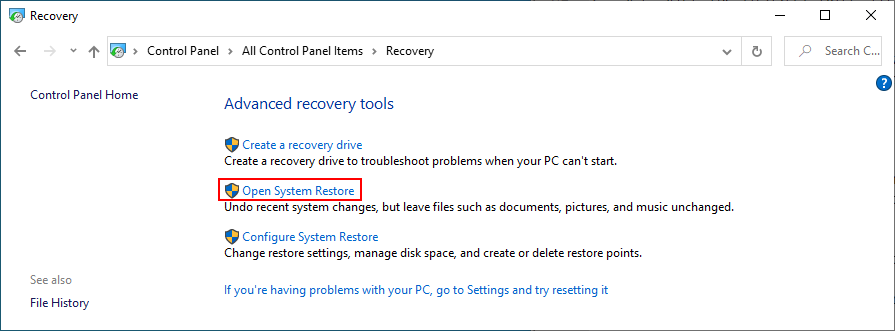
- Click Open System Restore
- Select a system restore point from the list
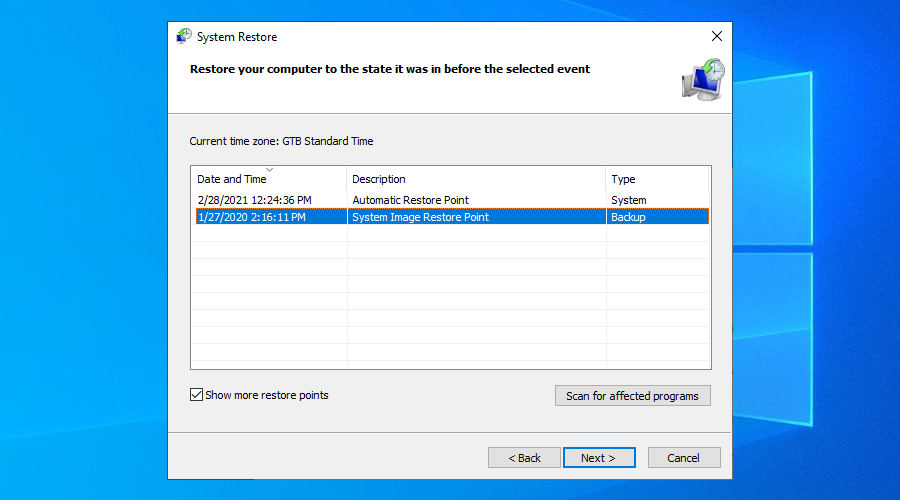
- Click Next and follow the on-screen instructions
- Restart your PC and check for audio issues
The Audio renderer error can be fixed
To review, you can stumble upon the audio renderer error when trying to watch a video on YouTube, in your media player, or anywhere else. It’s caused by a hardware or software issue which you should be able to fix.
For instance, you can clear browser cache, run the audio troubleshooter, make sure the sound device is enabled and set as default, restart the Windows Audio service, synchronize the sample rate for ASIO drivers, as well as run audio tests on HP laptops.
It’s also a good idea to reinstall the audio adapter, update the audio driver or roll back to a compatible version, check the cables and remove extra peripheral devices, disable any audio mixing software, update your web browser, as well as disable hardware acceleration.
Furthermore, you can turn off your ad blocker, try using a different browser, update Windows 10 or uninstall unstable system updates, sign in to Windows 10 using a different account, reset BIOS and update it to the latest version, as well as roll back Windows 10 using System Restore mode.
Wie haben Sie es geschafft, den Audio-Renderer-Fehler endlich loszuwerden? Haben wir wesentliche Schritte verpasst? Lass es uns im Kommentarbereich unten wissen.
