如何修正 GPG 錯誤:Ubuntu 中無法驗證以下簽名

安全地修復 Ubuntu APT 簽章錯誤。無需停用軟體包驗證,即可識別 NO_PUBKEY、EXPKEYSIG、BADSIG、時脈和軟體來源設定問題。
當用戶將軟件存儲庫或 PPA 添加到 Ubuntu 而不添加 GPG 簽名密鑰時,會發生“NO_PUBKEY”GPG 錯誤。由於 Ubuntu 的軟件後端非常重視安全性,系統將不允許用戶在沒有此密鑰的情況下從存儲庫安裝任何內容,因此出現此錯誤。幸運的是,它很容易修復。
在 Ubuntu 上有依賴錯誤?以下是修復它們的方法。
修復“NO_PUBKEY”GPG 錯誤——GUI
On Ubuntu Linux, it is possible to fix the “NO_PUBKEY” issue with the GUI. To start the process, press the Win key on the keyboard. Pressing this button will bring up the search box in Gnome on Ubuntu. From there, start typing “Software & Updates” in the search box. Then, click on the icon with that name. Or, if you can’t find it, select the icon with the brown box/globe.
Once the “Software & Updates” app window is open on the screen, look through the different tabs in the app, and click on “Authentication.” Clicking on the “Authentication” tab will take you to the “Trusted software providers” area.
Keep the “Software & Updates” area open, and open up a new browser tab. Then, head over to the page where you got the software PPA from. On this page, look for the GPG signing key and save it to your computer.
進入 Launchpad 頁面後,單擊“技術詳細信息”以顯示簽名密鑰,單擊密鑰鏈接轉到下一頁。
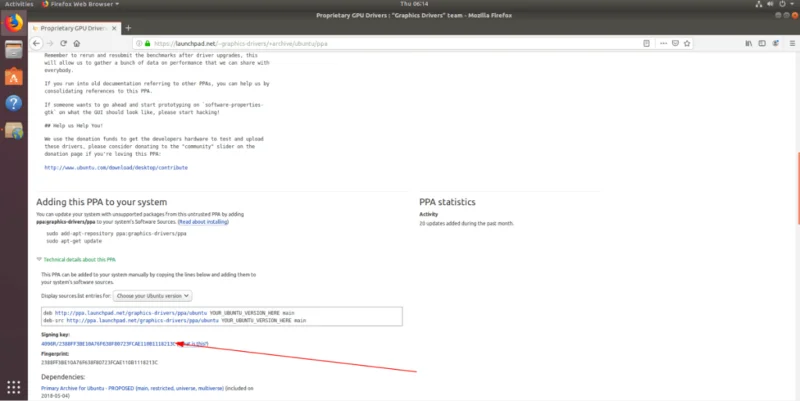
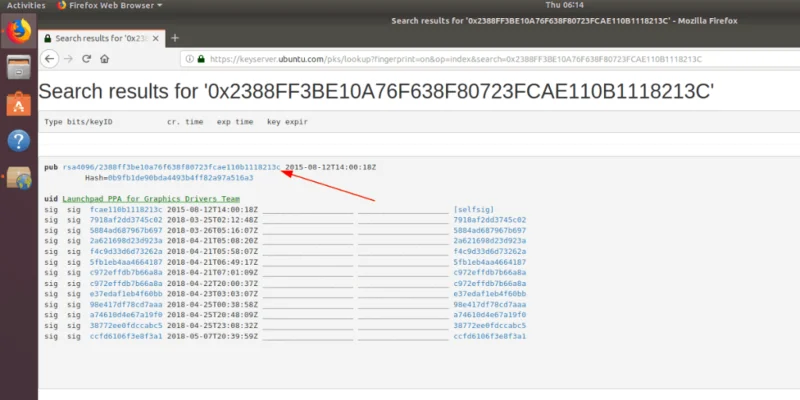
在下一頁上,單擊“pub”旁邊的鏈接,以在瀏覽器中顯示密鑰。
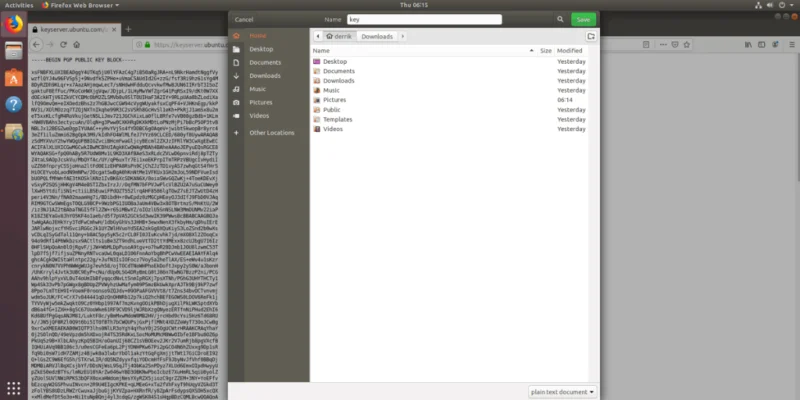
按 鍵盤上的Ctrl + S將文件保存為key。
將密鑰保存到 Ubuntu Linux PC 後,返回“身份驗證”部分中的“軟件和更新”應用程序。然後,在“身份驗證”部分,查找“導入密鑰文件”按鈕。
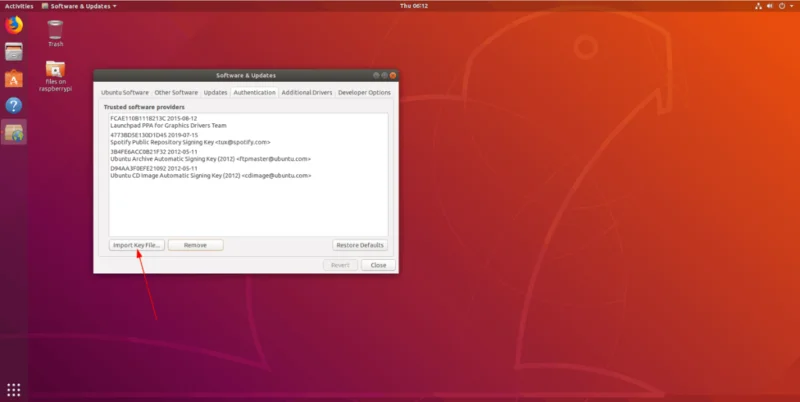
用鼠標單擊“導入密鑰文件”按鈕,打開文件瀏覽器窗口。然後,通過文件瀏覽器窗口將密鑰文件添加到 Ubuntu。
將密鑰文件添加到 Ubuntu 後,您將能夠從該軟件存儲庫安裝軟件。但是,在您嘗試從該存儲庫安裝軟件之前,您需要刷新 Ubuntu 的軟件源。
要刷新 Ubuntu 的軟件源,請單擊“關閉”按鈕。執行此操作時,將顯示一條消息,提示“有關可用軟件的信息已過期”。單擊“重新加載”按鈕進行刷新。一旦刷新,錯誤“NO_PUBKEY”就會消失。
修復“NO_PUBKEY”GPG 錯誤——命令行
“NO_PUBKEY” GPG 錯誤可以在終端中修復,也可以在 GUI 中修復。有些人會爭辯說,通過終端在 Ubuntu 中修復這個錯誤會更快。
通過按鍵盤上的 Ctrl + Alt + T或Ctrl + Shift + T在Ubuntu Linux PC 上打開終端窗口。然後,一旦終端窗口打開,使用更新命令到 Ubuntu 的軟件源,因為我們需要重現錯誤。
運行更新命令後,您將看到一條消息,指出“無法驗證以下簽名,因為公鑰不可用:NO_PUBKEY。”
在“NO_PUBKEY”消息之後,您將看到一個數字。用鼠標突出顯示此數字並將其複製到剪貼板。這個數字很重要,因為它可以與恢復命令一起使用,以自動將丟失的 GPG 密鑰導入您的 Ubuntu Linux 系統。
With the number saved to your clipboard, type out the following command in the terminal window. Be sure to replace the “COPIED-NUMBER-HERE” portion of the command with the number copied to the clipboard on your Linux PC.
Note: To use the paste feature in the Linux terminal, press Ctrl + Shift + V on the keyboard.
sudo apt-key adv --keyserver hkp://keyserver.ubuntu.com:80 --recv-keys COPIED-NUMBER-HERE
Let the apt-key command run, and it’ll download the missing GPG key directly from the internet. When the command finishes, you’ll see a message that says “public key “REPO NAME Singing Key imported”.
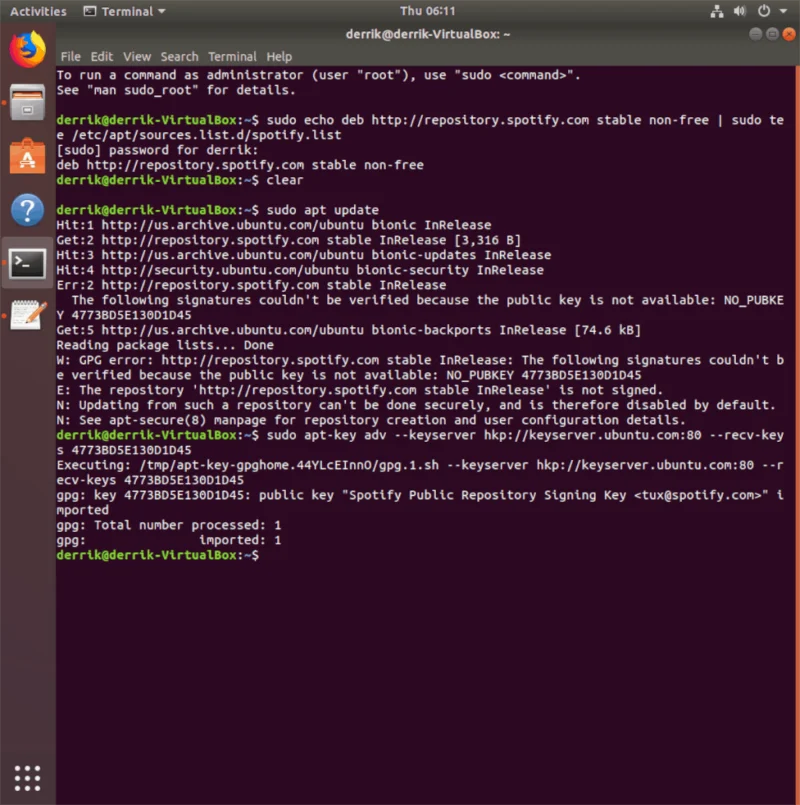
After successfully importing the missing GPG key into Ubuntu, the “NO_PUBKEY” error is taken care of. However, the fix is not complete, as Ubuntu’s software sources must be refreshed to reflect the changes made by importing the key.
To update Ubuntu’s software sources, you must use the update command.
sudo apt update
When the update command finishes running, everything should be in working order!
Prevent “NO_PUBKEY” errors on Ubuntu
The “NO_PUBKEY” error is easy to avoid. To ensure that you do not run into this problem on your Ubuntu Linux PC again, do the following.
安全地修復 Ubuntu APT 簽章錯誤。無需停用軟體包驗證,即可識別 NO_PUBKEY、EXPKEYSIG、BADSIG、時脈和軟體來源設定問題。
在 SLES 15 上設定 DM-Multipath,實現安全發現、服務設定、最小 multipath.conf 變更、initramfs 更新和路徑健康檢查。
使用 Btrfs 和 Snapper 在更新失敗後恢復 SLES。比較回滾選項,安全地測試快照,恢復系統,並驗證儲存庫。
使用 Liderahenk 和 Ahenk 來設定自訂的 Pardus GNOME 桌布,使用 dconf 鎖定選定的設置,並透過經過測試的試點專案推出其他客戶端策略。
診斷 Ubuntu 伺服器進入緊急模式的原因,安全地修復常見的 /etc/fstab 和掛載問題,檢查檔案系統,並驗證正常重新啟動。
排查 Ubuntu 24.04 上忽略 GTK 主題的 Flatpak 應用程式問題。檢查主題擴充、GTK 入口網站、淺色和深色設定以及應用程式工具包限制。
在 Pardus 上設定 LIDER AHENK,並採用以品質為中心的設定:驗證先決條件、部署 Lider、註冊 Ahenk 用戶端並驗證管理。
使用 Pardus NVIDIA 驅動程式安裝程式在 Pardus 23 上啟用 NVIDIA 驅動程式。檢查 GPU 相容性、安全重新啟動、驗證驅動程式並解決常見問題。
使用可重複的基準測試方法,比較 Ubuntu Server 24.04 Minimal 和 Standard 安裝的磁碟使用情況、記憶體、啟動時間、服務和實際工作負載效能。
安全地解決 SLES 中的 Zypper 鎖定錯誤。識別進程,選擇等待或停止該進程,並區分事務鎖和包鎖。