Es gibt nichts Schlimmeres, als sich darauf vorzubereiten, ein Videospiel mit Ihren Freunden zu spielen, nur um von einer Blue Screen of Death (BSOD)-Nachricht unterbrochen zu werden , die Ihren Computer übernimmt, alles herunterfährt und Sie daran hindert, etwas anderes als einen Neustart zu tun.
BSOD-Fehler variieren und weisen auf das genaue Problem hin, das dazu führt, dass Ihr Computer sich selbst abschaltet und Hardwarebeschädigungen und größere Datenverluste verhindert. Das Problem ist, dass Fehlercodes ohne technische Kenntnisse schwer zu entziffern sind.
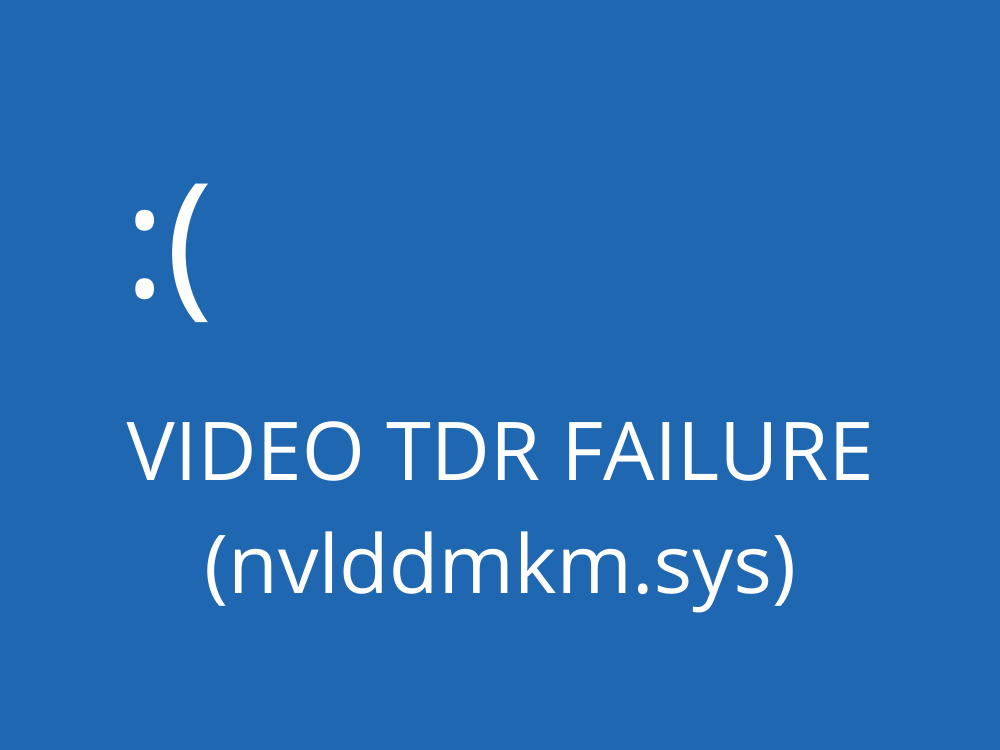
Zum Beispiel VIDEO TDR AUSFALL ist ein BSOD Stop - Code , die auf Computern mit NVIDIA - Grafikkarten auftreten können. Ihr gesamter Bildschirm wird blau, zeigt die Meldung Ihr PC ist aufgetreten und muss neu gestartet werden und zeigt nvlddmkm.sys als problematische Datei an. nvlddmkm.sys ist ein Treiber und sein vollständiger Name ist NVIDIA Windows Kernel Mode Driver .
VIDEO-TDR-FEHLER unter Windows 10 – FIX
Bevor Sie eine Problemumgehung für den Fehler VIDEO TDR FAILURE finden, sollten Sie einen Systemwiederherstellungspunkt erstellen . Wenn etwas passiert und Sie alle Änderungen rückgängig machen müssen, können Sie Windows 10 problemlos auf einen Prüfpunkt zurücksetzen und die Fehlerbehebung von Grund auf starten.
1. nvlddmkm.sys fehlgeschlagen ? Starten Sie Windows 10 im abgesicherten Modus
Wenn Sie Schwierigkeiten bei der Verwendung Ihres Computers haben, weil das System sofort abstürzt, den Bluescreen anzeigt und eine Neustartschleife durchläuft, können Sie Windows 10 im abgesicherten Modus starten :
- Schalten Sie Ihren PC dreimal ein und aus, um den Windows 10-Fehlerbehebungsmodus auszulösen
- Gehen Sie zu Problembehandlung > Erweiterte Optionen > Starteinstellungen

- Klicken Sie auf Neustart und warten Sie ein bisschen
- Drücken Sie F5 , um den abgesicherten Modus mit Netzwerk zu aktivieren
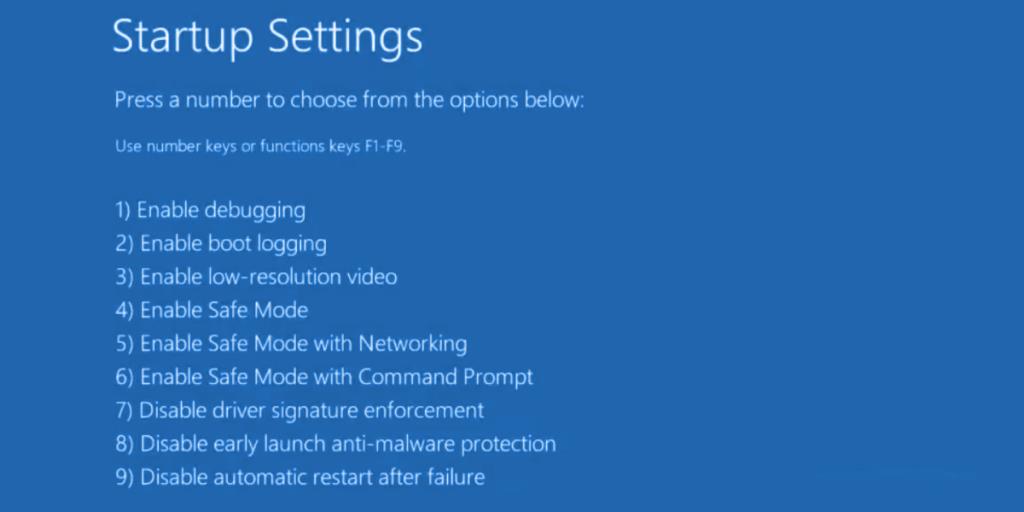
- Überprüfen Sie nach dem Booten von Windows, ob Sie immer noch den nvlddmkm-Fehler erhalten. Wenn Sie dies immer noch tun, führen Sie die obigen Schritte aus, um die Optionen für den abgesicherten Modus zu erreichen, und entscheiden Sie sich für F4 , um den abgesicherten Modus ohne Netzwerkfunktionen zu aktivieren
2. Führen Sie einen sauberen Neustart durch
Wenn sich herausstellt, dass der abgesicherte Modus der Schlüssel zur Stabilisierung Ihres Betriebssystems ist und verhindert, dass BSOD-Fehler angezeigt werden, können Sie Windows 10 sauber booten , um den Start und die Dienste zu deaktivieren, die möglicherweise fehlerhaft sind und den Fehler VIDEO TDR FAILURE verursachen.
- Befolgen Sie die Schritte in Lösung 1 , um Windows 10 im abgesicherten Modus zu starten
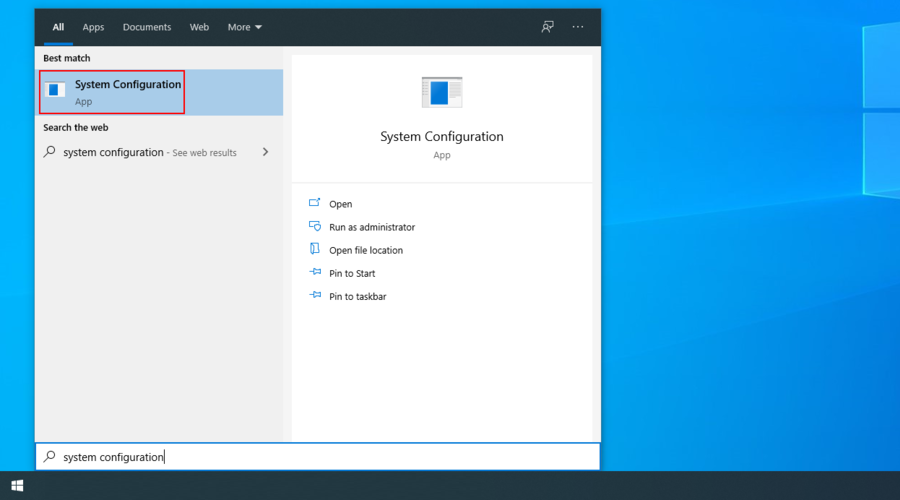
- Klicken Sie auf die Schaltfläche Start , suchen Sie nach Systemkonfiguration und starten Sie diese App
- Im Allgemein Registerkarte, wählen Sie den Start Selective Option
- Deaktivieren Sie Systemdienste laden und Startobjekte laden
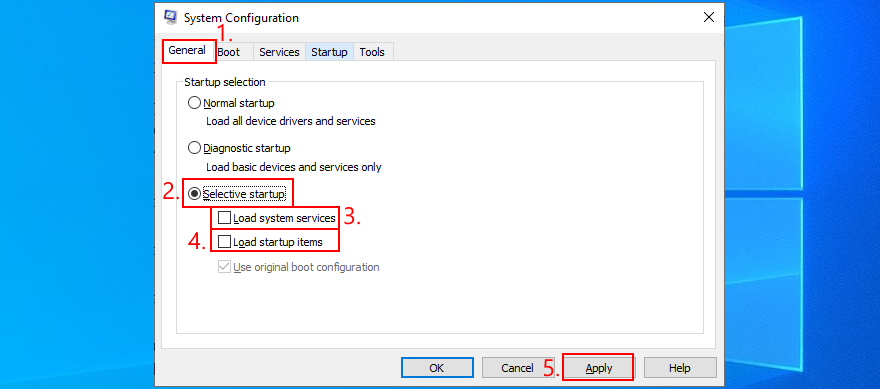
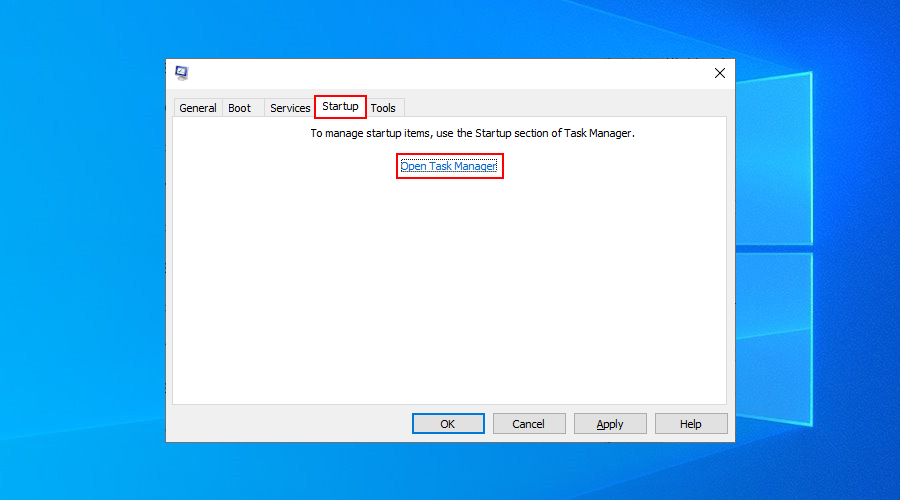
- Klicken Sie auf Übernehmen und gehen Sie zum Abschnitt Startup
- Klicken Sie auf Task-Manager öffnen
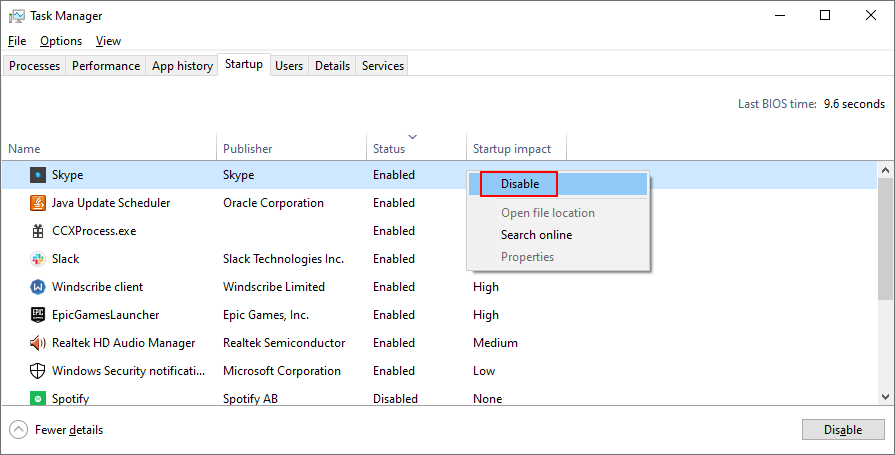
- Wählen Sie eine Anwendung mit dem Status Aktiviert aus und klicken Sie auf Deaktivieren . Machen Sie dies für alle Apps mit dem Status Aktiviert
- Starten Sie Ihren PC neu und überprüfen Sie die Ergebnisse
3. Nach Systemaktualisierungen suchen
Wenn Sie Windows Update längere Zeit nicht verwendet haben, haben Sie möglicherweise wichtige Updates zur Behebung von Systemfehlern verpasst. Da es sich um eine so wichtige Betriebssystemkomponente handelt, sollte Windows Update im Hintergrund ausgeführt werden und Sie jedes Mal auffordern, wenn ein Update aussteht. Wenn jedoch automatische Systemupdates auf Ihrem Gerät deaktiviert waren , sollten sie manuell gestartet werden.
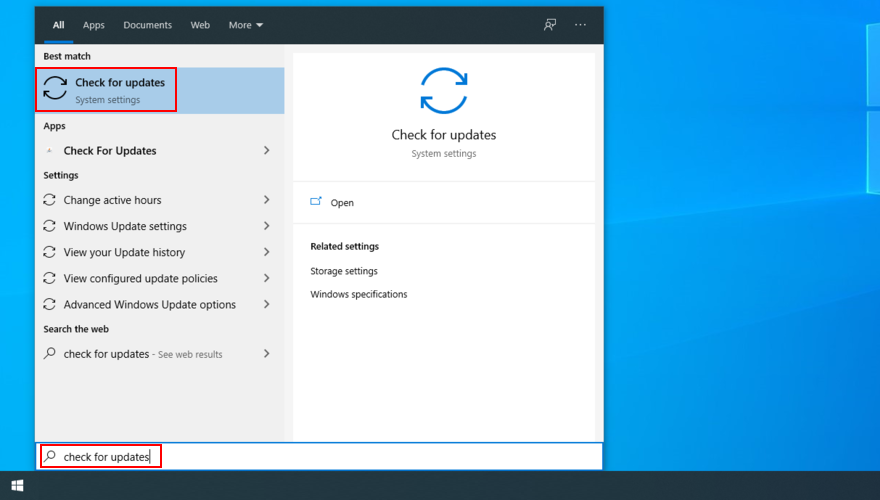
- Drücken Sie die Win- Taste, geben Sie Nach Updates suchen ein und drücken Sie die Eingabetaste
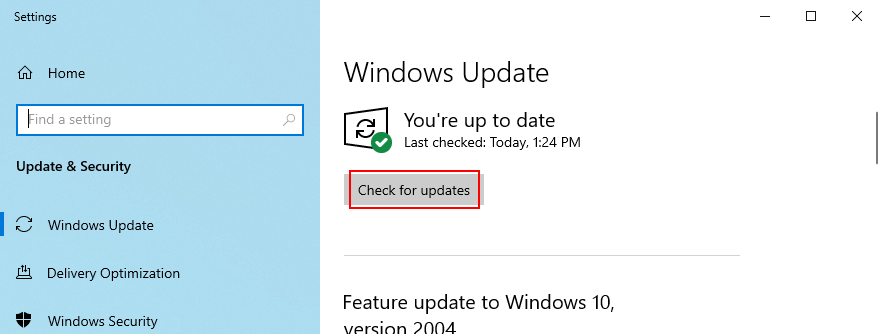
- Klicken Sie auf Nach Updates suchen und warten Sie
- Wenn Windows etwas findet, klicken Sie auf Download
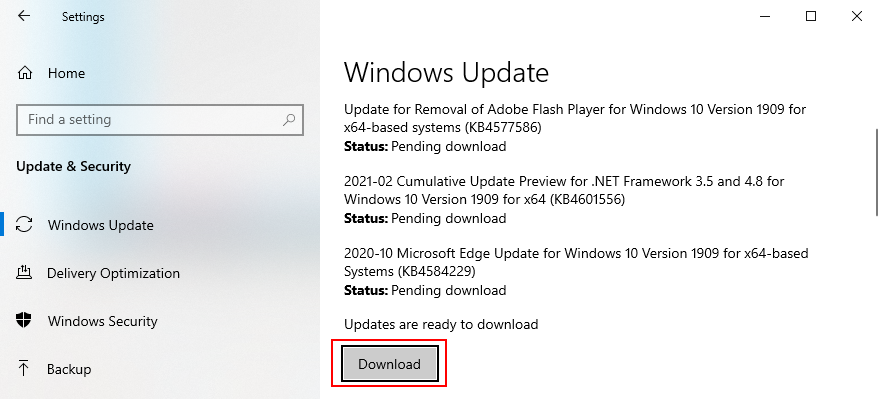
- Warten Sie geduldig, bis die neuen Systemupdates heruntergeladen und installiert sind
- Starte deinen Computer neu
4. Deaktivieren Sie die Übertaktungssoftware
Die Leute verwenden Tools zur Speicherübertaktung , um ihr Spielerlebnis zu verbessern. Wenn der Computer jedoch nicht mit einem Kühler ausgestattet ist, der leistungsstark genug ist, um die zusätzliche Hitze zu ertragen, schaltet sich Windows schließlich selbst aus und zeigt eine Bluescreen-Meldung wie VIDEO TDR FAILURE an, um Festplattenbeschädigung und Datenverlust zu verhindern.
Wenn Sie nicht genau wissen, was Sie tun, sollten Sie alle Übertaktungssoftwaretools wie MSI Afterburner , CPU-Z oder GPU-Z deaktivieren und die Takteinstellungen des Computers auf die Standardeinstellungen zurücksetzen. Wenn Sie die Übertaktung im BIOS konfiguriert haben, sehen Sie sich die nächste Lösung in dieser Liste an.
5. BIOS auf Standard zurücksetzen
Das BIOS des Computers enthält eine Vielzahl von Anpassungseinstellungen zur Verbesserung der Systemleistung. Leider könnte dieser Plan leicht nach hinten losgehen, wenn Sie oder jemand anderes mit Zugriff auf Ihren Computer ziellos BIOS-Einstellungen wie Übertaktung und Caching geändert hat.
Dies kann sogar zu Bluescreen-Fehlern wie nvlddmkm.sys führen. Der einfachste Weg, dieses Problem zu lösen, besteht darin, das BIOS auf die Standardeinstellungen zurückzusetzen .
- Schalten Sie Ihren PC ein
- Drücken Sie vor dem Booten von Windows schnell die auf dem Bildschirm angezeigte Taste, um auf das BIOS-Setup zuzugreifen
- Greifen Sie auf den erweiterten BIOS-Bereich zu
- Suchen und aktivieren Sie die Option, die die BIOS-Konfigurationsdaten auf die Standardwerte zurücksetzt
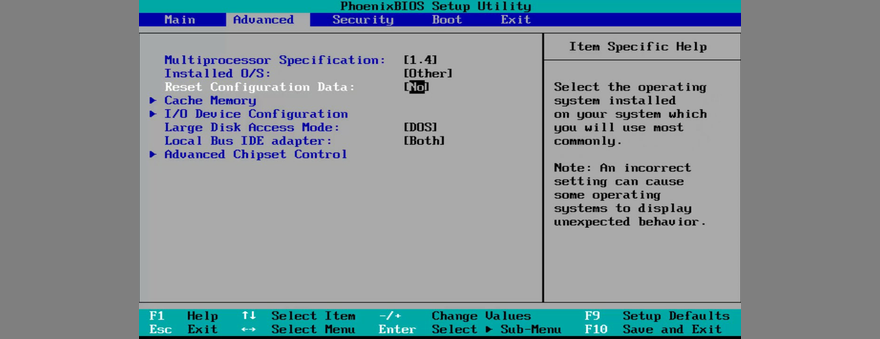
- Aktuelle Einstellungen speichern und beenden
6. BIOS aktualisieren
Wenn Sie das BIOS längere Zeit nicht oder noch nie aktualisiert haben, sollten Sie sofort damit beginnen. Sie benötigen lediglich einen USB-Stick und eine Internetverbindung.
- Verbinden Sie einen USB-Stick mit Ihrem PC
- Starten Sie Ihr System und drücken Sie die auf dem Bildschirm angezeigte Taste, um das BIOS-Setup aufzurufen
- Im Haupt-BIOS-Bereich finden Sie den BIOS-Hersteller, die Version und das Installationsdatum
- Starten Sie mit diesen Informationen Windows auf dem fehlerhaften PC oder verwenden Sie einen anderen Computer mit Internetzugang, öffnen Sie einen Webbrowser und besuchen Sie die Website des BIOS-Herstellers
- Suchen Sie die neueste BIOS-Version, die mit Ihrem Betriebssystem kompatibel ist, und laden Sie sie herunter
- Entpacken Sie die heruntergeladene Datei auf den USB-Stick
- Kehren Sie zum BIOS-Menü zurück, erstellen Sie zur sicheren Aufbewahrung ein Backup der aktuellen BIOS-Version und speichern Sie das Backup auf dem USB-Flash-Laufwerk
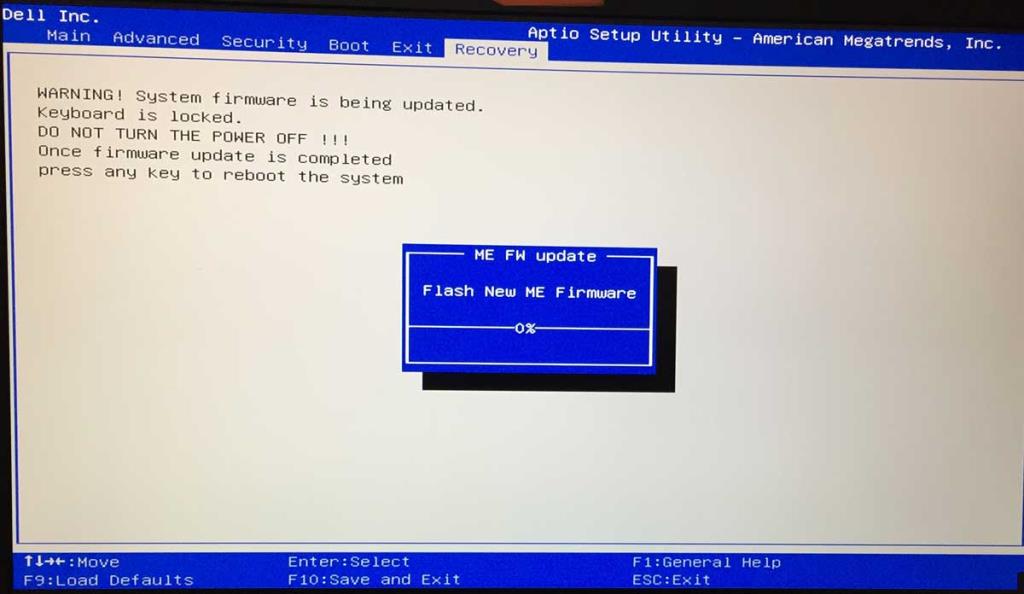
- Führen Sie das System-Firmware-Update aus und stellen Sie sicher, dass Sie den PC während dieser Zeit nicht herunterfahren oder neu starten
7. Stellen Sie die Datei nvlddmkm.sys wieder her
NVIDIA hat irgendwo auf Ihrem Computer eine Sicherungskopie der Datei nvlddmkm.sys. Sie müssen sie also nur finden, kopieren und die beschädigte Datei nvlddmkm.sys überschreiben.
- Öffnen Sie den Windows Explorer, indem Sie die Win- Taste + E . drücken
- Geben Sie in die Adressleiste ein
%SystemRoot%\System32\Drivers
- Suchen Sie die nvlddmkm.sys Datei und benennen Sie sie in nvlddmkm.sys.old
- Klicken Sie im Navigationsbereich von Windows Explorer auf Dieser PC
- Klicken Sie in das Feld Diesen PC suchen und suchen Sie nach nvlddmkm.sy_
- Kopieren Sie die Datei nvlddmkm.sy_
- Drücken Sie Win - Taste + R , geben Sie cmd ein und drücken Sie Enter öffnen Eingabeaufforderung
- Lauf
chdir desktop
- Dann renne
expand -r nvlddmkm.sy_ nvlddmkm.sys
- Eingabeaufforderung beenden
- Gehen Sie zu Ihrem Desktop und kopieren Sie die Datei nvlddmkm.sys
- Kehren Sie zu
%SystemRoot%\System32\Driversder Datei zurück und fügen Sie sie ein
- Starten Sie Ihren Computer neu und suchen Sie nach BSOD-Fehlern
8. System-Cookies und temporäre Dateien löschen
Windows speichert Cookies und temporäre Dateien, die regelmäßig gelöscht werden sollten, um den Systemcache zu leeren und Platz für neue Daten zu schaffen. Wenn dies nicht geschieht, kann dies zu Problemen mit der Systemstabilität und Blue Screen of Death-Fehlern wie VIDEO TDR FAILURE führen.
Um dieses Problem zu beheben, müssen Sie nur die Systemcookies und temporären Dateien mit speziellen Tools wie CCleaner löschen . Wenn Sie keine Anwendungen von Drittanbietern installieren möchten, können Sie das integrierte Dienstprogramm zur Datenträgerbereinigung verwenden.
So verwenden Sie die Datenträgerbereinigung:
- Klicken Sie auf die Schaltfläche Start , suchen Sie nach Datenträgerbereinigung und öffnen Sie diese App
- Wählen Sie das Laufwerk aus, auf dem Windows installiert ist (normalerweise C: ) und klicken Sie auf OK
- Wählen Sie die folgenden Dateien zum Löschen aus:
- Heruntergeladene Programmdateien
- Temporäre Internetdateien
- Temporäre Dateien
- Klicken Sie zur Bestätigung auf OK und Dateien löschen
9. Installieren Sie die Grafikkarte erneut
Ihr Grafikdisplay wurde möglicherweise nicht richtig auf Ihrem Computer installiert. Sie können dies jedoch leicht über den Geräte-Manager beheben.
- Klicken Sie mit der rechten Maustaste auf die Schaltfläche Start und wählen Sie Geräte-Manager
- Erweitern Sie die Kategorie Grafikkarten
- Klicken Sie mit der rechten Maustaste auf Ihren Grafikkartenadapter und wählen Sie Gerät deinstallieren
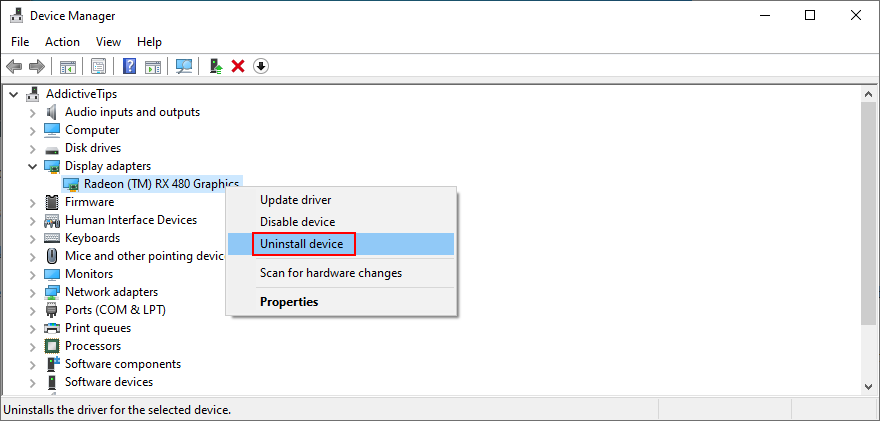
- Starten Sie Ihren PC neu. Windows installiert automatisch die fehlenden Adapter
10. Aktualisieren Sie die GPU-Treiber
Veraltete Grafiktreiber können Grafikkartenprobleme, Spieleprobleme und sogar Bluescreen-Fehler wie nvlddmkm.sys verursachen. Aber Sie können den veralteten GPU-Treiber mit minimalem Aufwand aktualisieren.
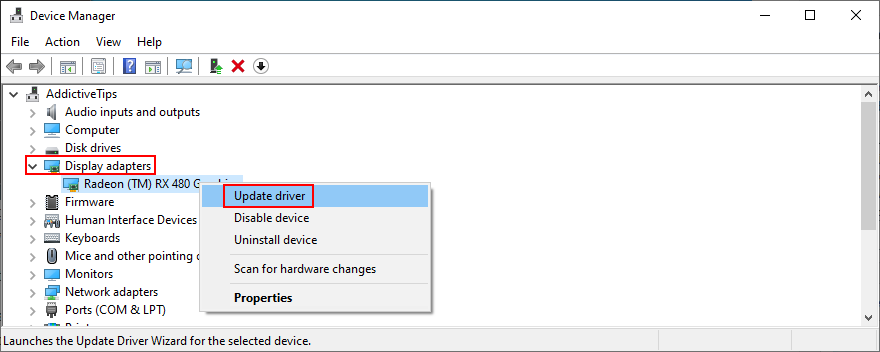
- Öffnen Sie den Geräte-Manager , klicken Sie mit der rechten Maustaste auf Ihre Grafikkarte und wählen Sie Treiber aktualisieren
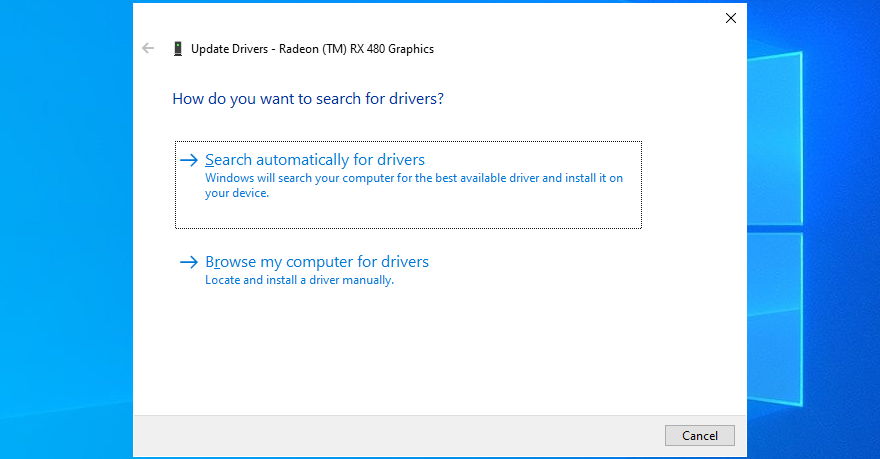
- Klicken Sie auf Automatisch nach Treibern suchen
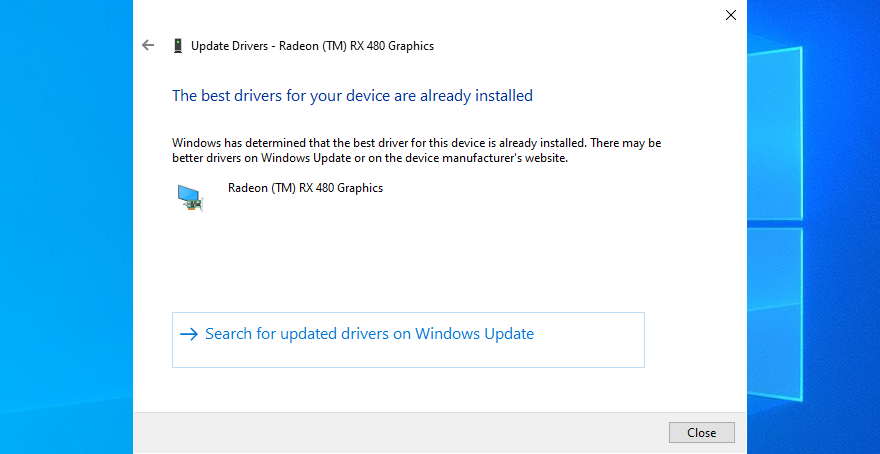
- Wenn Sie die Meldung Die besten Treiber für Ihr Gerät sind bereits installiert erhalten , klicken Sie auf Windows Update nach aktualisierten Treibern suchen . Wenn Sie Ihr System jedoch bereits auf Updates überprüft haben, müssen Sie dies nicht noch einmal tun
- Starten Sie Ihren Computer neu, wenn der Treiber erfolgreich aktualisiert wurde
Leider findet Windows häufig keine neueren Treiber in seiner Datenbank oder mithilfe der Windows Update-Komponente. In diesem Fall können Sie im Geräte-Manager auf den GPU-Adapter doppelklicken, zur Registerkarte Treiber wechseln und den Treiberhersteller, die Version und das Installationsdatum ermitteln. Rufen Sie anhand dieser Informationen den Hersteller der Website auf, um den neuesten Treiber herunterzuladen und zu installieren.
Wenn Sie diesen Vorgang jedoch als schwierig empfinden oder nicht riskieren möchten, einen nicht unterstützten Treiber herunterzuladen, können Sie sich an einen Treiber-Updater wenden , der automatisch alle veralteten Treiber auf Ihrem PC erkennt und anbietet, die neuesten Versionen sofort zu installieren. Und Sie riskieren auch nicht, inkompatible Treiber zu bekommen.
11. Rollback nicht unterstützter GPU-Treiber zurück
Apropos inkompatible GPU-Treiber: Viele PC-Benutzer laden sie von unbekannten Quellen herunter, ohne tatsächlich zu wissen, ob sie auf ihren Computern funktionieren oder nicht.
Wenn Sie einer dieser Benutzer sind, sollten Sie den nicht unterstützten Bildschirmtreiber sofort zurücksetzen, um die Stabilität Ihres Computers wiederherzustellen, wiederkehrende Systemabstürze zu vermeiden und mit einer korrekten Treiberaktualisierung fortzufahren.
- Gehen Sie zum Geräte-Manager und doppelklicken Sie auf den GPU-Adapter
- Wechseln Sie zum Abschnitt Treiber
- Klicken Sie auf Rollback Driver und befolgen Sie die Anweisungen auf dem Bildschirm. Wenn die Schaltfläche ausgegraut ist, bedeutet dies, dass keine vorherige Treiberversion auf Ihrem PC gespeichert ist, sodass Sie diese gesamte Lösung überspringen können
12. Führen Sie die Fehlerbehebung für Hardware und Geräte aus
Windows 10 verfügt über interne Problembehandlungen zum Beheben häufiger Probleme, die bei verschiedenen PC-Komponenten, einschließlich Hardware und Geräten, auftreten. Normalerweise sollten Sie es in den Fehlerbehebungseinstellungen finden können . Wenn jedoch die Fehlerbehebung für Hardware und Geräte in diesem Abschnitt fehlt , können Sie sie wie folgt sofort ausführen:
- Drücken Sie die Win- Taste + R und führen Sie aus
msdt.exe -id DeviceDiagnostic
- Click Next and wait until the troubleshooter scans your PC
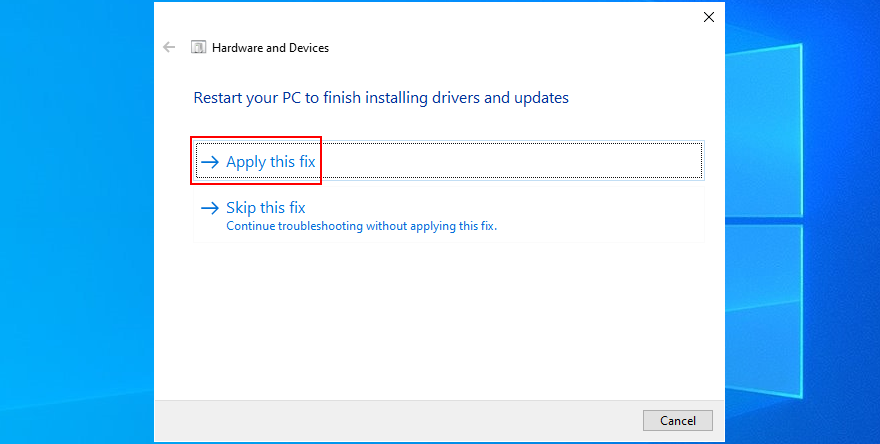
- If it finds any workarounds, click Apply this fix
- Reboot your PC when it finishes and check for BSOD errors
13. Disable hardware acceleration
Numerous software applications use hardware acceleration to improve your experience, whether we’re talking about gaming, web browsing, streaming, or something else. If you noticed that your computer shows the BSOD error after launching a particular application, inspect the program’s settings and look for a hardware acceleration option to turn it off. Here are some suggestions.
How to disable hardware acceleration in Google Chrome:
- In Chrome, open the More menu and go to Settings
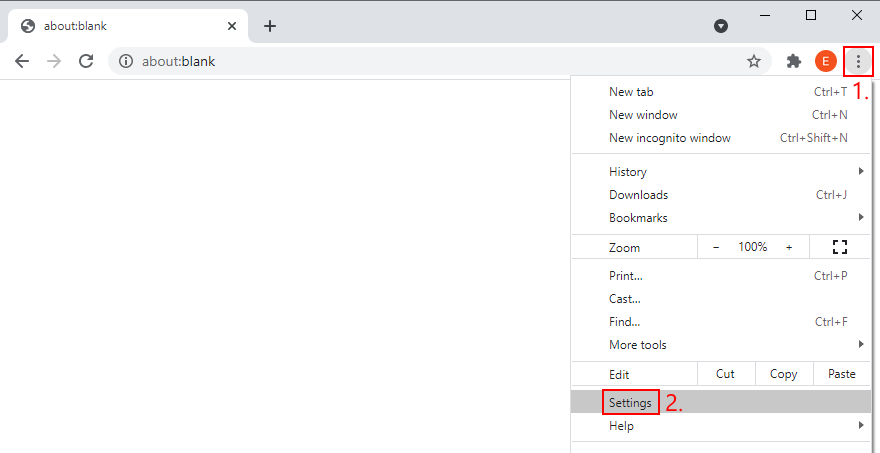
- Select Advanced > System (or go to
chrome://settings/system)
- Disable Use hardware acceleration when available

- Restart Chrome
How to disable hardware acceleration in Mozilla Firefox:
- In Firefox, open the ≡ menu and go to Options (or visit
about:preferences)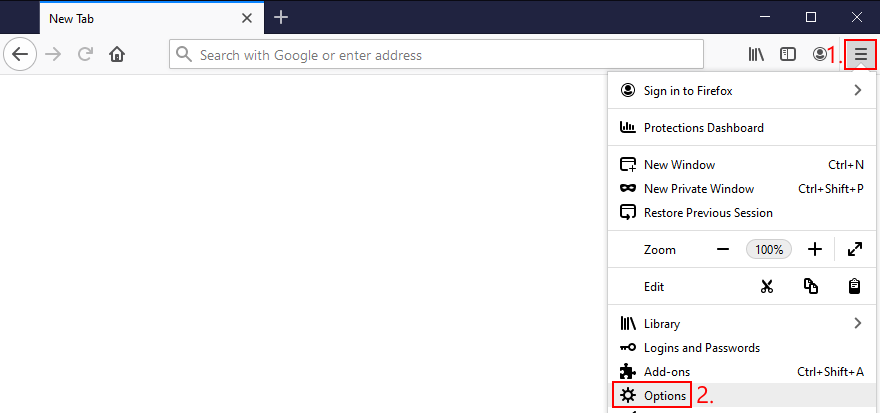
- In General, locate the Performance section
- Disable Use recommended performance settings
- Also disable Use hardware acceleration when available
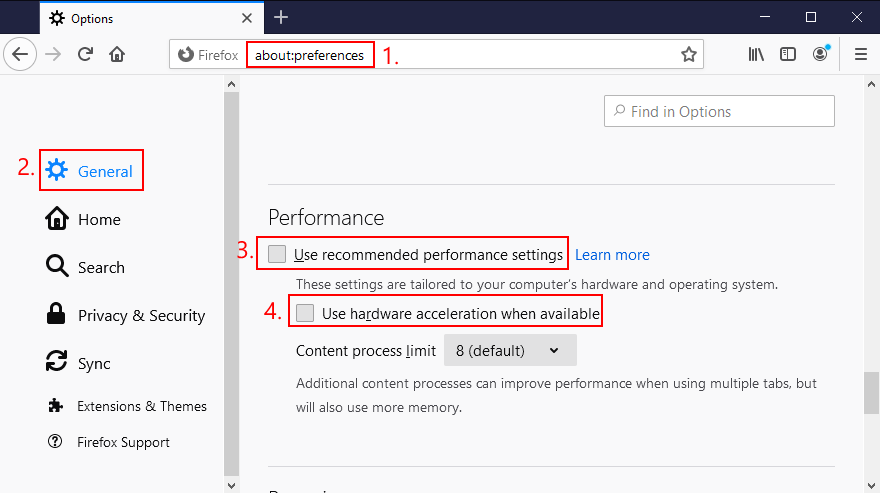
- Restart Firefox
How to disable hardware acceleration in Microsoft Edge:
- In Edge, open the More menu and select Settings
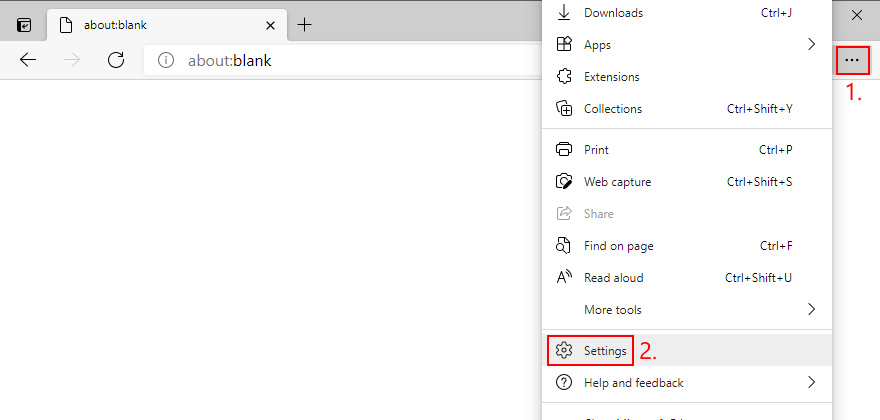
- Go to System (or visit
edge://settings/system)
- Disable Use hardware acceleration when available

- Restart Edge
14. Analyze the crash dumps
If you’re the type of user who doesn’t shy away from the computer’s technical aspects, you can analyze the crash dumps left behind by the VIDEO TDR FAILURE error, in order to find out the exact driver that’s giving you trouble. Event Viewer is a great assistant for this role.
How to use Event Viewer:
- Restart your PC after a system crash
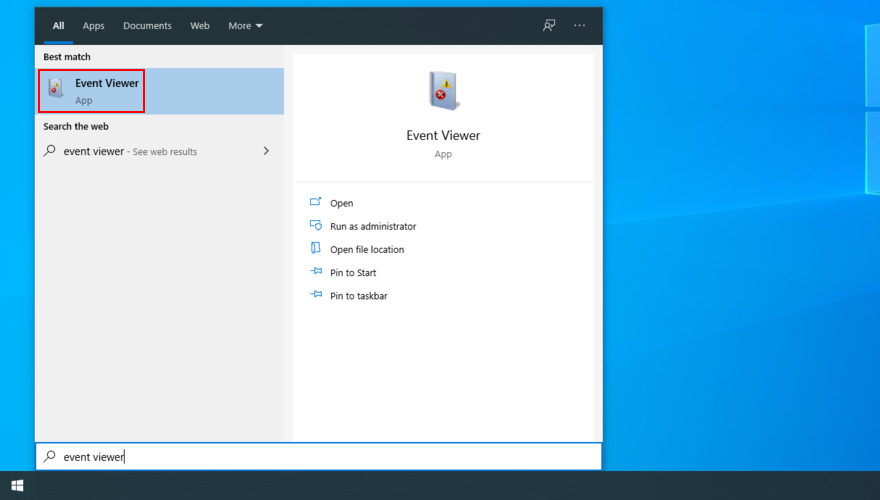
- Immediately press the Win key, search for Event Viewer, and open this app
- In the navigation pane on the left side, go to Windows Logs > System
- Select the first entry that says Error
- Inspect the information from the General and Details tab
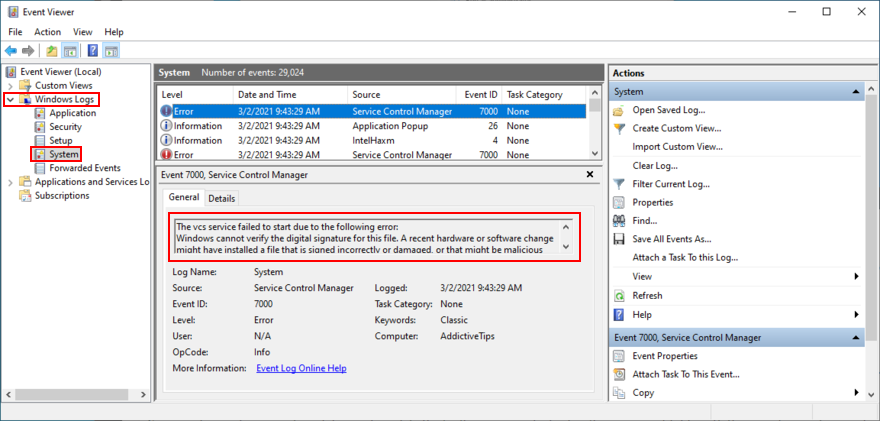
You can use this data to perform a Google search or get in touch with the Microsoft support team. However, if you find Event Viewer to be intimidating, we suggest using BlueScreenView instead. It has the same role but it’s wrapped in a simpler interface and has more intuitive options for analyzing minidump files.
15. Use Display Driver Uninstaller
Display Driver Uninstaller (DDU) is an awesome application that can reset your GPU software and drivers. If display driver nvlddmkm stopped responding on your Windows 10 PC, you can use DDU to safely troubleshoot the BSOD error.
- Make sure to create a system restore point if you haven’t so far
- Download Display Driver Uninstaller from the official website
- Unzip the downloaded archive and open the DDU file
- Start Windows 10 in Safe Mode with Networking (see Solution 1 from this list)
- Open Display Driver Uninstaller.exe
- When prompted with the configuration window, leave everything as is and click OK to continue
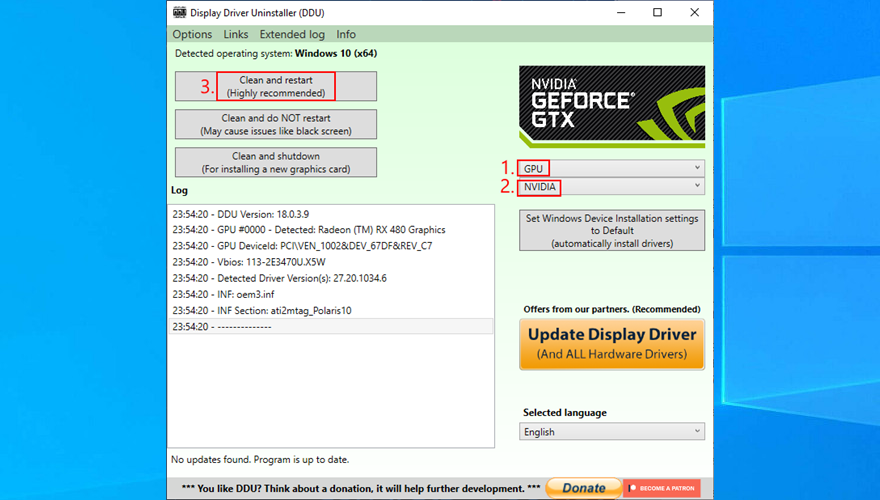
- Select GPU and NVIDIA from the two menus on the right side
- Then, click Clean and restart
16. Remove and reseat the GPU card
It’s possible that your graphics card needs to be reattached to your computer unit. If it’s not properly connected, this could trigger Blue Screen of Death errors like the VIDEO TDR FAILURE stop code.
Shut down your desktop, unplug all cables, remove the computer chassis, and carefully detach the GPU card. Then, put it back in the same slot firmly but without using force. Turn on your computer and see if anything changed.
17. Try the GPU card on another computer
If your graphics card is malfunctioning and needs to be replaced, then all your efforts at attempting to resolve the blue screen problem at the software level will have been in vain.
A simple way to test this is by removing the GPU card from your computer and inserting it into another PC, preferably with a clean Windows installation. If the system starts glitching, it should be pretty clear that you need to replace your hardware. Check out the best GPU cards for gaming.
18. Check system memory
System memory issues can affect the entire computer, leading to blue screen errors like nvlddmkm.sys. You can easily run a check-up by turning to Windows Memory Diagnostic, a tool that comes bundled with Windows 10.
How to use Windows Memory Diagnostic:
- Save your current work and close all programs
- Press Win key + R, type
mdsched.exe, and hit the Enter key
- Click Restart now and check for problems
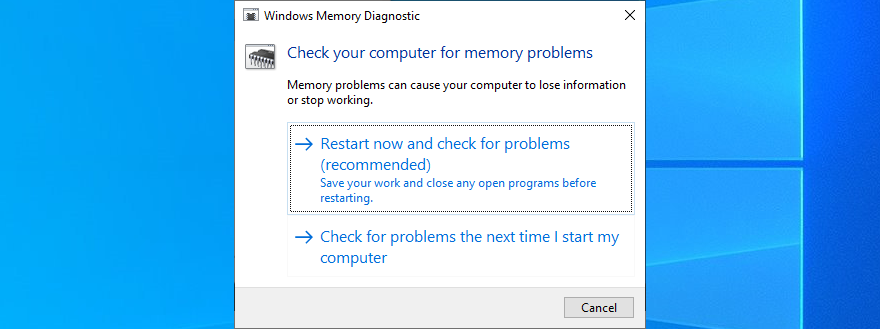
Your operating system will reboot and start running memory tests. It runs a standard test by default. However, if you have a bit of time on your hands, we suggest switching to the Extended test in order to obtain more accurate information about any potential RAM issues.
Press F1 to open the options section, select Extended, and press F10 to apply this setting. The entire memory test can take a long time, so you can leave your PC unattended since your intervention will not be required. Once the test is complete, Windows 10 boots as usual and shows the test results in the notifications center.
19. Use Startup Repair
If Windows 10 is experiencing boot problems, this can lead to all sorts of computer issues, including BSOD errors with the VIDEO TDR FAILURE stop code. But you can fix startup issues by running the Startup Repair tool from the Advanced Startup menu. Before doing so, you need an empty USB flash drive and Internet access to set up a system installation disk.
How to create a Windows 10 installation media disk:
- Plug a USB flash drive into the PC and make sure to save any important files saved there since the drive will be formatted
- Download Media Creation Tool from the official website
- Open Media Creation Tool and follow the steps to create a Windows 10 installation media disk on the USB flash drive
How to run Startup Repair:
- Make sure the USB flash drive with the Windows 10 installation media is plugged into the PC
- Click the Start button and open the menu with the power options
- While holding down the Shift key, click Restart to boot Windows 10 to the troubleshoot menu
- Go to Troubleshoot > Advanced options > Startup Repair

- Select your administrator account and enter your password to continue
- Follow the given instructions to complete the startup repair sequence
20. Fix HDD issues
Your hard drive may have corrupt files or bad sectors which prevent Windows from operating normally, But you can fix HDD issues without having to use a third-party software application, thanks to CHKDSK (Check Disk).
- Press Win key + R, type CMD, and press Ctrl + Shift + Enter to open Command Prompt with administrator rights

- If your OS is installed on the C: drive, run
chkdsk c: /f /r. Else, replace c: with the correct partition letter
- If you don’t know Windows’ whereabouts, choose a drive letter when entering the run command (e.g.
run d:) and view its containing folders (run dir). Keep listing folders for multiple drive letters until you see the Windows directory
- When asked to confirm scheduling CHKDSK during the next system reboot, type y and press Enter
- Restart your computer and wait for CHKDSK to do its job
21. Repair corrupt system files
Not only hard disk problems but also damaged, modified, or missing OS files can cause blue screen errors on your computer. To restore system files on Windows 10, you can run DISM (Deployment Image Servicing and Management) and SFC (System File Checker).
- Start Windows 10 in Safe Mode with Networking (see Solution 1)
- Click the Start button, type cmd, and open Command Prompt
- Run
DISM.exe /Online /Cleanup-image /RestoreHealth. However, if the Windows Update component is broken, this command won’t work. Instead, you can create a Windows 10 installation media disk (see Solution 19) and set it as the repair source: DISM.exe /Online /Cleanup-Image /RestoreHealth /Source:C:\RepairSource\Windows (replace C:\RepairSource\Windows with the full path to your Windows 10 installation media disk)
- After DISM does its job, run SFC (
sfc /scannow). If SFC is successful, it shows the Windows Resource Protection did not find any integrity violations message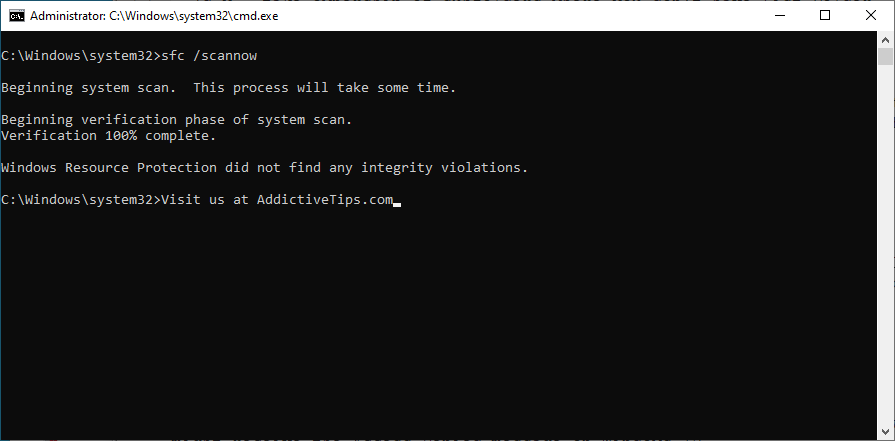
22. Disable Fast Startup
Fast Startup is a Windows component that boots your operating system faster by pre-loading drivers. Unfortunately, it’s known to cause serious PC problems. If drivers are not properly shut down and restarted, it could trigger blue screen errors like nvlddmkm.sys.
To solve this problem, you can disable Fast Startup:
- Press the Win key, search for Control Panel, and open this app
- Double-click Power Options
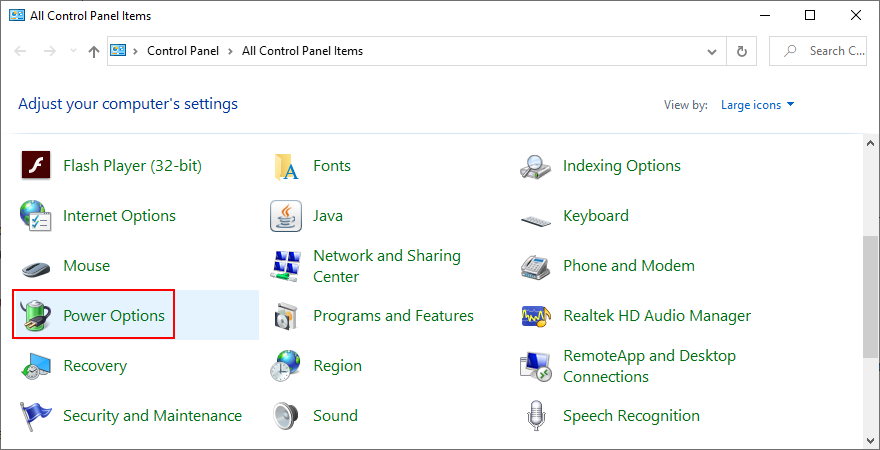
- Click Choose what the power buttons do
- Click Change settings that are currently unavailable (admin rights are required)
- Disable Turn on fast startup and click Save changes
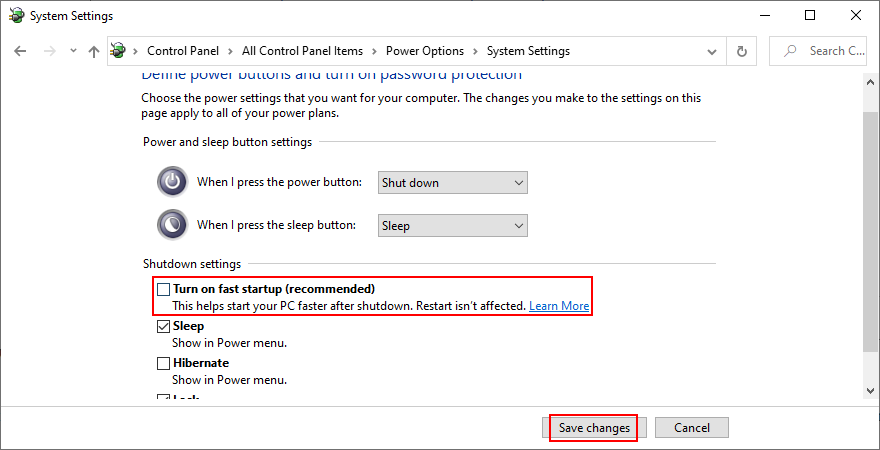
- Restart your computer
23. Disable the PCI Express power option
Many users reported that turning off the PCI Express power option helped fix the VIDEO TDR FAILURE error on their computer. Here’s what you need to do:
- Click the Start button, type edit power plan, and press Enter
- Click Change advanced power settings
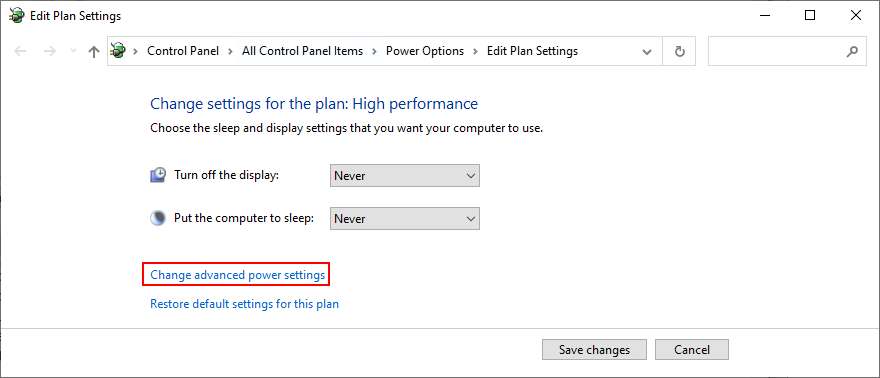
- Expand the PCI Express group
- Set Link State Power Management to Off
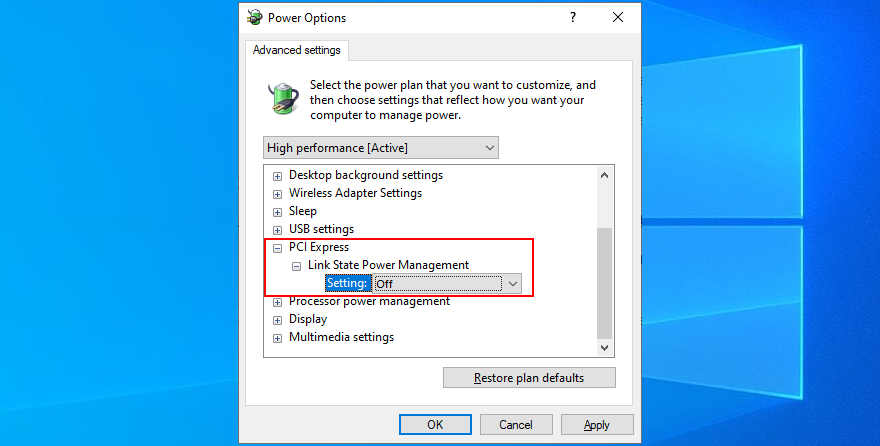
- Click Apply
- Restart your computer
24. Run a malware scan
Malware infections can be severe enough to corrupt critical system files and prevent you from running system tools like Task Manager or Command Prompt. If you suspect that your computer was recently infected with a virus, you should run a scan to eliminate any threats and regain the control of your PC.
How to run a malware scan with Windows Defender:
- Press the Windows key, type Windows Security, and launch this tool
- Select Virus & threat protection
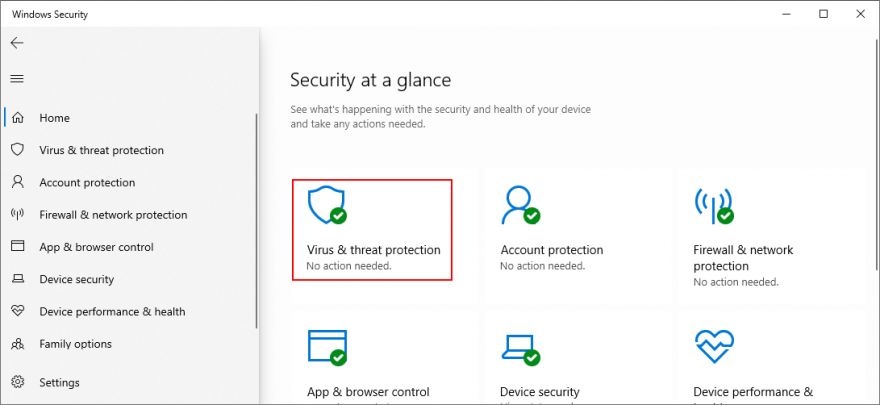
- Click Scan options
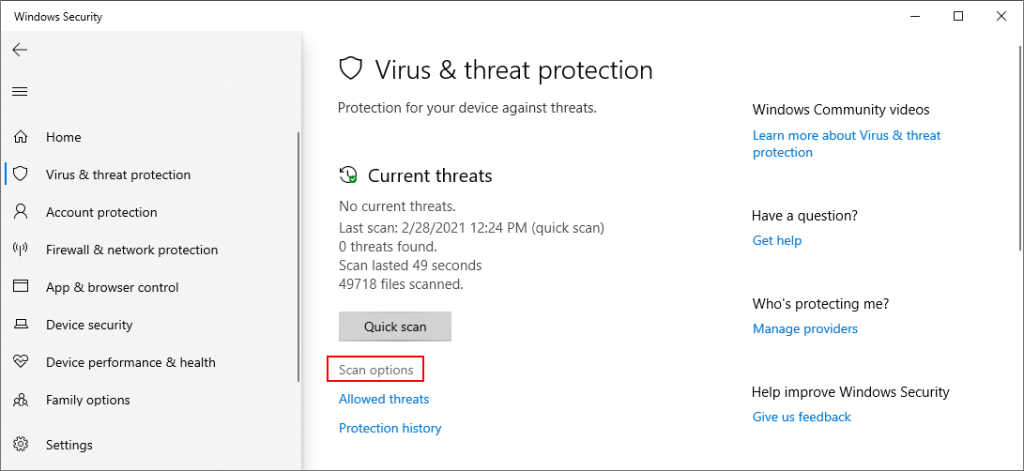
- Choose Quick scan and press Scan now
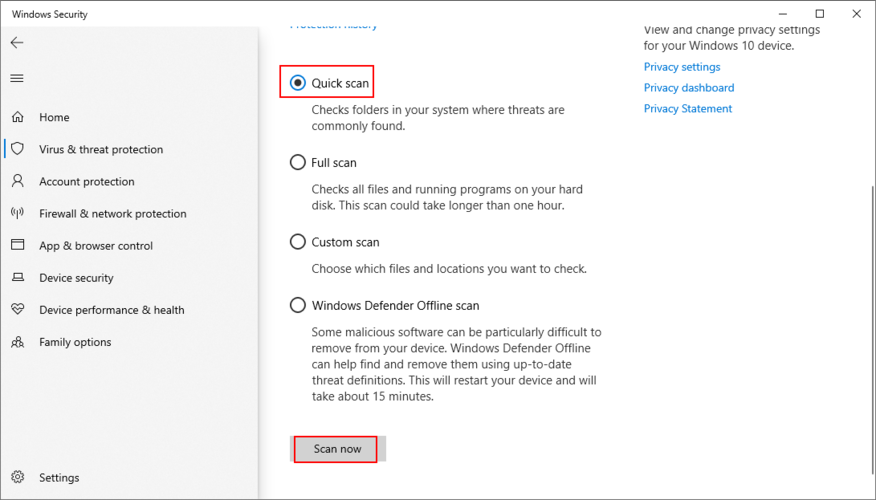
- If the computer search reveals nothing, select Windows Defender Offline scan and click Scan now
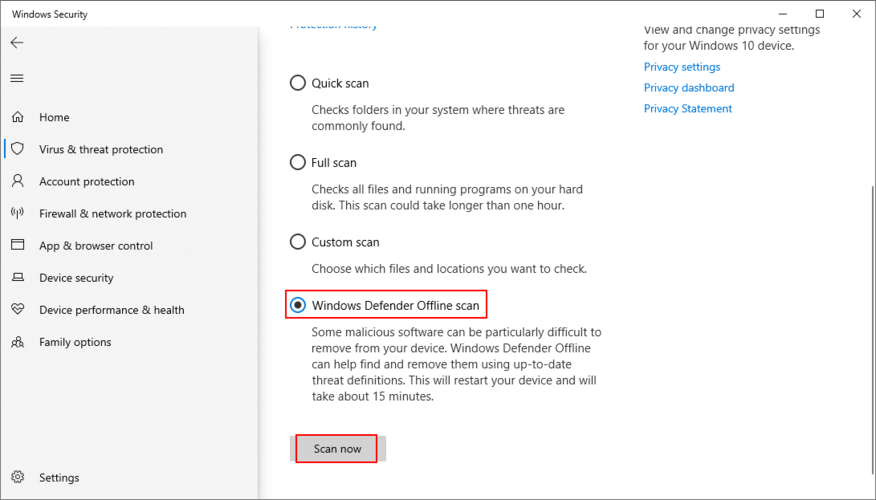
- Allow Windows Defender to remove or quarantine any threats. If you think it has wrongfully detected safe files as malware, make sure to add them to the whitelist in order to exclude the items from future scans
25. Fix the system registry
Missing, modified, corrupt, or incorrect registry settings can be devastating for your operating system and can even trigger blue screen errors like nvlddmkm.sys. But you can restore the original registry configuration from Command Prompt before system boot.
- Click the Start button and open the power menu
- Hold down the Shift key and click Restart to reboot Windows in Advanced Startup mode
- Select Troubleshoot > Advanced options > Command Prompt
- Pick your admin account and enter your password
- Run these commands (press Enter after each line):
-
cd %SystemRoot%System32\config
-
ren %SystemRoot%System32\config\DEFAULT DEFAULT.old
-
ren %SystemRoot%System32\config\SAM SAM.old
-
ren %SystemRoot%System32\config\SECURITY SECURITY.old
-
ren %SystemRoot%System32\config\SOFTWARE SOFTWARE.old
-
ren %SystemRoot%System32\config\SYSTEM SYSTEM.old
-
copy %SystemRoot%System32\config\RegBack\DEFAULT %SystemRoot%System32\config\
-
copy %SystemRoot%System32\config\RegBack\DEFAULT %SystemRoot%System32\config\
-
copy %SystemRoot%System32\config\RegBack\SAM %SystemRoot%System32\config\
-
copy %SystemRoot%System32\config\RegBack\SECURITY %SystemRoot%System32\config\
-
copy %SystemRoot%System32\config\RegBack\SYSTEM %SystemRoot%System32\config\
-
copy %SystemRoot%System32\config\RegBack\SOFTWARE %SystemRoot%System32\config\
- Start Windows as usual
26. Unplug external devices
If you have recently attached new hardware components into your desktop or laptop, such as a webcam, a USB flash drive, a microphone, headphones, or a wireless network adapter, it’s possible that the device is experiencing compatibility issues with your Windows 10 PC, triggering the VIDEO TDR FAILURE stop code as a result.
You can easily test this by unplugging all external devices from your PC, except for your keyboard and mouse, in order to inspect results. If the keyboard and mouse are also brand new, try replacing them if you have others.
27. Use System Restore
System Restore allows you to revert Windows 10 to a checkpoint that was recorded before you started experiencing blue screen errors. However, it means that System Restore must be enabled on your computer and at least one restore point must have been created prior to the BSOD event.
Even if you didn’t manually set up a restore point, it’s possible that some of your applications did, such as driver updaters, so it doesn’t hurt to at least check.
How to use System Restore:
- Sign in to Windows 10 using an administrator account
- Press the Win key, type Control Panel, and launch this app
- Go to Recovery
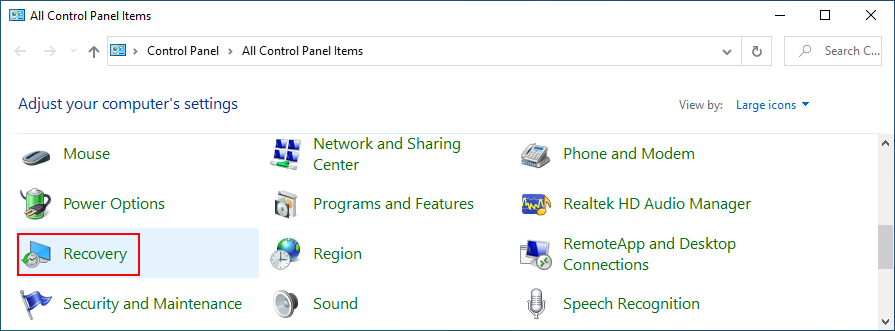
- Click Open System Restore
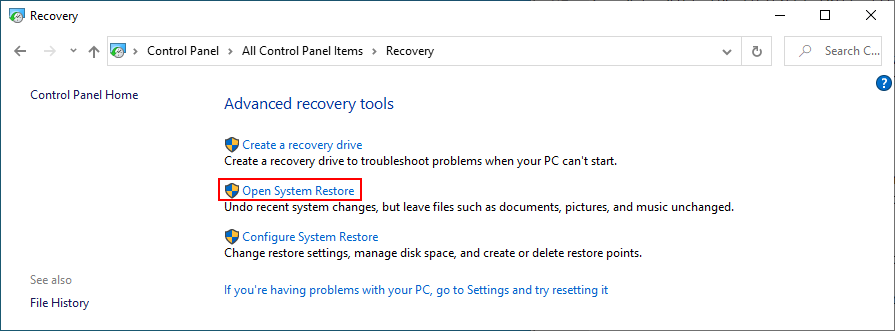
- Select a restore point or click Show more restore points to evaluate more options. You can also click Scan for affected programs to find out which applications you will have to reinstall after restore
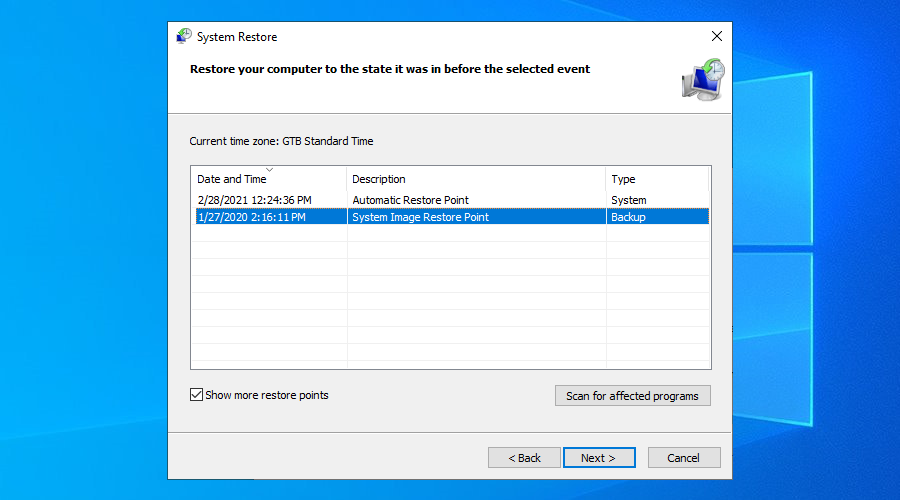
- Click Next and follow the instructions. Your PC will reboot
28. Reset Windows 10
If everything failed up until this point, you should prepare Windows 10 for factory reset in order to uninstall all programs and restore system settings to default. The good news is that your personal files will be left untouched.
But make sure to write down all applications you will have to install, save program preferences, and get hold of serial keys required for reactivation. Then, proceed to the following steps:
- Right-click the Start button and go to Settings
- Select Update & Security
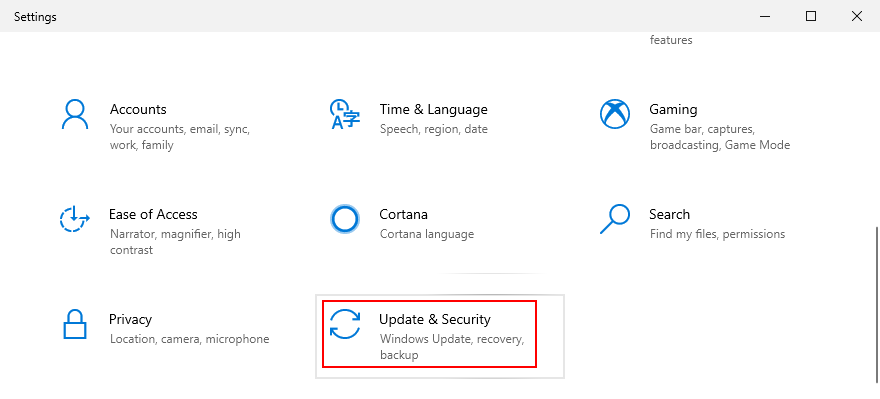
- Choose Recovery and click Get started
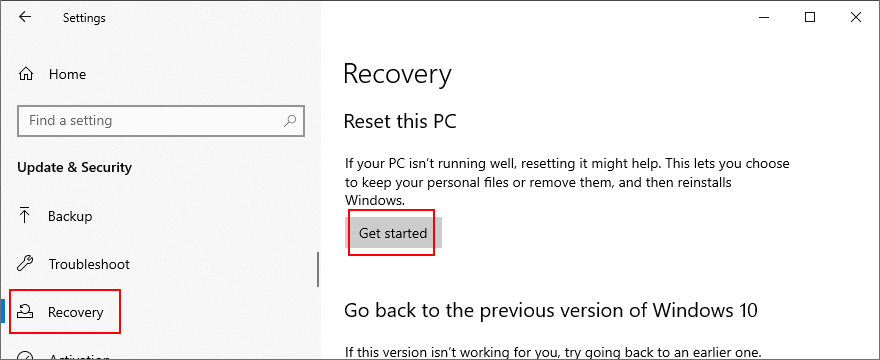
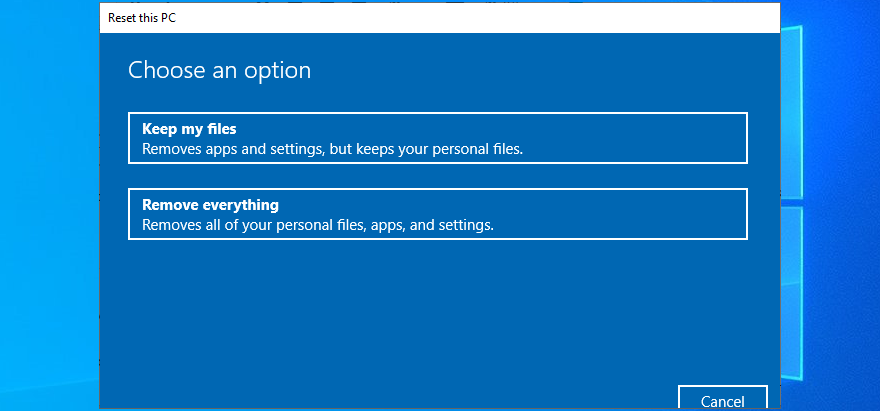
- Click Keep my files and follow the remaining instructions
Stop code VIDEO TDR FAILURE (nvlddmkm.sys) can be fixed on Windows 10
To recap, VIDEO TDR FAILURE is a BSOD error that indicates a problem with your video settings. If it’s accompanied by the nvlddmkm.sys file, it means that you can troubleshoot the file errors to get rid of system crashes.
To fix this problem, you can start Windows 10 in Safe Mode, run a clean system boot, check for system updates, disable overclocking software, reset and update BIOS, restore the nvlddmkm.sys file, clear system cookies and temp files, reinstall the graphics adapter, as well as update or roll back GPU drivers.
It’s also a good idea to run the Hardware and Devices troubleshooter, disable hardware acceleration, analyze crash dumps, use Display Driver Uninstaller, remove and reseat the GPU card, try the GPU card on another computer, check system memory, use Startup Repair, or fix HDD issues and corrupt system files.
In addition, you can disable Fast Startup and the PCI Express power option, run a computer malware scan, fix the system registry, unplug external devices, and use System Restore to roll back Windows 10 to a previous checkpoint. If all these solutions fail, you can go to the last resort, which means resetting Windows 10 to factory settings.
How did you manage to fix the nvlddmkm.sys file and VIDEO TDR FAILURE stop code? Tell us all about it in the comments section below.
