Microsoft publie régulièrement des mises à jour pour Windows dont votre ordinateur a besoin afin de tirer parti des derniers correctifs de sécurité et correctifs. Sur la plupart des PC, le service Windows Update est programmé pour s'exécuter automatiquement, vous informant des mises à jour en attente qui nécessitent votre attention.
Malheureusement, le service de mise à jour ne fonctionne pas toujours comme prévu, jetant des erreurs telles que 0x8024401c en conséquence . Si les mises à jour du système sont bloquées sur votre PC en raison du code d'erreur 0x8024401c, découvrez comment résoudre ce problème sans avoir à faire appel à un professionnel pour obtenir de l'aide.
CORRECTIF : Erreur de mise à jour Windows 0x8024401c
Certaines des solutions suivantes nécessitent que vous bricoliez les paramètres du registre système. C'est donc une bonne idée de créer un point de restauration système avant de commencer l'opération de dépannage. Si vous faites des erreurs, vous pouvez restaurer Windows 10 et recommencer.
1. Utilisez l'utilitaire de résolution des problèmes de Windows Update
L' utilitaire de résolution des problèmes de Windows Update exécute une analyse rapide sur votre ordinateur pour identifier et résoudre les problèmes courants qui empêchent l'outil de mise à jour du système de fonctionner correctement. Voici comment vous pouvez l'utiliser :
- Appuyez sur la touche Win , recherchez les paramètres de dépannage et appuyez sur Entrée
- Cliquez sur Dépanneurs supplémentaires
- Recherchez et sélectionnez Windows Update
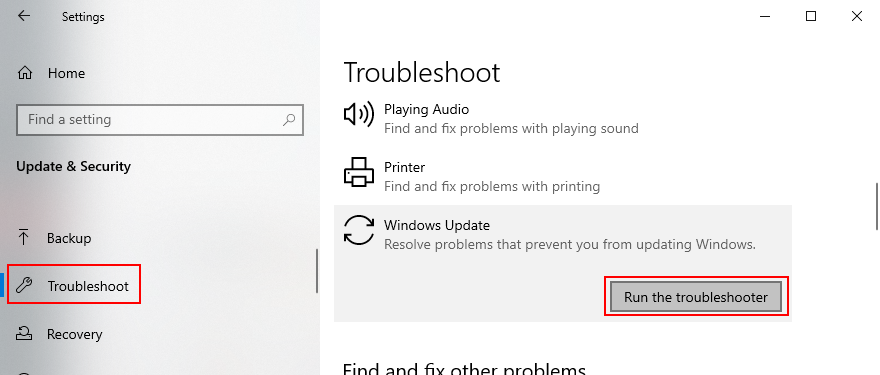
- Cliquez sur le bouton Exécuter l'utilitaire de résolution des problèmes
- Suivez les étapes de l'assistant et autorisez Windows à appliquer les correctifs
2. Utilisez le diagnostic de mise à jour Windows
D'autres problèmes de mise à jour de Windows peuvent être résolus par le diagnostic de mise à jour de Windows :
- Connectez-vous à Windows 10 à l'aide d'un compte administrateur
- Téléchargez Windows Update Diagnostic sur le site officiel
- Démarrez l'application et sélectionnez Windows Update
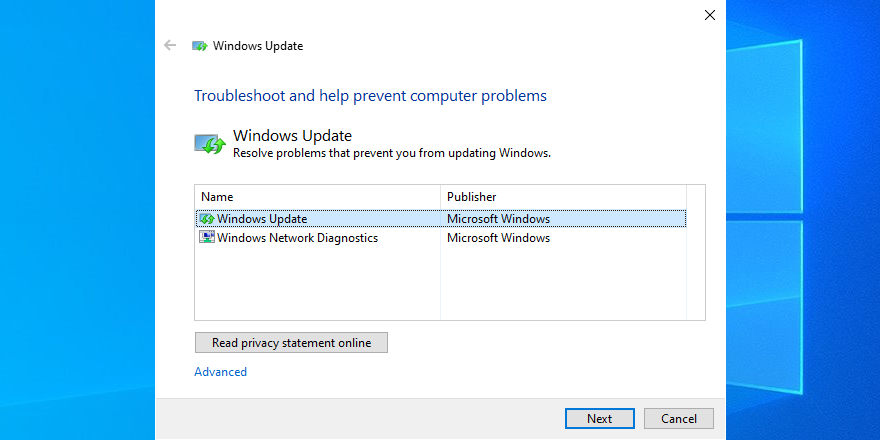
- Cliquez sur Suivant et suivez les instructions étape par étape
- Lancez à nouveau l'application et choisissez Windows Network Diagnostics
- Cliquez sur Suivant et suivez les étapes restantes
- Redémarrez votre ordinateur
3. Vérifier les services
Certains services système sont liés à Windows Update et doivent être autorisés à s'exécuter. D'autres peuvent entrer en conflit avec l'application et doivent être désactivés pour rester du bon côté. Voici ce que vous devez faire :
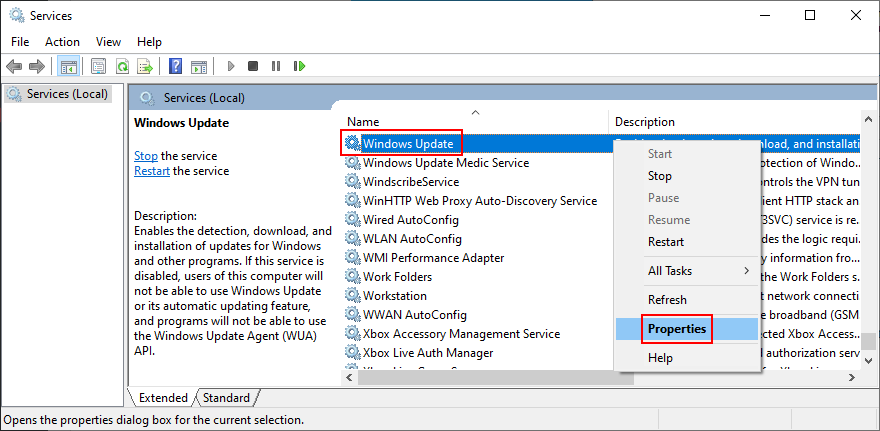
- Cliquez sur le bouton Démarrer , écrivez Services et ouvrez cette application
- Cliquez avec le bouton droit de la souris sur Windows Update et accédez à Propriétés
- Définissez le type de démarrage sur Automatique (démarrage différé) et cliquez sur le bouton Démarrer
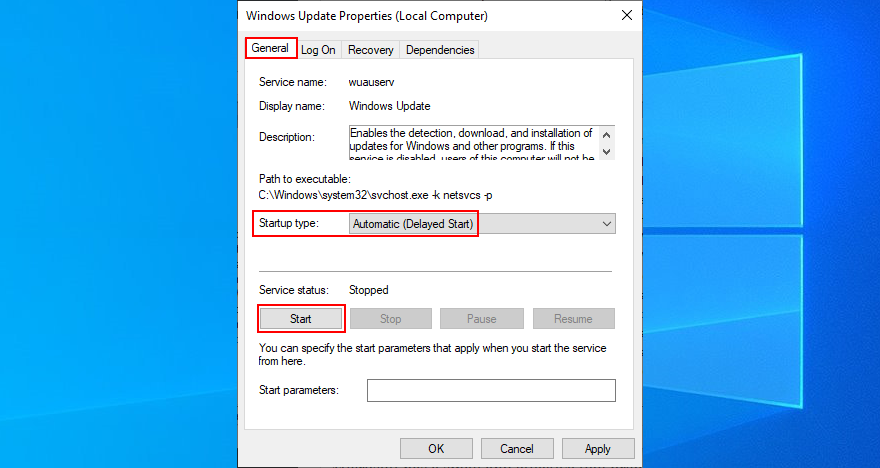
- Cliquez sur Appliquer
- Recherchez les entrées Background Intelligent Transfer Service et App Readiness et définissez les mêmes options
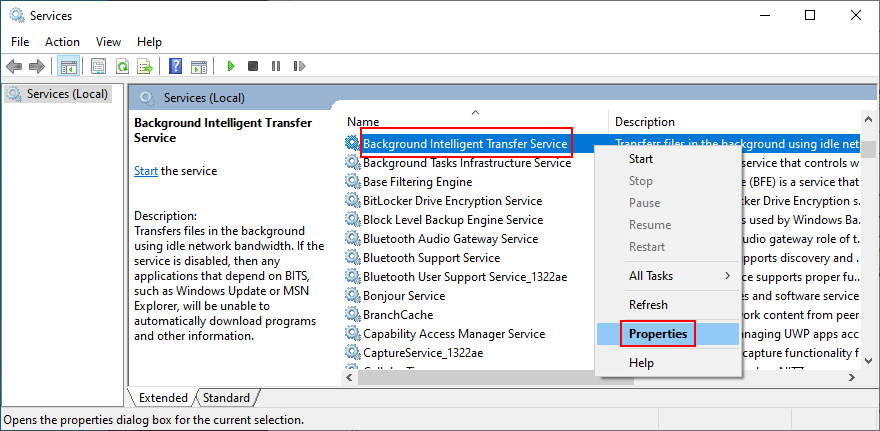
- Trouvez le service de liste de réseaux et accédez à ses propriétés
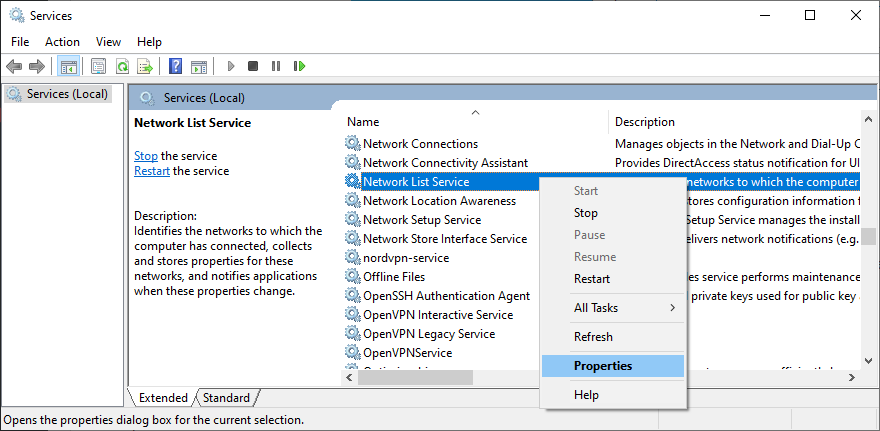
- Définissez le type de démarrage sur Désactivé et cliquez sur Arrêter
- Cliquez sur Appliquer et quittez le bureau
4. Vérifiez la politique de groupe
Vous devez vous diriger vers l'éditeur de stratégie de groupe local pour vous assurer que Windows Update est autorisé à s'exécuter sur votre ordinateur. Sinon, vous pourriez vous retrouver avec l'erreur 0x8024401c.
- Cliquez sur le bouton Démarrer , recherchez Modifier la stratégie de groupe et appuyez sur Entrée
- Accédez à l'emplacement suivant : Configuration ordinateur > Modèles d'administration > Composants Windows > Windows Update
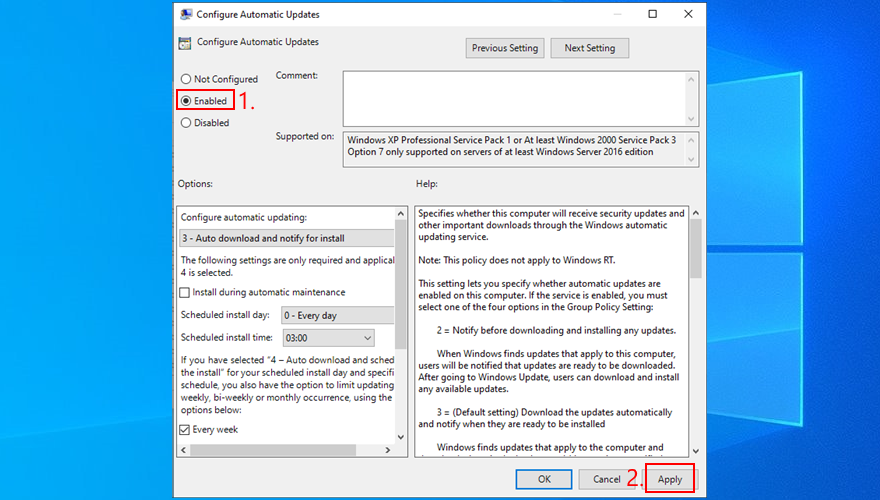
- Double-cliquez sur Configurer les mises à jour automatiques pour afficher ses propriétés
- Sélectionnez Activé , cliquez sur Appliquer et quittez le bureau
5. Réinitialiser Windows Update à partir de l'invite de commande
Vous pouvez vider le cache de Windows Update en réinitialisant tous les composants logiciels impliqués dans ses services, grâce à l'environnement de ligne de commande :
- Assurez-vous de vous connecter à Windows 10 en utilisant un compte administrateur
- Appuyez sur la touche Windows , tapez cmd et ouvrez l' application Invite de commandes
- Saisissez ces commandes et appuyez sur Entrée après chaque ligne :
- Redémarrez votre PC
6. Vérifiez les paramètres du registre
À l'aide de l'Éditeur du Registre, vous devez inspecter certaines entrées qui affectent Windows Update, afin de vous assurer que tout fonctionne correctement. Voici ce que vous devez faire :
- Appuyez sur la touche Windows + R , écrivez regedit et appuyez sur Entrée pour ouvrir l'Éditeur du Registre . Si vous y êtes invité par UAC (Contrôle de compte d'utilisateur), cliquez sur Oui
- Ouvrez le menu Fichier et sélectionnez Exporter
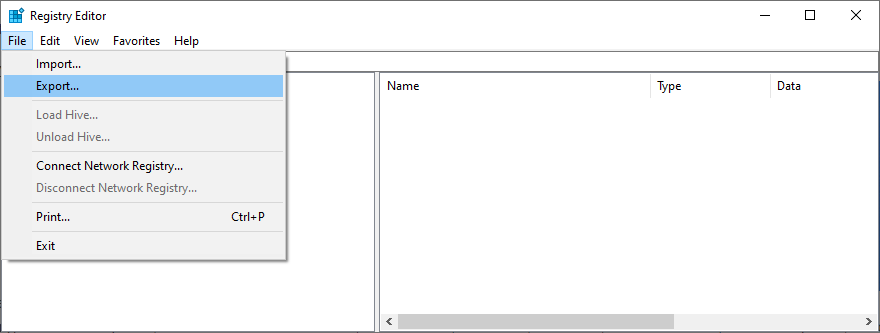
- Créez un fichier de sauvegarde de registre en spécifiant le nom du fichier et le répertoire de sauvegarde
- Rendez-vous à l'emplacement suivant :
Ordinateur\HKEY_LOCAL_MACHINE\SOFTWARE\Microsoft\Windows\CurrentVersion\WindowsUpdate\Auto Update
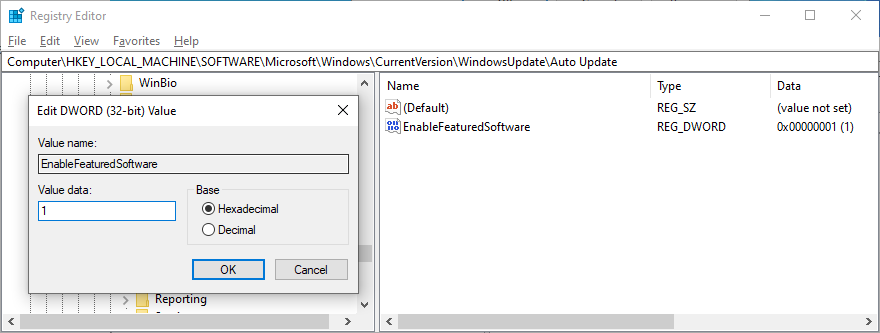
- Vérifiez si EnableFeaturedSoftware existe ou non . Si tel est le cas, assurez-vous que Data est défini sur 0x0000001 (1) . Sinon, double-cliquez sur son entrée, définissez les données de la valeur sur 1 et la base sur hexadécimal , puis cliquez sur OK
- Cependant, si EnableFeaturedSoftware n'existe pas, vous devez le créer :
- Sélectionnez Edition > Nouveau > Valeur DWORD (32 bits)
- Entrez l' entrée EnableFeaturedSoftware et double-cliquez dessus
- Définissez les données de la valeur sur 1 et la base sur Hexadécimal , puis cliquez sur OK
- Rendez-vous à cet endroit :
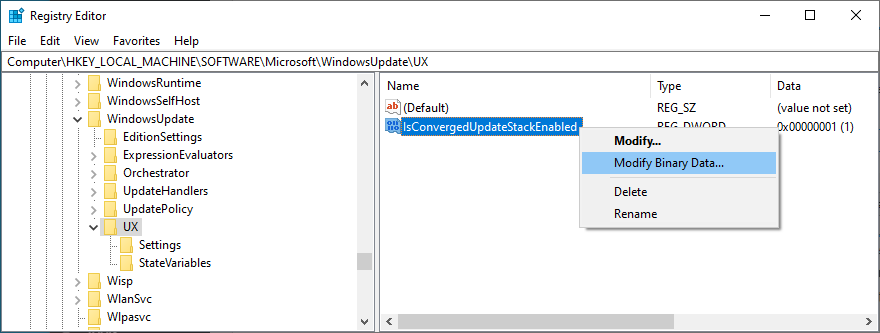
HKEY_LOCAL_MACHINE\SOFTWARE\Microsoft\WindowsUpdate\UX
- Double-cliquez sur IsConvergedUpdateStackEnabled , définissez les données de la valeur sur 0 et la base sur Hexadécimal , puis cliquez sur OK
- Maintenant, dirigez-vous vers cette destination:
HKEY_LOCAL_MACHINE\SOFTWARE\Microsoft\WindowsUpdate\UX\Settings
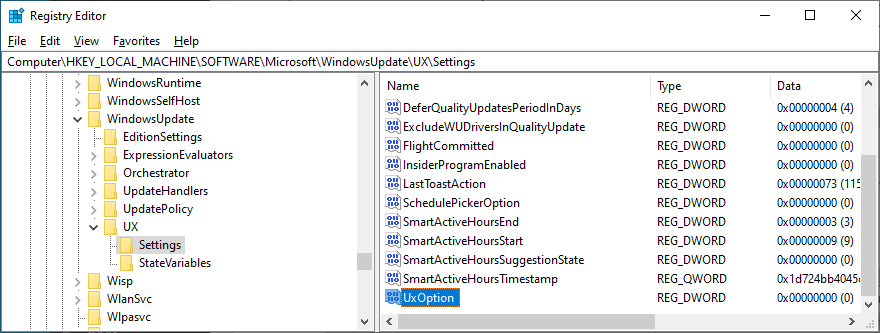
- Double-cliquez sur UxOption , définissez les données de la valeur sur 0 et la base sur hexadécimal , puis cliquez sur OK
- Ensuite, visitez:
HKEY_LOCAL_MACHINE\SOFTWARE\Policies\Microsoft\SystemCertificates
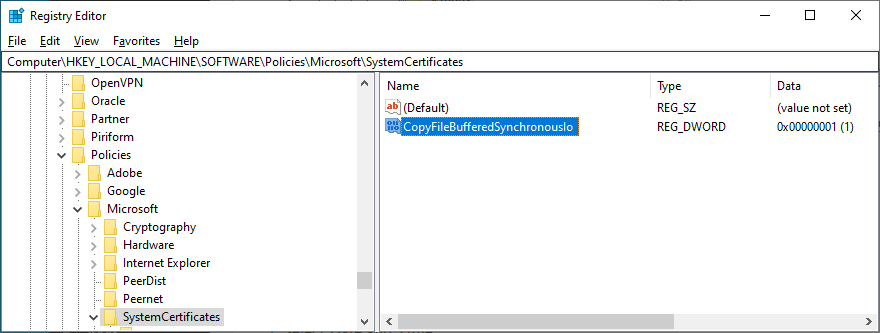
- Vérifiez si CopyFileBufferedSynchronousIo existe ou non . Ainsi, assurez-vous que ses données sont définies sur 0x00000001 (1) . Sinon, double-cliquez sur l'entrée, définissez les données de la valeur sur 1 et la base sur hexadécimal , puis cliquez sur OK
- Si CopyFileBufferedSynchronousIo n'existe pas :
- Sélectionnez Edition > Nouveau > Valeur DWORD (32 bits)
- Renommez l'entrée en CopyFileBufferedSynchronousIo et double-cliquez dessus
- Définissez les données de la valeur sur 1 et la base sur Hexadécimal , puis cliquez sur OK
- Quitter sur le bureau
7. Mettez à jour vos pilotes réseau
Si vous rencontrez des problèmes de connectivité réseau, vous devez vérifier vos pilotes réseau car ils peuvent être obsolètes, surtout si vous avez toujours les pilotes d'origine car vous n'avez jamais effectué de mise à jour.
Le moyen le plus rapide et le plus sûr consiste à utiliser une application de mise à jour des pilotes pour mettre à jour tous les pilotes obsolètes en même temps. Cependant, si vous ne souhaitez installer aucun programme tiers, vous pouvez vous tourner vers le Gestionnaire de périphériques :
- Appuyez sur la touche Windows + R , tapez devmgmt.msc et appuyez sur Entrée
- Cliquez sur le bouton fléché à côté de Cartes réseau pour développer ce groupe
- Cliquez avec le bouton droit sur votre interface réseau et sélectionnez Mettre à jour le pilote
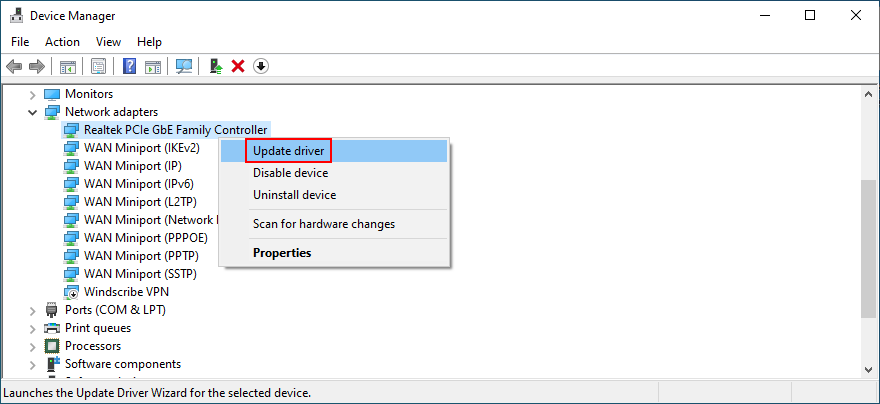
- Cliquez sur Rechercher automatiquement les pilotes et attendez
Si la recherche en ligne ne renvoie rien, vous pouvez visiter le site Web du fabricant de votre adaptateur réseau afin de trouver, télécharger et installer la dernière version. C'est risqué, cependant, car vous pourriez accidentellement configurer un pilote non pris en charge.
8. Restaurer vos pilotes réseau
D'un autre côté, vous avez peut-être accidentellement téléchargé et installé un pilote qui n'est pas compatible avec votre carte réseau ou votre système d'exploitation. Cela pourrait nuire à l'ensemble de vos connexions Internet, il est donc préférable de revenir à la version précédente. Voici comment:
- Cliquez avec le bouton droit sur le bouton Démarrer et sélectionnez Gestionnaire de périphériques
- Double-cliquez sur votre carte réseau pour accéder à ses propriétés
- Basculer vers l' onglet Pilote
- Cliquez sur le bouton Restaurer le pilote et suivez les instructions étape par étape
Si vous ne pouvez pas cliquer sur Restaurer le pilote car le bouton est grisé, il est impossible de procéder à la restauration car il n'y a pas de pilote précédent enregistré sur votre PC.
9. Débranchez les périphériques
Les composants matériels récemment connectés à votre ordinateur de bureau ou portable peuvent ne pas prendre entièrement en charge votre système d'exploitation. À son tour, cela pourrait affecter vos applications, vos connexions Internet et vos outils système tels que Windows Update, entraînant l'erreur 0x8024401c.
Consider any new pieces of hardware that you connected to your PC, like a webcam, a Wi-Fi adapter, a pen drive, or a memory card. Remove their cables, restart your computer, and check if you can run Windows Update. You should also try plugging the devices into other USB ports in case they are not working properly.
10. Reinstall devices
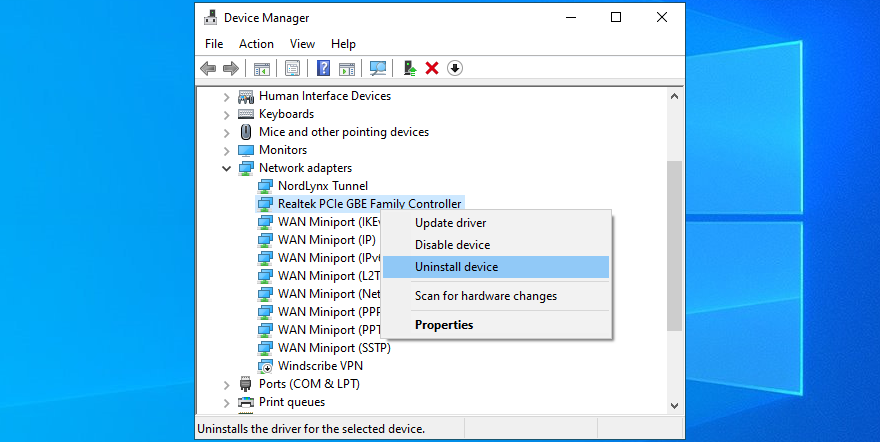
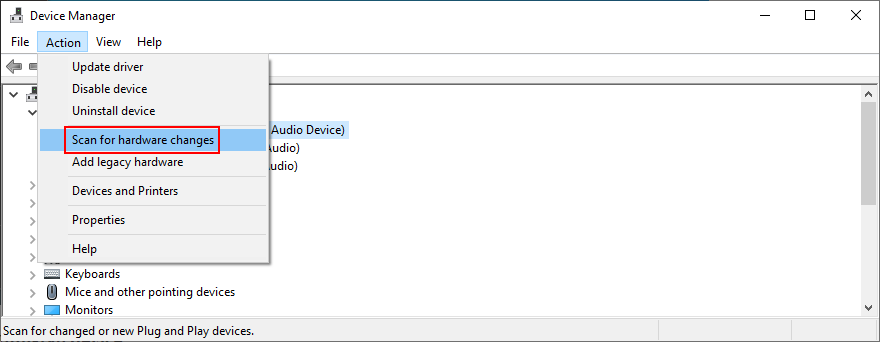
Another way to deal with peripheral devices is by reinstalling them on your Windows 10 PC. This is made possible through Device Manager since you just have to uninstall the adapters. After restarting your computer, Windows will make sure to automatically install all missing devices. Here’s what you need to do:
- Click the Start button, search for Device Manager, and press Enter
- Look for any devices with a yellow exclamation mark
- Right-click it and select Uninstall device
- Open the Action menu and choose Scan for hardware changes
- Reboot your Windows PC
11. Check your hard disk for errors
Your HDD or SSD might be experiencing hardware failure or bad sectors. It could affect your entire system, including the Windows Update service. But you can turn to CHKDSK (Check Disk) to find and fix any problems:
- Click the Start button, search for Command Prompt, and select Run as administrator (click Yes if prompted by UAC)
- Take into account the partition letter of Windows and enter
chkdsk c: /f /r (if it’s not c:, replace it with the correct letter)
- CHKDSK will ask you to confirm scheduling the tool at the next Windows boot. Agree by typing y and pressing Enter
- Restart your PC and wait for CHKDSK to do its job
12. Fix corrupt system files
Windows 10 might have damaged, modified or missing files that are essential for Windows Update. Without taking measures, you will keep seeing error code 0x8024401c. But you can fix this problem by running DISM (Deployment Image Servicing and Management) and then SFC (System File Checker):
- Press the Win key, type CMD, select Command Prompt, and click Run as administrator
- Write
DISM /online /cleanup-image /scanhealth and press Enter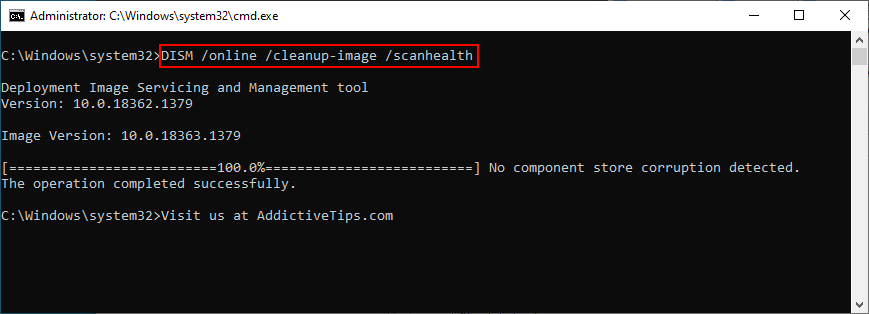
- If it finds any issues, run
DISM /online /cleanup-image /restorehealth to fix them
- Reboot your PC and launch Command Prompt with elevated rights
- Type
sfc /scannow and hit the Enter key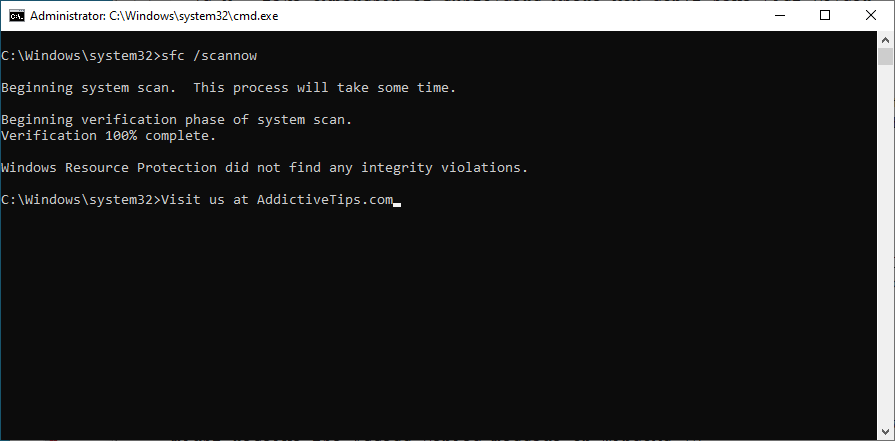
- Restart your workstation before trying Windows Update
13. Check firewall settings
Your firewall filters Internet traffic by allowing and denying access to processes and services. If you have accidentally messed up the firewall settings, this could explain why Windows Update throws you errors like 0x8024401c. Unless you have a third-party firewall tool installed, here’s what you can do with Windows Defender Firewall.
How to temporarily disable your firewall:
- Make sure you’re signed in with an admin account on Windows 10
- Click the Start button, type check firewall status, and press Enter
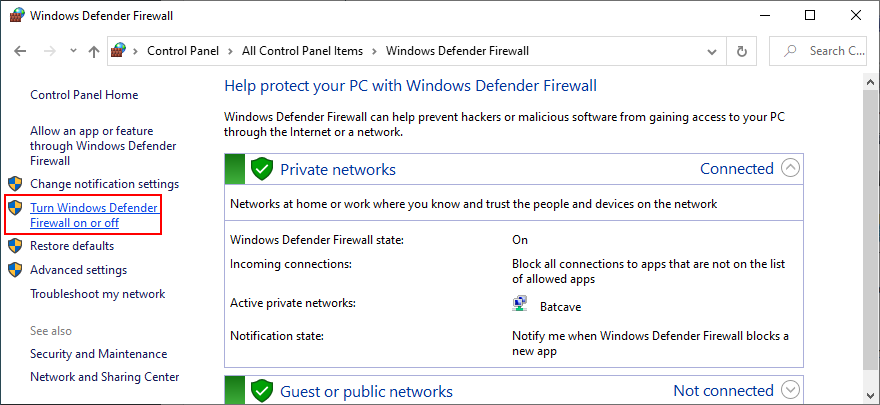
- Click Turn Windows Defender Firewall on or off
- At Private network settings and Public network settings, select Turn off Windows Defender Firewall and click OK
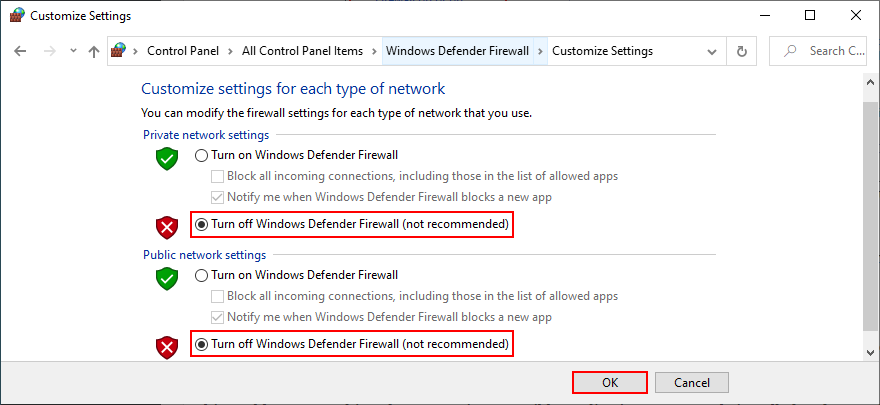
Try to run Windows Update now. If it turns out to be a successful move, you shouldn’t keep your firewall disabled because it means leaving your PC vulnerable to malware attacks. Instead, you can restore firewall settings to default, in order to undo any customized preferences that could’ve triggered the Windows Update error.
How to restore firewall settings to default:
- Press the Win key, type firewall, and open Firewall & network protection
- Scroll down to the bottom of the page and click Restore firewalls to default
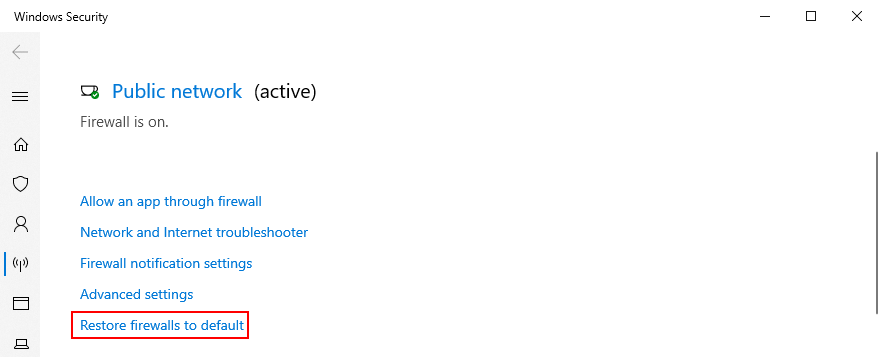
- Click Restore defaults and click Yes to confirm
14. Run a malware scan
A malicious agent could have hijacked your PC and deactivated critical files that Windows Update needs to work properly. Unless you have a third-party security solution installed, here’s how to find and remove malware using Windows Defender:
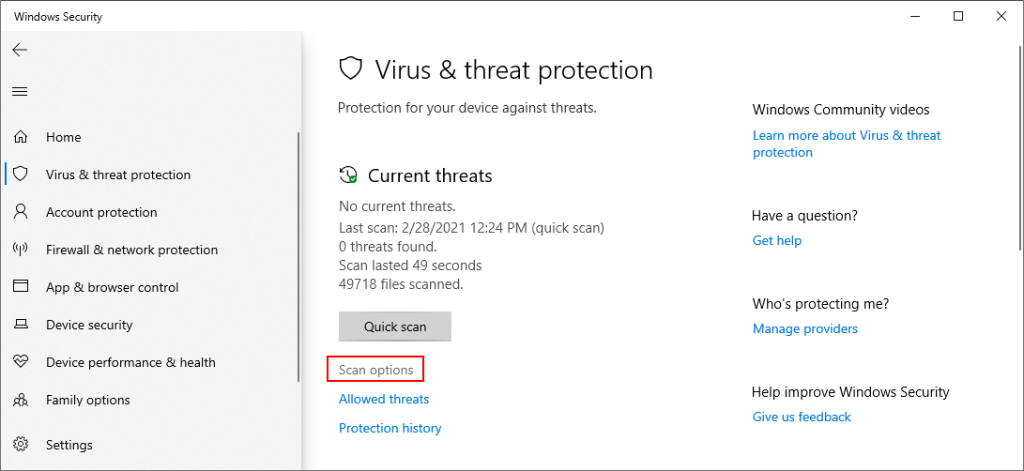
- Click the Start button, write Windows Security, and open this tool
- Pick Virus & threat protection
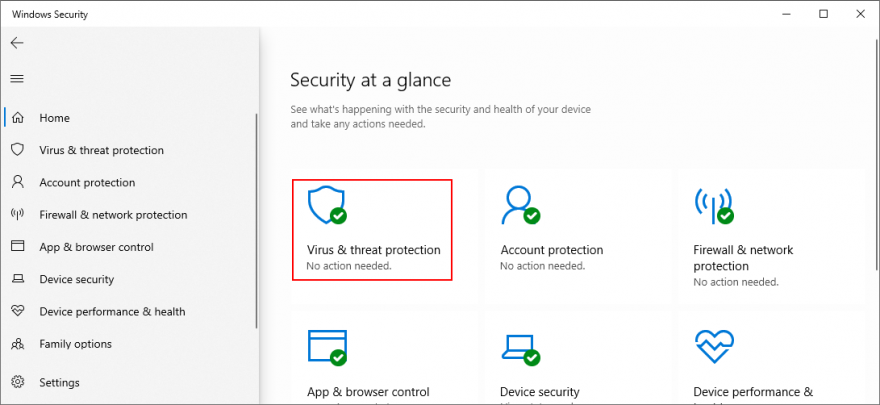
- Click Scan options
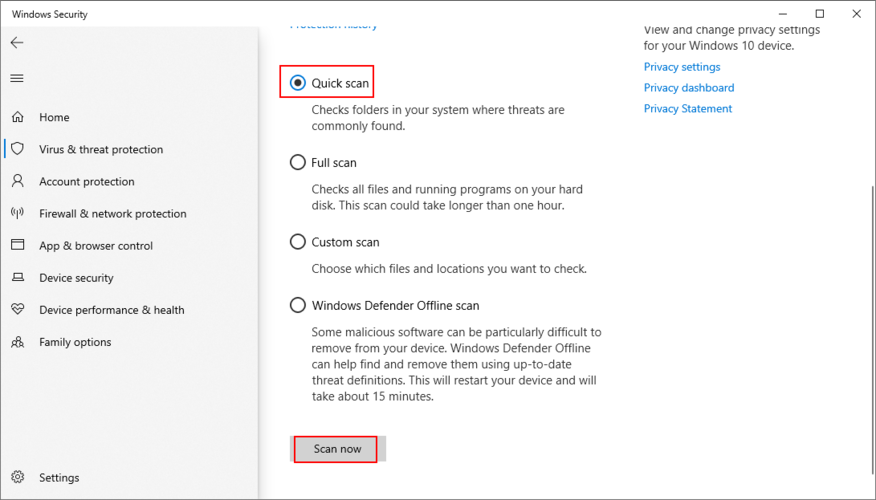
- Select Quick scan and click Scan now
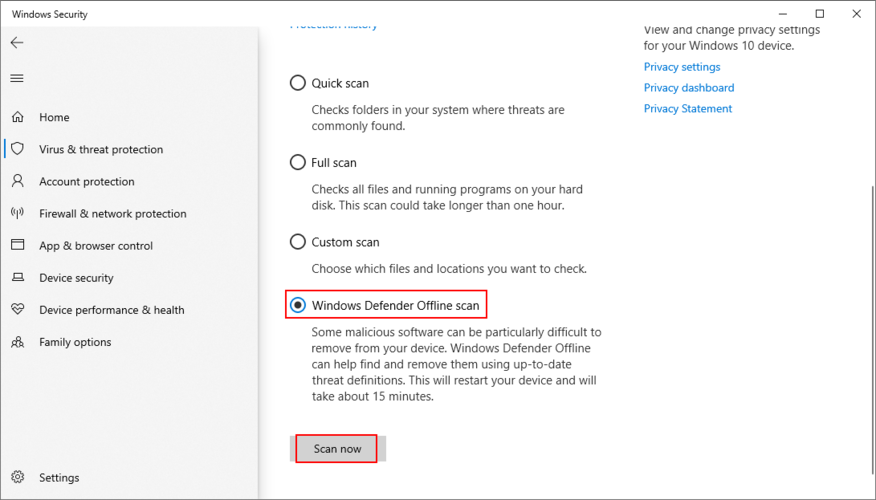
- If the scanner doesn’t find any threats, pick Windows Defender Offline scan and click Scan now
- Make sure to quarantine or remove any files identified as threats by Defender. If you think it makes a mistake, add those files to the whitelist to exclude them from further scans
- Restart your PC
15. Uninstall recent software
Programs you installed on your computer lately might cause software conflicts with Windows Update which culminate in error 0x8024401c. So you should uninstall any recent and suspicious applications, especially if you started experiencing Windows Update issues right after adding them to your PC. Here’s how:
- Right-click the Start button and select Apps and Features
- Click Sort by and select Install date to view recent programs first
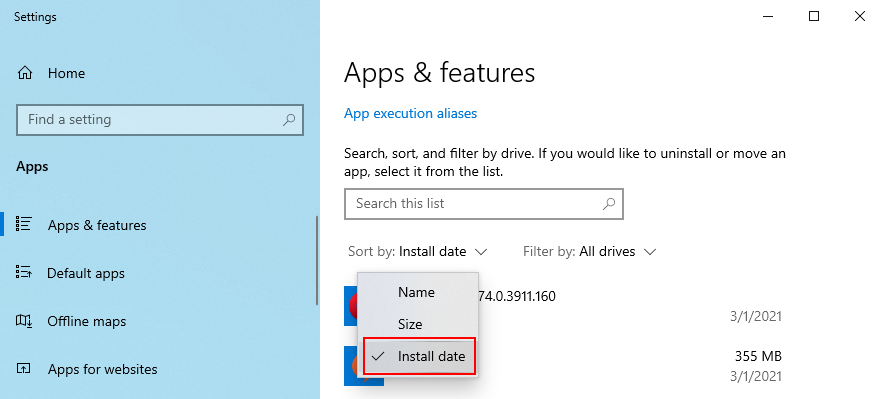
- Select the first app in the list and click Uninstall
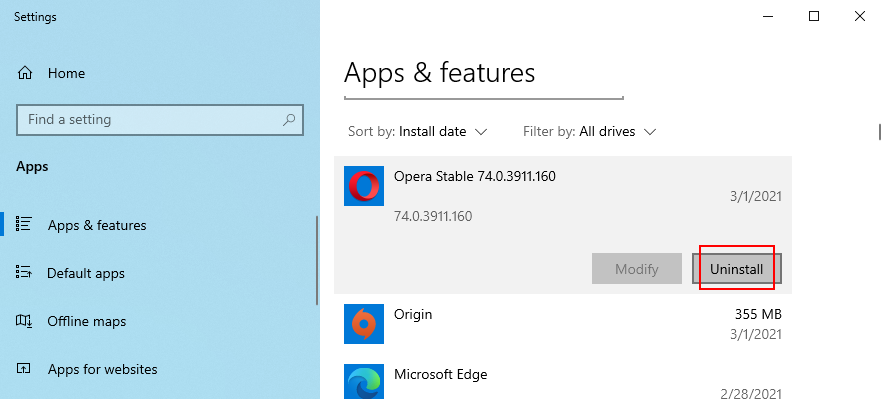
- Click Uninstall again to confirm
- Restart your computer
16. Uninstall system updates
Certain Windows updates can cripple your operating system and prevent it from accessing further updates. You should remove it from your PC to get rid of error code 0x8024401c. Here’s what you need to do:
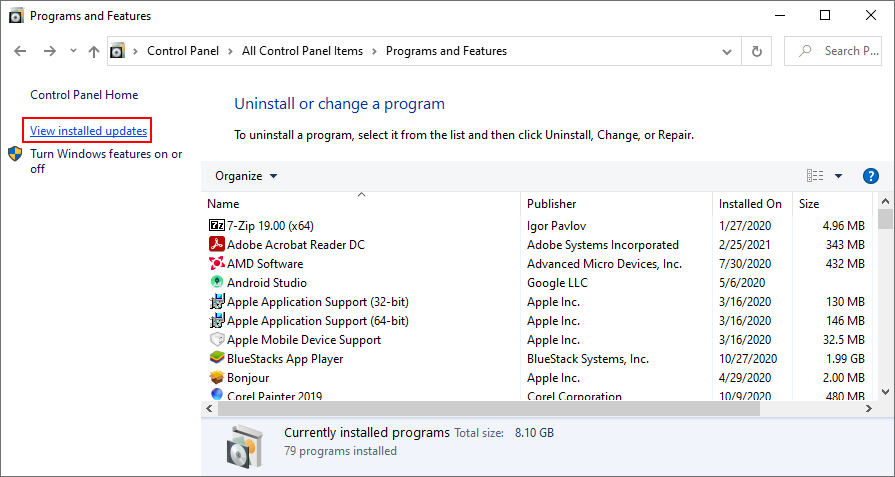
- Press Win key + R, enter appwiz.cpl, and hit the Enter key
- Click View installed updates
- Click the Installed On column to view the newest updates first
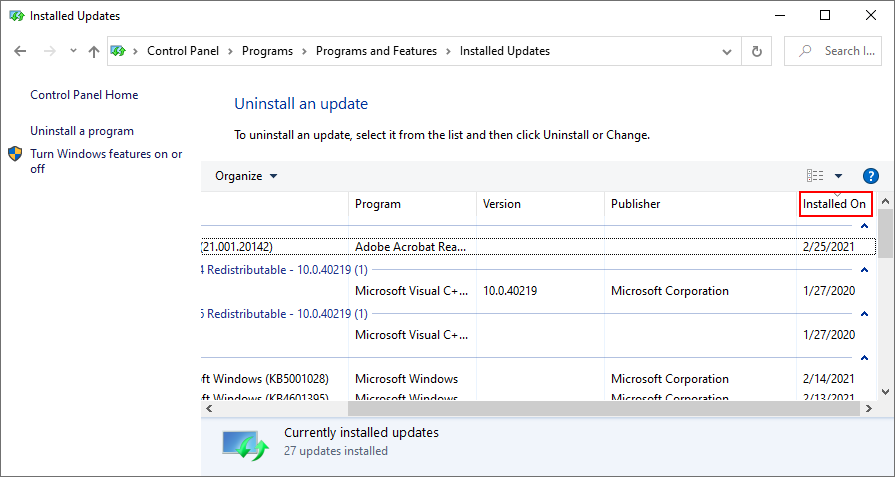
- In the Microsoft Windows category, double-click the first update
- Click Yes to confirm the update
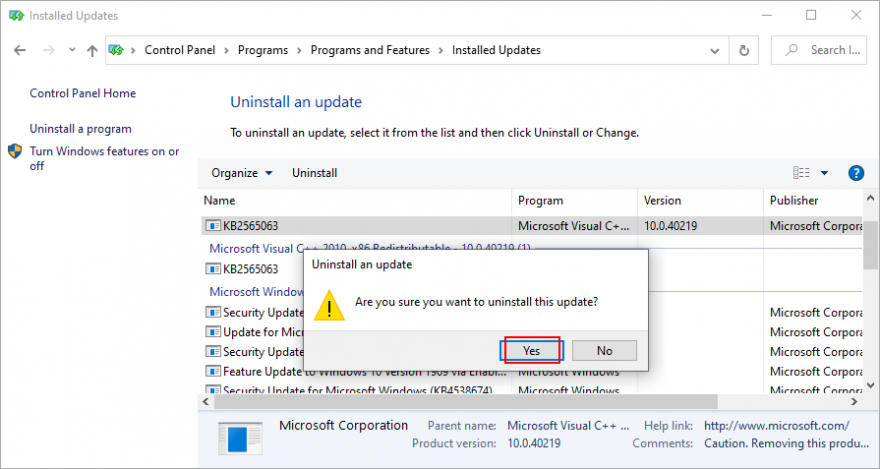
- Reboot your PC
17. Check the disk space
If you don’t have enough free space on the system drive, Windows Update won’t be able to download and install anything. But you can fix this problem by increasing the volume size with the help of a partition manager like Disk Management.
How to use Disk Management:
- Right-click the Start button and go to Disk Management
- Select a local drive where Windows is not installed
- Right-click the entry and choose Shrink Volume
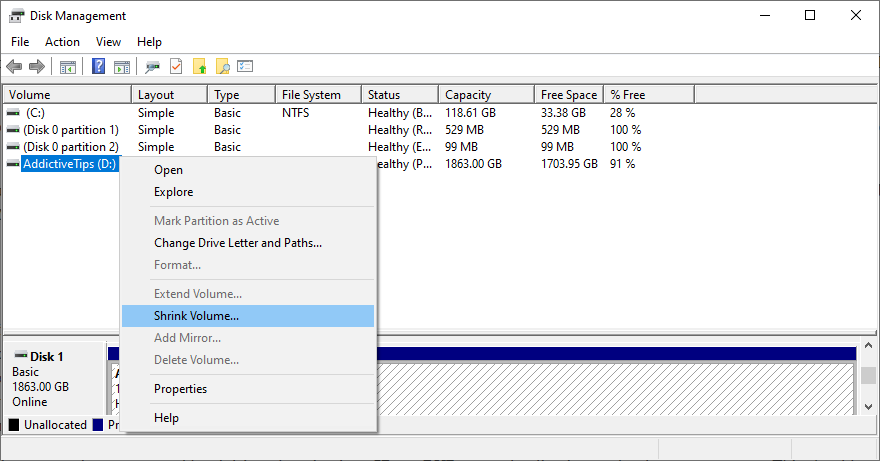
- Set the new partition size and click Shrink
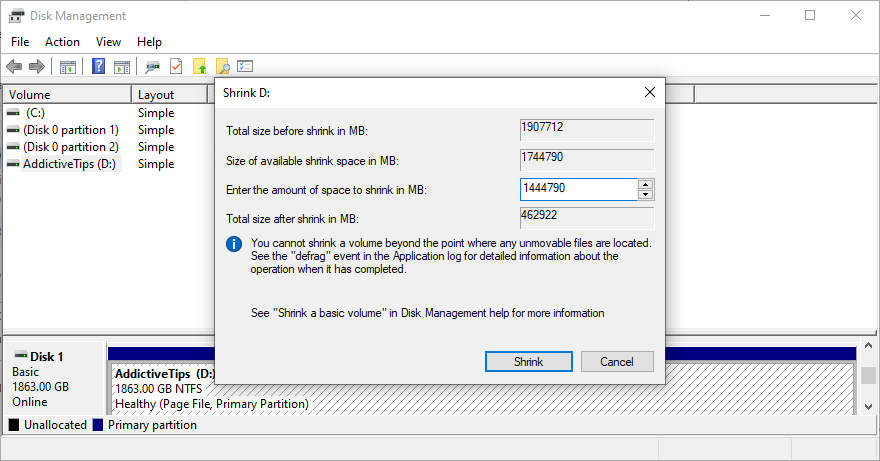
- Return to the main window and select the Windows partition
- Right-click the entry and pick Extend Volume
- Follow the on-screen instructions and restart your computer
If you don’t have enough room on another volume to increase the Windows drive size, you can uninstall large applications and games you don’t play anymore, in order to clear up your disk space.
Furthermore, you should move large files to an external disk, burn them to DVDs, or upload them to a cloud storage account. As far as junk files and unnecessary data is concerned, you can turn to a system cleaner like Disk Cleanup.
How to use Disk Cleanup:
- Sign in to Windows 10 using an administrator account
- Go to Downloads and Recycle Bin. Make sure to copy or restore any important files since these folders will be cleared
- Press Win key + R, type control panel, and press Enter
- Select Administrative Tools
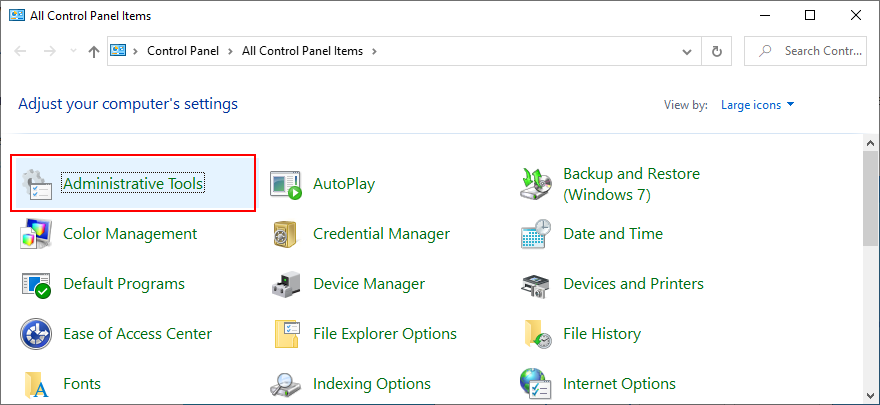
- Double-click to open Disk Cleanup
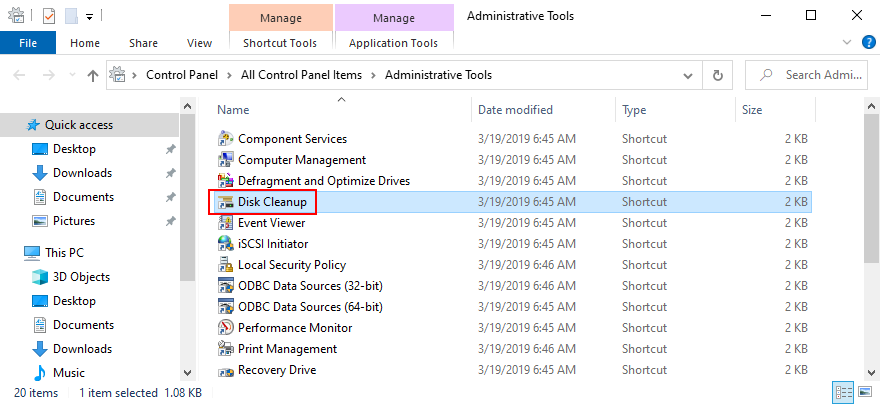
- Choose the partition where Windows is installed (default C:) and click OK
- Select all items at Files to delete and click Clean up system files
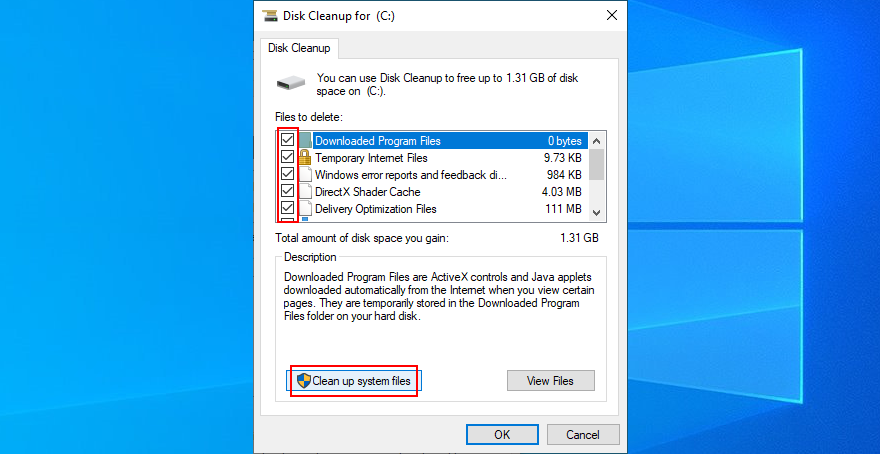
- Disk Cleanup starts a file search. Once it finishes, pick all items again and click OK
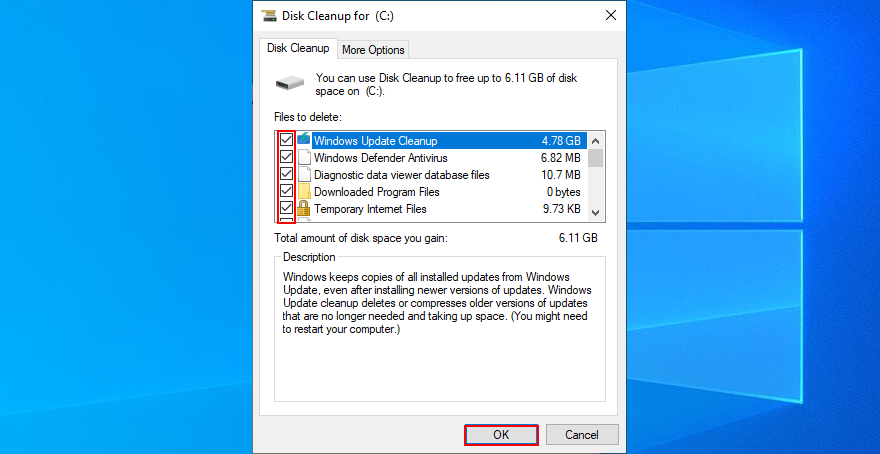
- Patiently wait while Windows deletes all junk files. Then, restart your computer
18. Check your Internet connection
Windows Update error 0x800705b4 could be caused by network connectivity problems, so you should verify the stability of your Internet connection and make it faster. Here are some suggestions:
- Reboot your router
- Move your device closer to the router
- Connect to a 5Ghz Wi-Fi network
- Disconnect other devices from your wireless network
- Terminate applications that use a lot of network bandwidth, such as torrenting clients and streaming services
- Run the Internet Connections troubleshooter
- Empty the DNS cache or change DNS servers
- Set up a wired Internet connection
- Run a ping test in both wired and wireless mode
- Check your VPN or proxy settings
- Contact our ISP
19. Use System Restore
If you can’t identify the software event that led to Windows Update error 0x8024401c, you can use System Restore to roll back Windows 10 to a checkpoint that was recorded before you started having PC problems. But you will lose all applications installed after recording the restore point.
How to use System Restore:
- Click the Start button, search for Control Panel, and open this app
- Visit the Recovery section
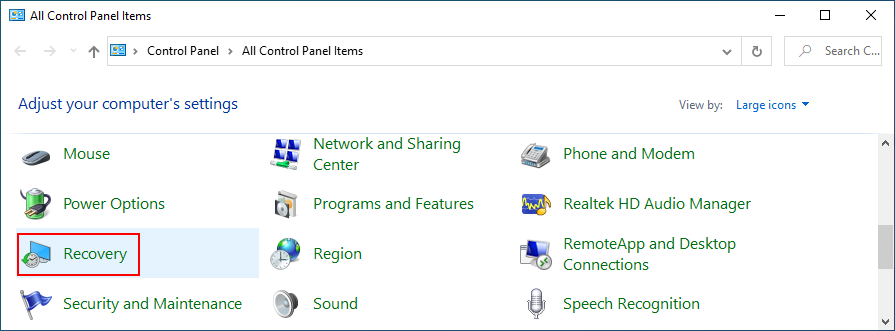
- Click Open System Restore (you need administrator rights)
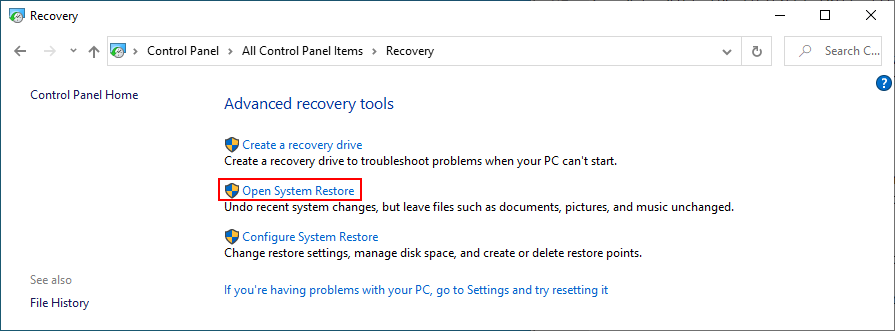
- Select a restore point or click Show more restore points for more options. You can also click Scan for affected programs to see which applications will disappear
- Click Next and follow the steps
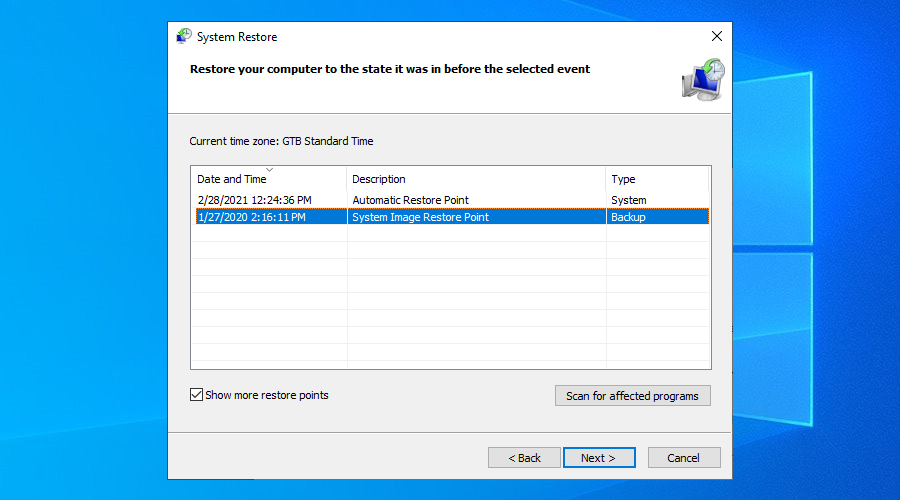
- Your PC will reboot after the system restore
20. Reset your PC
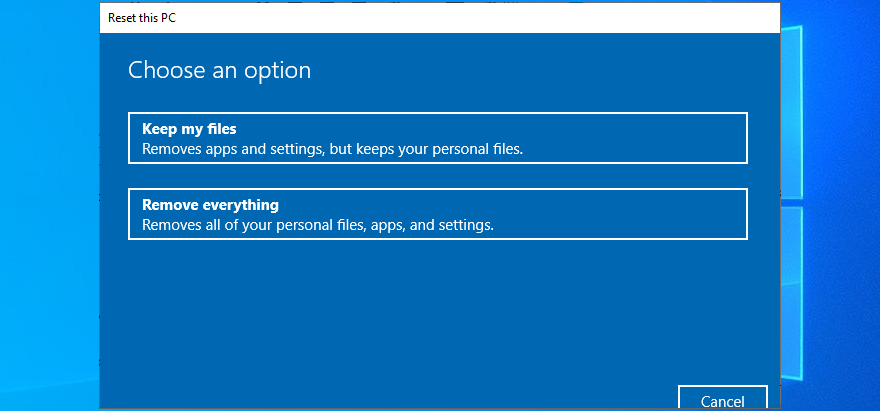
If System Restore fails to work, you can reset Windows 10 to factory mode without losing your personal files. However, this will uninstall all your applications and restore all computer settings to default, which means that you will have to spend a little time to set up your PC afterward. Here’s what you need to do:
- Press the Win key, search for Recovery options, and hit the Enter key
- At Reset this PC, click Get started
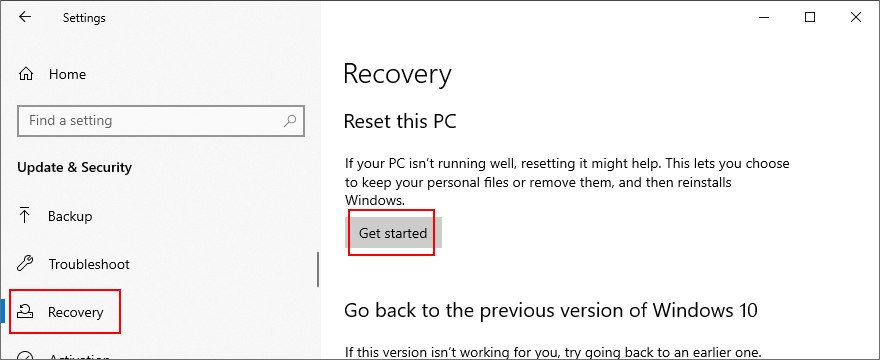
- Choose Keep my files and follow the step-by-step instructions
Windows Update error 0x8024401c can be solved
To recap, 0x8024401c is a Windows 10 error code that stops Windows Update and blocks system updates on your computer. However, you can try to fix it by using the Windows Update troubleshooter and Windows Update Diagnostic, as well as by checking Services, Group Policy and system registry settings.
It’s also a good idea to reset Windows Update from the Command Prompt, update or roll back your network drivers, unplug peripheral devices, reinstall devices, check your hard disk and operating system for errors and file corruption, verify firewall settings, or run a malware scan.
Moreover, you can uninstall recent software and malfunctioning system updates, check your free disk space, verify the quality of your Internet connection, roll back Windows 10 to a previous checkpoint using System Restore, and reset your PC to default settings if everything else fails.
How did you finally manage to get rid of error 0x8024401c and restore Windows Update? Let us know in the comments below.
