Sistem tidak dapat mencari fail yang dinyatakan ialah mesej ralat yang boleh berlaku pada Windows 10 apabila cuba membuka atau memadam fail, melancarkan aplikasi, mengemas kini OS, menyandarkan data atau melakukan operasi fail lain.
Dalam senario yang lebih teruk, ralat muncul apabila cuba but sistem pengendalian anda, sebaliknya menunjukkan skrin oren . Walau bagaimanapun, terdapat beberapa cara anda boleh membaiki masalah ini, bergantung pada tempat anda mengalaminya.
Bagaimana untuk membetulkan Sistem tidak dapat mencari ralat yang ditentukan fail pada Windows 10
Semak pembaikan berikut. Jika boleh, pastikan anda membuat titik pemulihan sistem supaya anda boleh memulihkan Windows 10 jika anda perlu memulakan penyelesaian dari awal.
1. Mulakan semula komputer anda
Mungkin Windows sedang menunjukkan Sistem tidak dapat mencari ralat yang ditentukan oleh fail disebabkan oleh proses gantung atau perkhidmatan tidak bertindak balas. Jadi adalah idea yang baik untuk memulakan dengan sesuatu yang asas seperti memulakan semula komputer anda. Idea yang lebih baik ialah but semula PC anda. Selepas penutupan, cabut plag sumber kuasa dan pastikan butang kuasa ditekan selama 20-30 saat untuk mengosongkan cache PC. Kemudian, but sistem pengendalian anda dan semak sama ada masalah anda kini telah diselesaikan.
2. Kemas kini Windows 10
Menambah kemas kini terkini pada sistem pengendalian anda adalah penting untuk penyelenggaraan komputer anda, yang dimungkinkan oleh Windows Update. Perkhidmatan ini harus berjalan secara automatik di latar belakang, menyemak kemas kini secara berterusan dan menggesa anda apabila tindakan selanjutnya diperlukan.
Lihat dalam pusat pemberitahuan atau menu pilihan kuasa untuk sebarang titik merah yang menunjukkan permulaan semula yang belum selesai, terutamanya jika anda tidak mematikan komputer anda untuk masa yang lama. Jika tidak, anda boleh menyemak kemas kini secara manual:
- Klik butang Mula , taip semak kemas kini dan tekan Enter
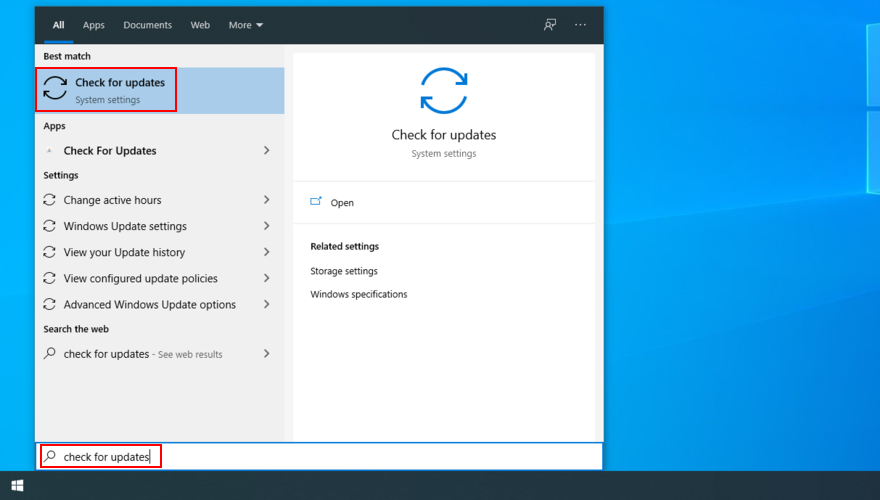
- Klik Semak kemas kini dan tunggu
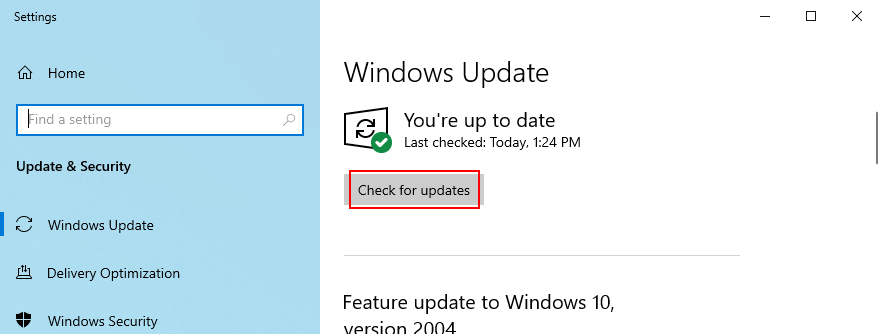
- Jika ada apa-apa yang belum selesai, klik Muat turun
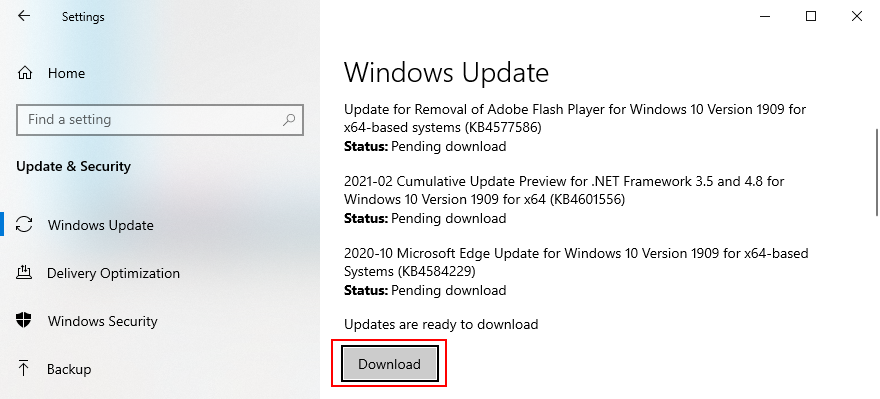
- Jangan tutup atau mulakan semula PC anda pada masa ini. Setelah kemas kini dimuat turun dan dipasang, lakukan but semula PC untuk memuktamadkan tugas
3. Jalankan penyelesai masalah Kemas Kini Windows
Ramai pengguna tidak dapat menjalankan Windows Update kerana ralat Sistem tidak dapat mencari fail yang ditentukan . Dalam kes itu, anda harus menggunakan penyelesai masalah Kemas Kini Windows untuk mencari dan menyelesaikan masalah biasa yang menghalang apl ini daripada berjalan:
- Klik butang Mula , taip tetapan Selesaikan Masalah dan tekan Enter
- Klik Penyelesai masalah tambahan
- Pilih Kemas Kini Windows dan klik Jalankan penyelesai masalah
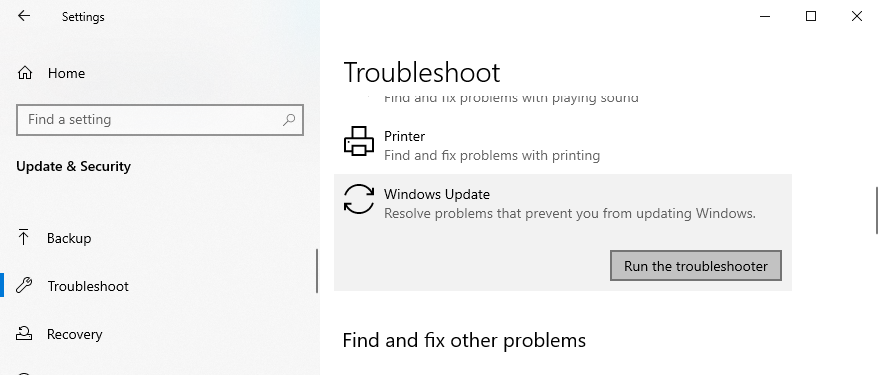
- Gunakan sebarang pembetulan yang dikenal pasti oleh penyelesai masalah
- Mulakan semula PC anda dan cuba jalankan Windows Update sekarang
4. Semak perkhidmatan Kemas Kini Windows
Sesetengah pengguna melumpuhkan perkhidmatan Kemas Kini Windows kerana ia mengganggu aktiviti mereka dan mengambil masa selama-lamanya untuk menutup, memulakan atau memulakan semula komputer mereka semasa tugasan mendesak. Walau bagaimanapun, jika ia kekal dilumpuhkan, perkhidmatan itu tidak akan dapat mengambil kemas kini kritikal, mengakibatkan pelbagai masalah komputer.
Bagaimana untuk memulakan semula perkhidmatan Kemas Kini Windows:
- Tekan kekunci Win + R , taip services.msc , dan tekan Enter untuk membuka apl Perkhidmatan
- Cari dan klik dua kali Windows Update untuk melihat sifatnya
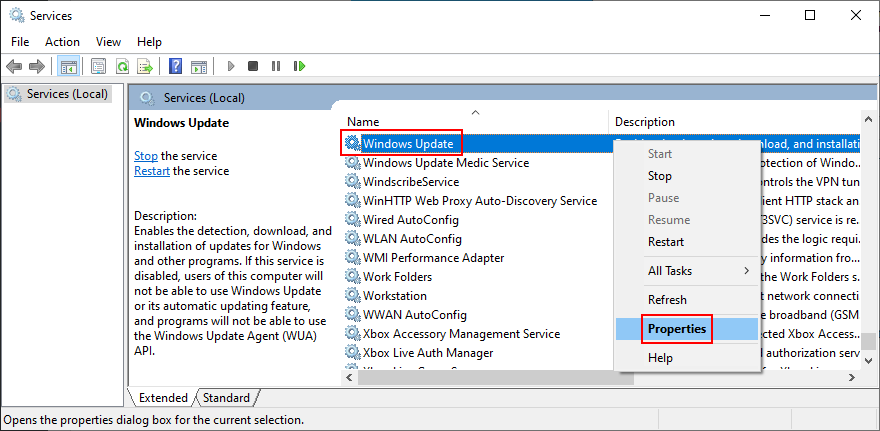
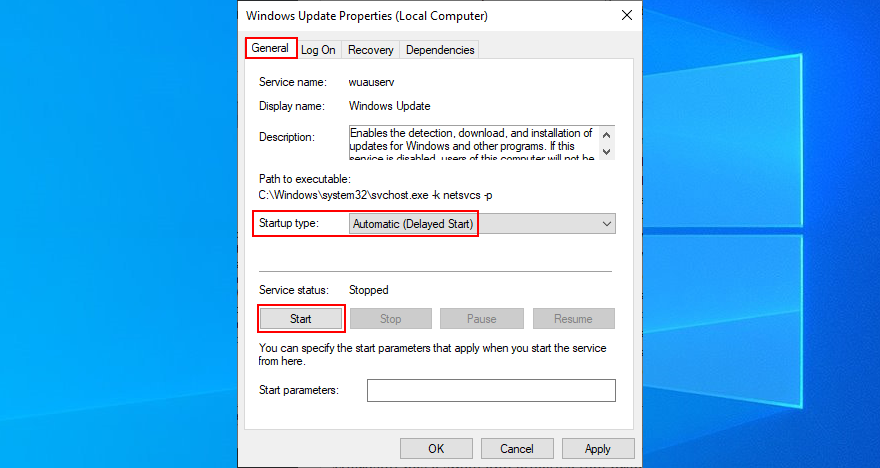
- Tetapkan jenis Permulaan kepada Automatik (Permulaan Tertunda)
- Klik butang Mula untuk memulakan perkhidmatan dengan segera
- Klik Guna dan kembali ke tetingkap utama
- Cari Perkhidmatan Pemindahan Pintar Latar Belakang dan perkhidmatan Kesediaan Apl untuk menukar tetapan yang sama di atas
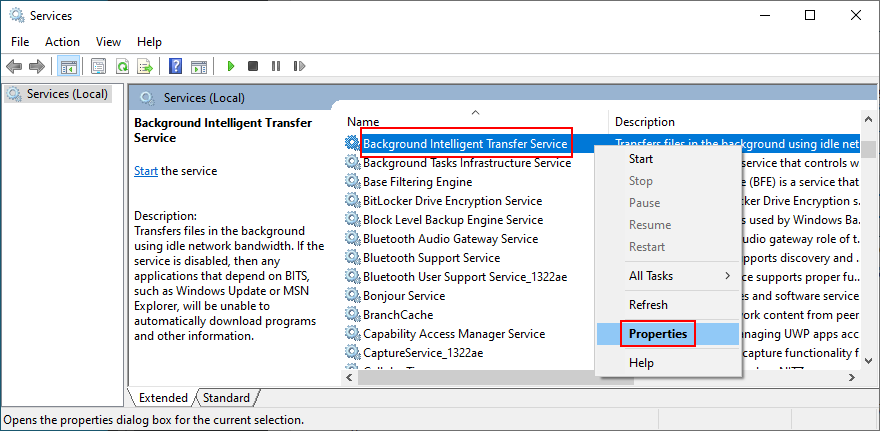
Ia juga merupakan idea yang baik untuk mematikan Perkhidmatan Senarai Rangkaian, yang kadangkala bercanggah dengan perkhidmatan Kemas Kini Windows:
- Cari dan klik dua kali Perkhidmatan Senarai Rangkaian untuk mengakses sifatnya
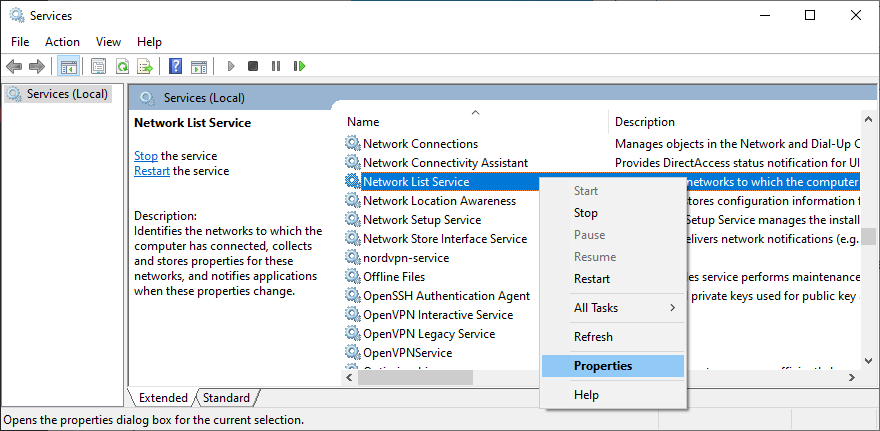
- Tetapkan jenis Permulaan kepada Dilumpuhkan
- Klik Berhenti untuk menamatkan perkhidmatan
- Klik Guna dan keluar ke desktop
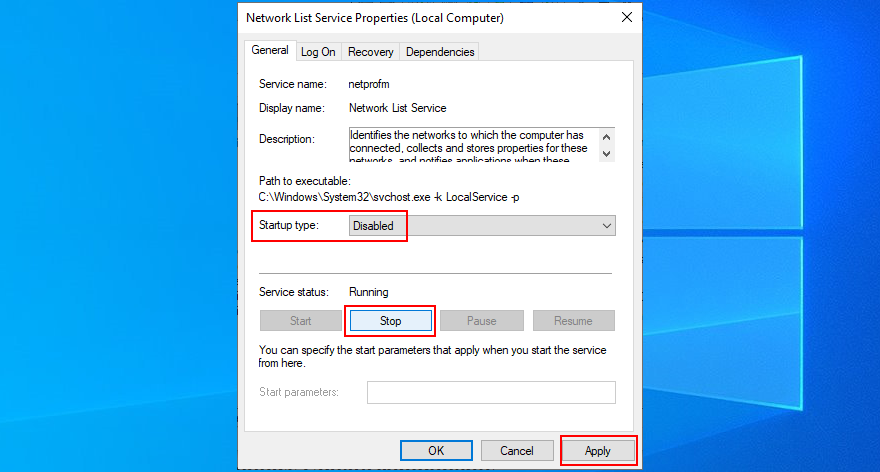
- Cuba jalankan Windows Update sekarang
5. Mulakan Windows 10 dalam Safe Mode
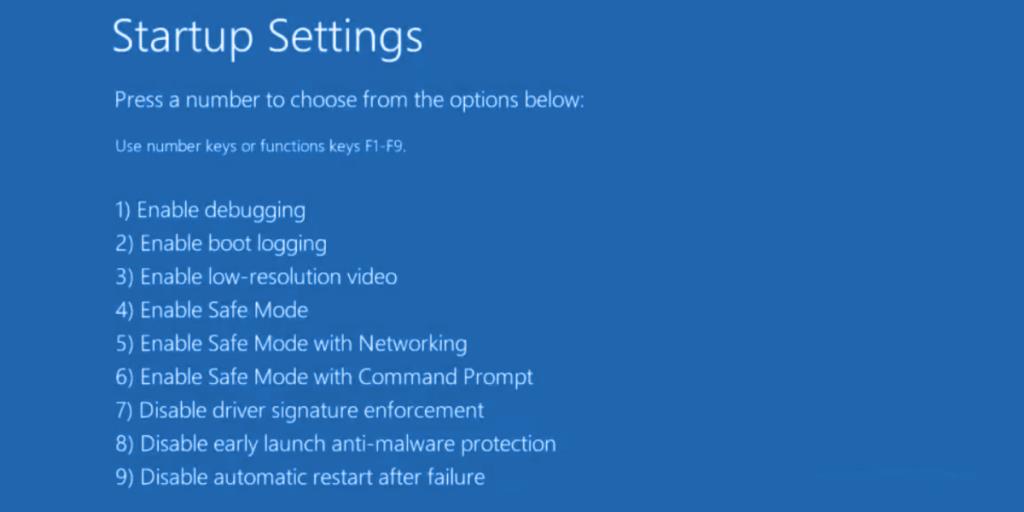
Jika ralat Sistem tidak dapat mencari fail yang ditentukan dicetuskan oleh pemacu atau perkhidmatan pihak ketiga yang rosak, anda boleh menjalankan Windows 10 dalam Safe Mode untuk mematikan secara automatik semua pemacu dan perkhidmatan yang bukan milik sistem pengendalian anda. Inilah yang perlu anda lakukan:
- Klik kanan butang Mula dan pergi ke Tetapan
- Pilih Kemas Kini & Keselamatan
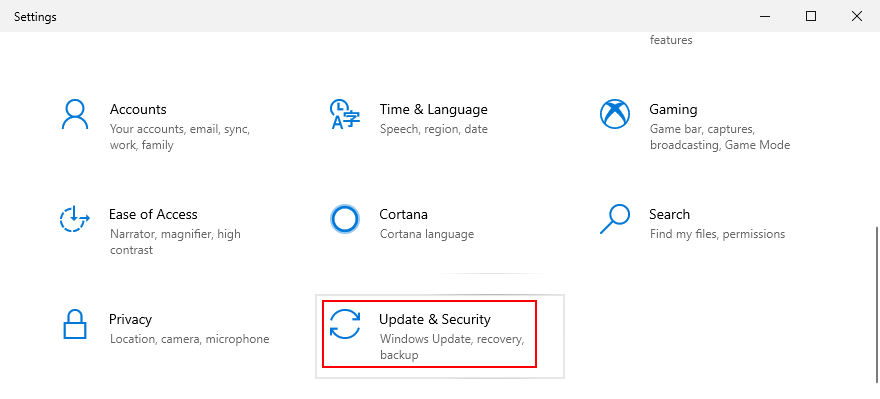
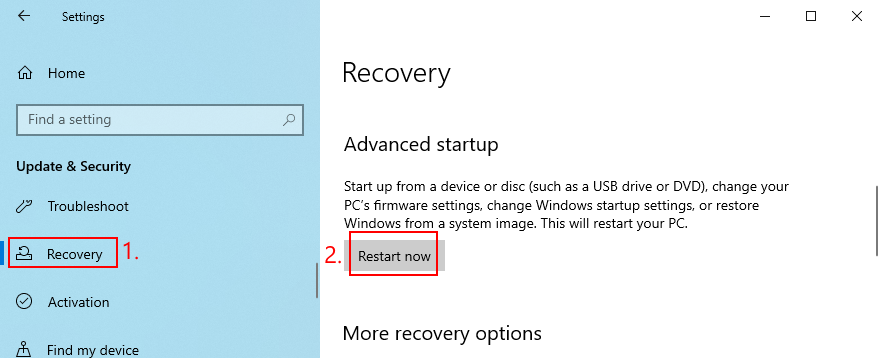
- Pergi ke Pemulihan
- Pada Mula Lanjutan , klik Mulakan semula sekarang
- Pergi ke Selesaikan Masalah > Pilihan lanjutan > Tetapan Permulaan

- Klik Mulakan semula
- Jika anda tidak memerlukan akses Internet, tekan F4 . Jika tidak, tekan F5 untuk mendayakan Mod Selamat dengan rangkaian
6. Lumpuhkan apl permulaan
Jika Mod Selamat tidak membantu membetulkan ralat Sistem tidak dapat mencari fail yang ditentukan , cuba lumpuhkan program permulaan . Sebagai contoh, anda mungkin mempunyai aplikasi keselamatan yang dijadualkan berjalan secara automatik setiap kali anda menghidupkan komputer anda, yang bercanggah dengan proses sistem kritikal. Adalah sukar untuk mengenal pasti pihak yang bersalah, jadi lebih baik untuk mematikan segala-galanya.
Bagaimana untuk melumpuhkan program permulaan:
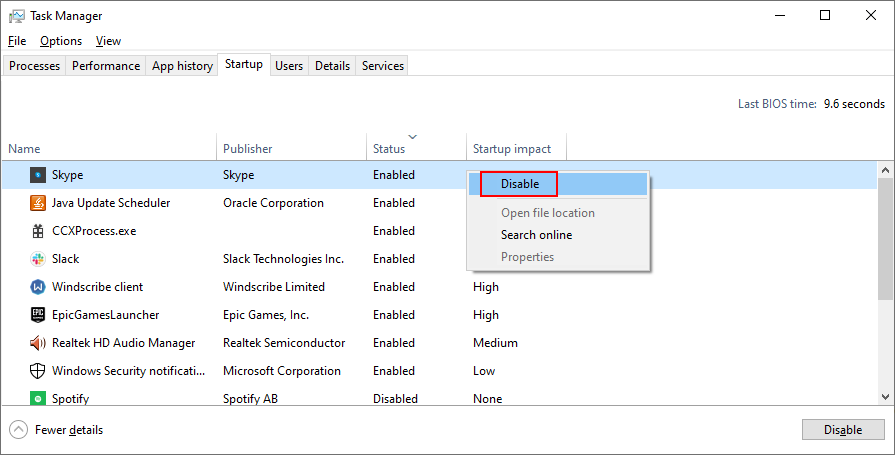
- Klik kanan bar tugas Windows 10 dan pilih Pengurus Tugas
- Pergi ke Startup seksyen
- Untuk setiap aplikasi dengan status Didayakan , pilih entrinya dan klik Lumpuhkan
- Mulakan semula komputer anda
7. Bersihkan but OS
Melakukan but bersih pada Windows 10 agak serupa dengan Safe Mode. Perbezaannya ialah but bersih melumpuhkan bukan sahaja peranti dan perkhidmatan yang tidak penting tetapi juga item permulaan. Begini cara mengkonfigurasinya:
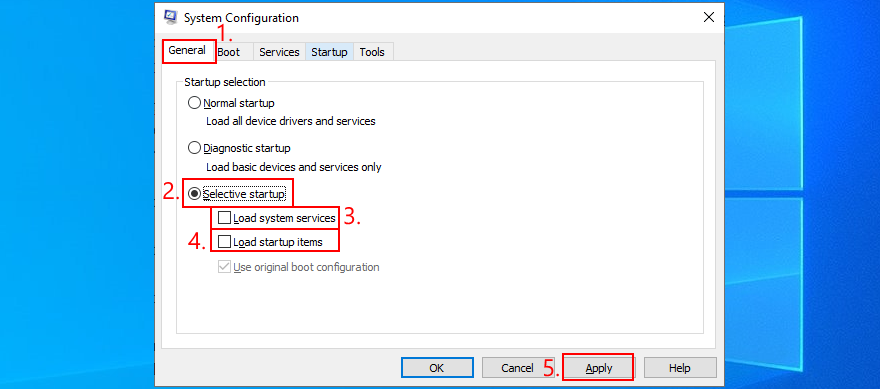
- Tekan kekunci Win + R , taip msconfig , dan tekan Enter untuk membuka aplikasi Konfigurasi Sistem
- Kekal dalam tab Umum
- Pilih Permulaan terpilih
- Nyahtanda Muatkan perkhidmatan sistem dan Muatkan item permulaan
- Klik Guna
- Beralih ke tab Permulaan
- Klik Buka Pengurus Tugas
- Lumpuhkan semua apl permulaan dengan status Didayakan

- Mulakan semula komputer anda
Jika kemudian anda perlu memulihkan tetapan but kepada lalai, buka apl Konfigurasi Sistem dan pilih Permulaan biasa .
8. Nyahpasang aplikasi pihak ketiga
Mendapatkan Sistem tidak dapat mencari ralat yang ditentukan fail selepas melancarkan aplikasi boleh menandakan konflik perisian. Mungkin program anda bertembung dengan satu lagi, seperti dua program antivirus dengan enjin masa nyata yang berasingan. Tiada apa yang perlu dilakukan kecuali mengalih keluar aplikasi lain daripada komputer anda.
- Klik kanan butang Mula dan pilih Apl dan Ciri
- Cari dan pilih program daripada senarai
- Klik Nyahpasang dan kemudian sekali lagi untuk mengesahkan
- Teruskan dengan ahli sihir
- Mulakan semula komputer anda
Walau bagaimanapun, jika program telah menukar tetapan pendaftaran, penyahpasang lalai Windows tidak akan membantu memulihkannya. Sebaliknya, anda harus menggunakan penyahpasang perisian yang memadamkan bukan sahaja program tetapi juga apa-apa baki fail dan entri pendaftaran.
9. Putuskan sambungan peranti luaran
Konflik juga mungkin disebabkan oleh peranti persisian yang tidak disokong baru-baru ini dipalamkan ke dalam komputer anda. Jika anda baru-baru ini membeli atau menerima perkakasan baharu sebagai hadiah, seperti penyesuai Wi-Fi, fon kepala baharu, kamera web atau pemacu denyar USB, segera keluarkannya daripada PC anda dan kemudian mulakan semula untuk memeriksa sama ada ini menyelesaikan masalah tersebut . sistem tidak dapat mencari ralat yang ditentukan fail .
Ia mungkin bukan kesalahan peranti tetapi port anda. Cuba tukar port USB jika anda mempunyai berbilang pilihan yang tersedia. Jika tidak, palamkan hab USB berbilang port ke dalam komputer, dan kemudian peranti anda ke dalam hab dan bukannya terus ke dalam PC anda. Ia kadang-kadang berfungsi.
10. Jalankan CHKDSK
CHKDSK (Check Disk) ialah alat dalaman Windows yang boleh anda kendalikan daripada persekitaran baris arahan. Ia membantu membaiki isu rasuah cakera keras dan sektor buruk yang mungkin menghalang komputer anda daripada berjalan dengan betul dan menyebabkan sistem tidak dapat mencari ralat yang ditentukan oleh fail sebagai hasilnya.
Cara menggunakan CHKDSK:
- Klik butang Mula , taip Prompt Perintah , pilih apl ini dan klik Jalankan sebagai pentadbir
- Jika Windows dipasang pada pemacu C: lalai, taip
chkdsk c: /f /r. Jika tidak, pastikan anda menggantikan c:dengan huruf partition OS
- Apabila diminta untuk menjadualkan CHKDSK pada but semula sistem seterusnya, taip y dan tekan Enter
- But semula PC anda dan tunggu sehingga CHKDSK melakukan tugasnya
11. Jalankan SFC
Jika anda masih mendapat ralat Sistem tidak dapat mencari fail yang ditentukan selepas menjalankan alat CHKDSK, mungkin anda harus mengalihkan perhatian anda kepada sistem kerana ia mungkin mempunyai fail yang rosak atau hilang. SFC (Pemeriksa Fail Sistem) boleh membantu anda dalam hal ini.
Cara menggunakan SFC:
- Mulakan Windows 10 dalam Safe Mode
- Tekan kekunci Win + R dan tekan Enter run Command Prompt
- Tulis
sfc /scannowdan tekan Enter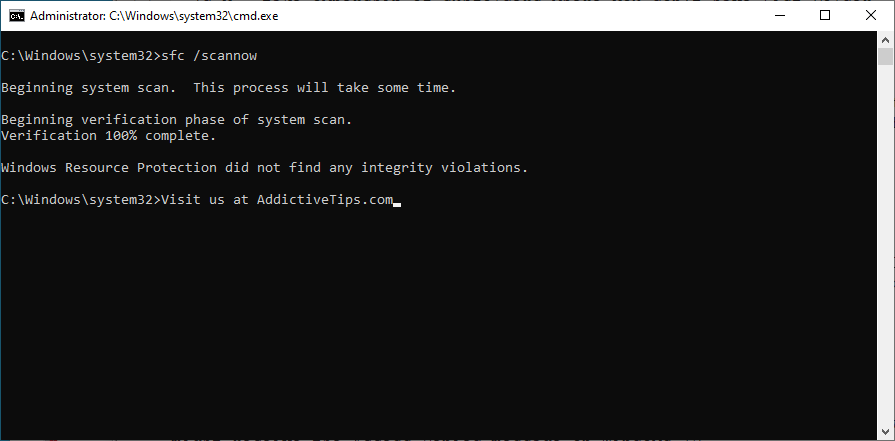
- Selepas SFC selesai, but semula PC anda
12. Jalankan DISM
DISM (Deployment Image Servicing and Management) ialah alat yang lebih maju daripada SFC kerana ia boleh menyemak integriti stor komponen dalam fail imej Windows.
Cara menggunakan DISM:
- Mulakan Windows 10 dalam Safe Mode
- Buka Prompt Perintah
- Taip
DISM /online /cleanup-image /scanhealthdan tekan Enter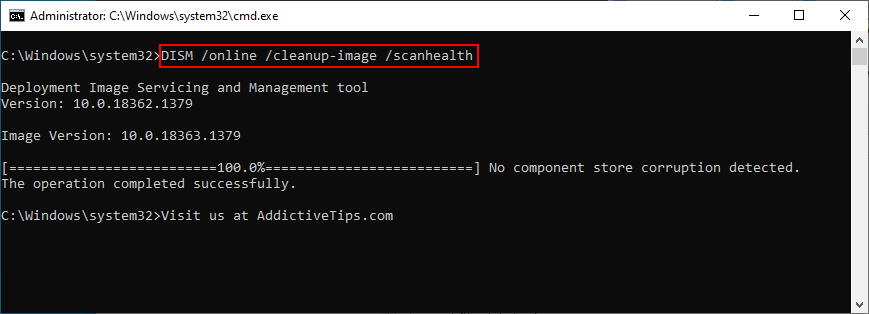
- Jika ia mengenal pasti sebarang ralat, jalankan
DISM /online /cleanup-image /restorehealthuntuk menyingkirkannya
- Selepas ia selesai, mulakan semula Windows 10 dalam Safe Mode
- Buka Prompt Perintah dan jalankan SFC (
sfc /scannow)
- Mulakan semula PC anda seperti biasa
13. Rujuk log sistem
Anda boleh mengetahui pemacu peranti yang tepat yang menyebabkan ralat Sistem tidak dapat mencari fail yang ditentukan dengan merujuk fail log sistem. Inilah yang perlu anda lakukan:
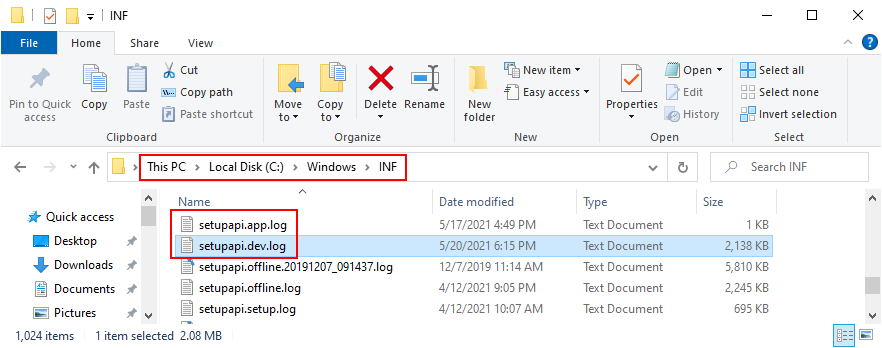
- Tekan kekunci Win + E untuk membuka Windows Explorer
- Pergi ke alamat berikut:
%SystemRoot%\INF
- Cari dan buka fail setupapi.dev atau setupapi.dev.log dalam Notepad
- Tekan Ctrl + F , taip sistem tidak dapat mencari fail dan tekan Enter
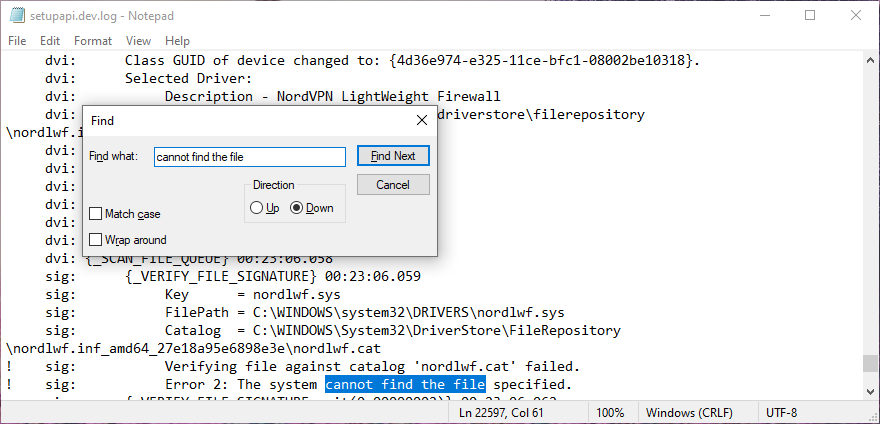
- Di FilePath , salin nama pemacu
- Buka penyemak imbas web dan masukkan nama fail pemacu untuk mengetahui peranti miliknya
Sebaik sahaja anda mengenal pasti peranti yang bersalah, anda boleh mengambil tindakan selanjutnya dalam Pengurus Peranti (teruskan dengan penyelesaian berikut).
14. Pasang semula peranti dengan pantas
Dengan mengambil kira pemacu dan peranti yang terdapat dalam log sistem, anda harus pergi ke Pengurus Peranti untuk memasang semula peranti. Jika ia tidak dipasang dengan betul pada PC Windows 10 anda, kaedah ini harus membetulkannya. Inilah yang perlu anda lakukan:
- Right-click the Start button and select Device Manager
- Find the device and double-click it
- Switch to the Driver tab and click Driver Details
- Here you can double-check that the driver file matches the information you found in the system log
- Return to the main window of Device Manager
- Right-click the device and select Uninstall device
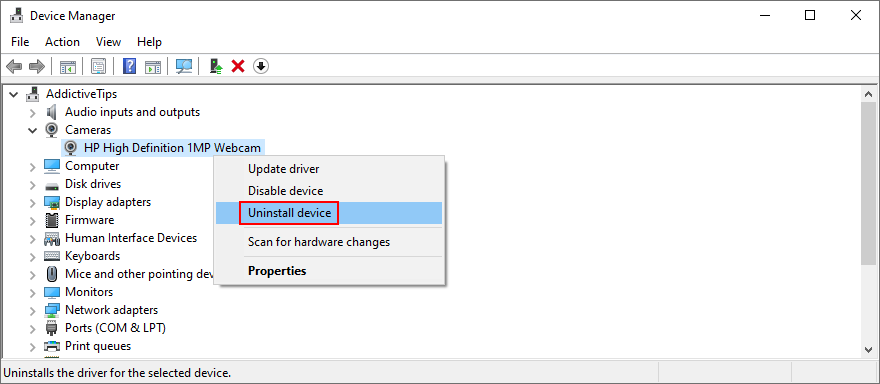
- Check Delete the driver software for this device and click Uninstall to confirm
- Open the Action menu and select Scan for hardware changes
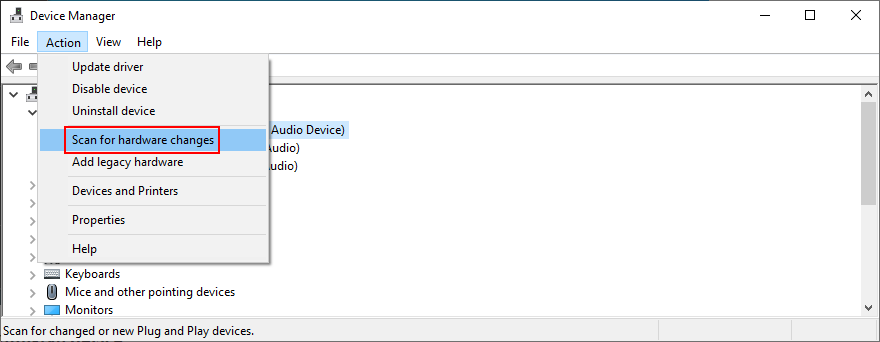
- If the device doesn’t reappear in Device Manager, reboot your PC since Windows will auto-reinstall the missing adapter
15. Update device drivers
It’s possible that the device is properly installed on your computer but its driver is outdated. The solution here is to update the obsolete drivers:
- Press Win key + R, type devmgmt.msc, and press Enter
- Right-click the device and select Update driver

- Click Search automatically for drivers and follow the on-screen instructions
If the online search doesn’t return any results, click Search for updated drivers on Windows Update. However, if you have already checked for system updates or the dedicated service doesn’t work, then you have to manually download and install drivers.
However, if you don’t want to risk installing an unsupported driver, it’s better to use a driver update tool. Besides, you can use it to update all your obsolete drivers at the same time, without risking compatibility issues.
16. Roll back drivers
If you have already downloaded an unsupported driver, you must roll it back to the previous version before performing the update. Here’s what you need to do:
- Click the Start button, search for Device Manager, and press Enter
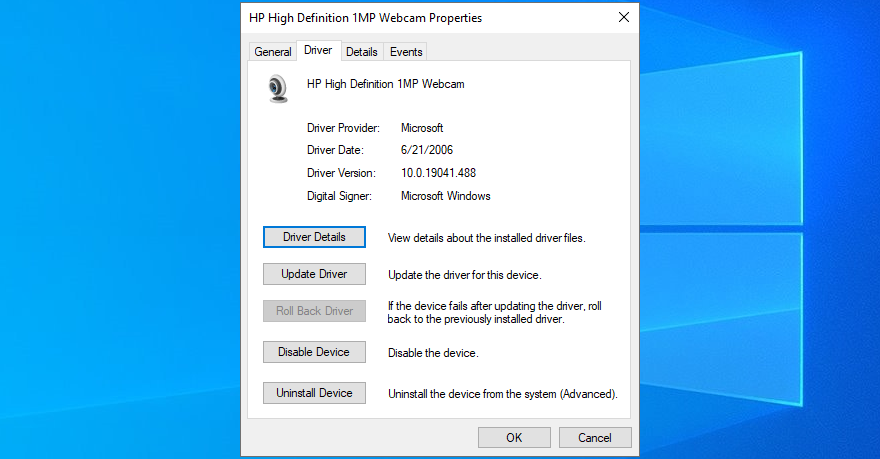
- Right-click a device and go to Properties
- Select the Driver section
- Click Roll Back Driver and follow the instructions. If the button is greyed out, you can skip this step since you can’t perform the rollback
17. Reinstall programs
Some software applications should be reset, repaired, or reinstalled, depending on the available operations. It certainly applies in the scenario where the The system cannot find the file specified error started appearing on your screen after a recent software change.
You have multiple options when it comes to Microsoft Store apps. Click the Start button, search for a program, and go to App settings. From that section, you can repair or reset the app with one click. And, if those two options fail, you should uninstall the app and reinstall it from Microsoft Store.
It’s simpler with regular software programs since the repair option rarely works. Instead, you can uninstall the application from Apps & Features, then download it again from its official website and proceed with the setup operation.
18. Check registry settings
If you can’t open files or launch applications due to the The system cannot find the file specified error, you should inspect registry settings to make sure that everything is in order. It’s pretty easy. Here’s what you need to do:
- Click the Start button, search for Registry Editor, and hit Enter to open this app
- Open the File menu and click Export
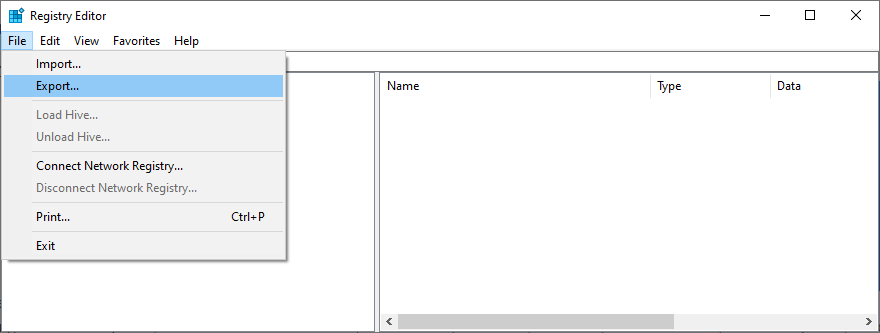
- Create a registry backup by setting a file name, picking a destination, and clicking Save. If you need to restore the initial registry configuration later, just double-click the .reg file
- Visit the following address:
Computer\HKEY_LOCAL_MACHINE\SOFTWARE\Microsoft\Windows\CurrentVersion\
- Look for the RunOnce key (looks like a folder in the tree on the left)
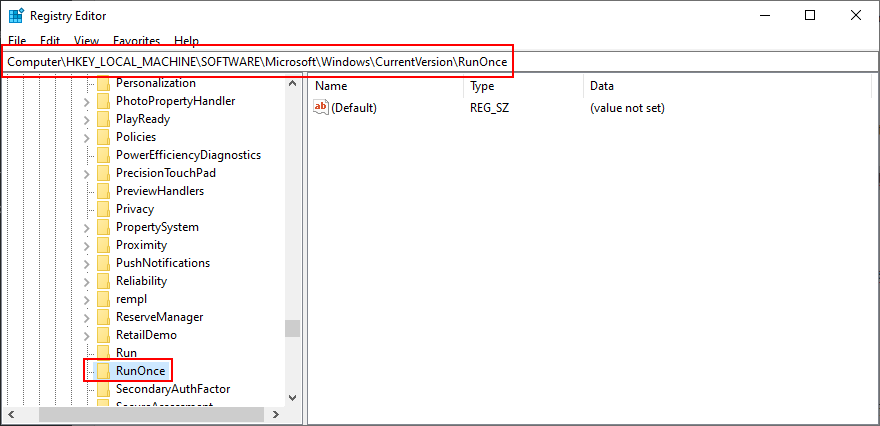
- If the key doesn’t exist, right-click the CurrentVersion key and select New > Key
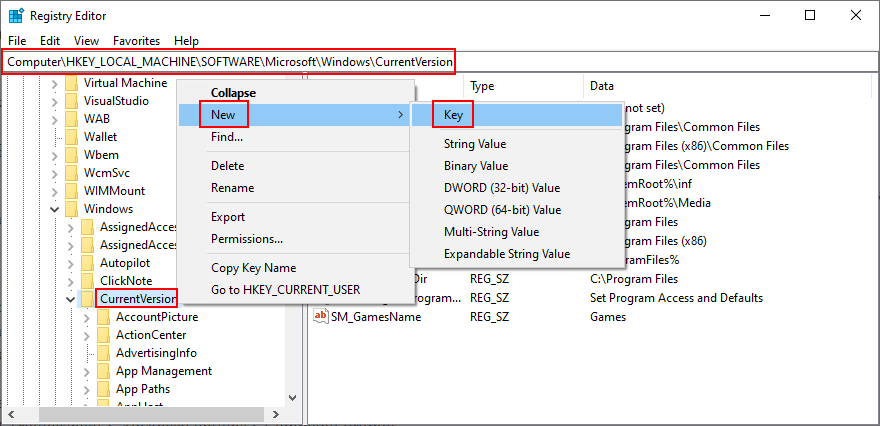
- Set the key name to RunOnce
- Now, go to this location:
Computer\HKEY_CURRENT_USER\SOFTWARE\Microsoft\Windows\CurrentVersion\
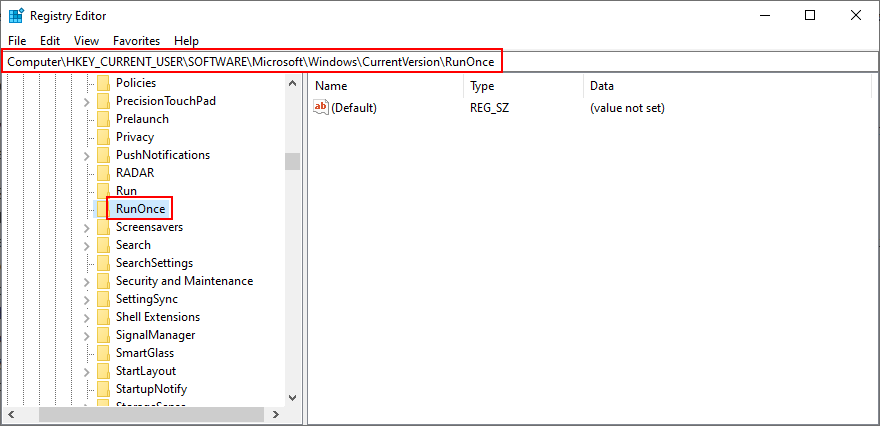
- Take the same steps: if the RunOnce key doesn’t exist, create it
- Exit Registry Editor
19. Restore the original registry settings
If the system registry suffered more modifications that you can’t identify, it’s easier to restore its configuration to factory values, which is more effective than using a registry cleaner. Here’s how to make it happen.
- Click the Start button, search for Registry Editor, and launch this tool
- Create a registry backup:
- Open the File menu and click Export
- Set a file name and destination
- Click Save to create a backup of the current registry settings
- Press the Windows key and click the power button to view power options
- While holding down the Shift key, click Restart to reboot Windows in troubleshooting mode
- Select Troubleshoot > Advanced options > Command Prompt
- Choose your PC account and enter your password to continue
- Write the following commands and hit Enter after each one:
-
cd %SystemRoot%\System32\config
-
ren %SystemRoot%\System32\config\DEFAULT DEFAULT.old
-
ren %SystemRoot%\System32\config\SAM SAM.old
-
ren %SystemRoot%\System32\config\SECURITY SECURITY.old
-
ren %SystemRoot%\System32\config\SOFTWARE SOFTWARE.old
-
ren %SystemRoot%\System32\config\SYSTEM SYSTEM.old
-
copy %SystemRoot%\System32\config\RegBack\DEFAULT %SystemRoot%\System32\config\
-
copy %SystemRoot%\System32\config\RegBack\DEFAULT %SystemRoot%\System32\config\
-
copy %SystemRoot%\System32\config\RegBack\SAM %SystemRoot%\System32\config\
-
copy %SystemRoot%\System32\config\RegBack\SECURITY %SystemRoot%\System32\config\
-
copy %SystemRoot%\System32\config\RegBack\SYSTEM %SystemRoot%\System32\config\
-
copy %SystemRoot%\System32\config\RegBack\SOFTWARE %SystemRoot%\System32\config\
- Restart your computer
20. Uninstall system updates
Some Windows updates end up harming your computer and causing various problems, including the The system cannot find the file specified error. In this case, the best course of action is to remove the most recent system update. Here’s how:
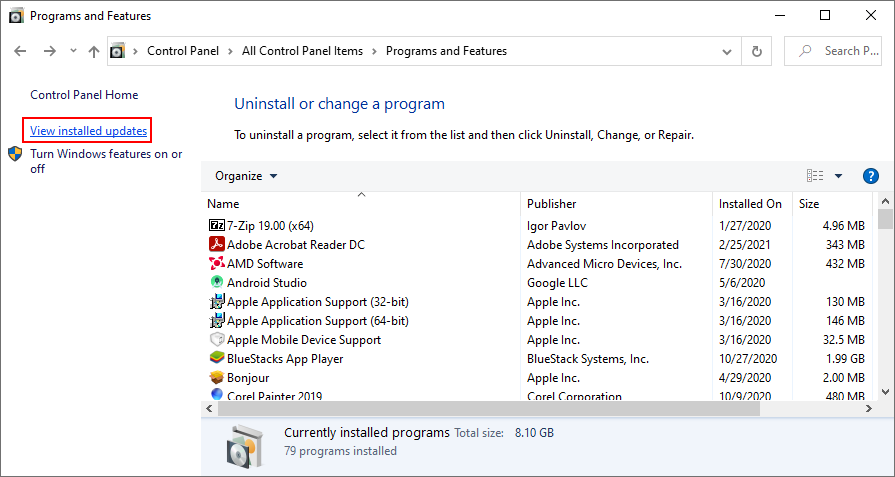
- Press Win key + R, type appwiz.cpl, and hit Enter

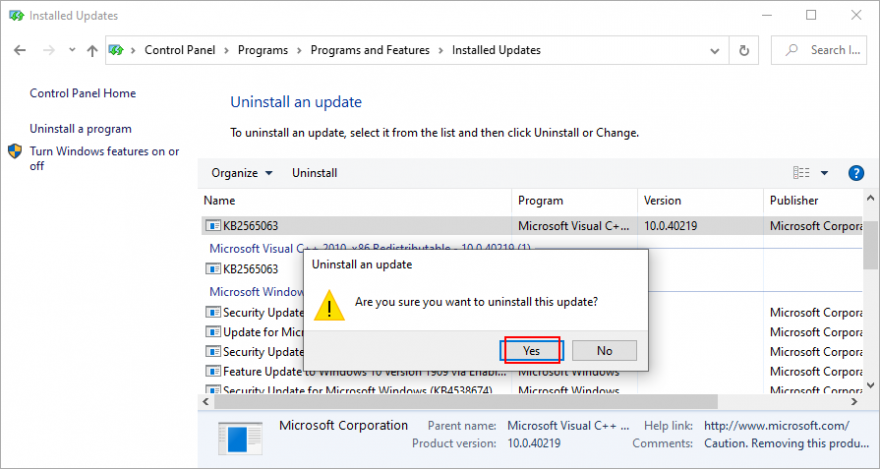
- Click View installed updates
- To sort the updates by time of installed, click the Installed On column
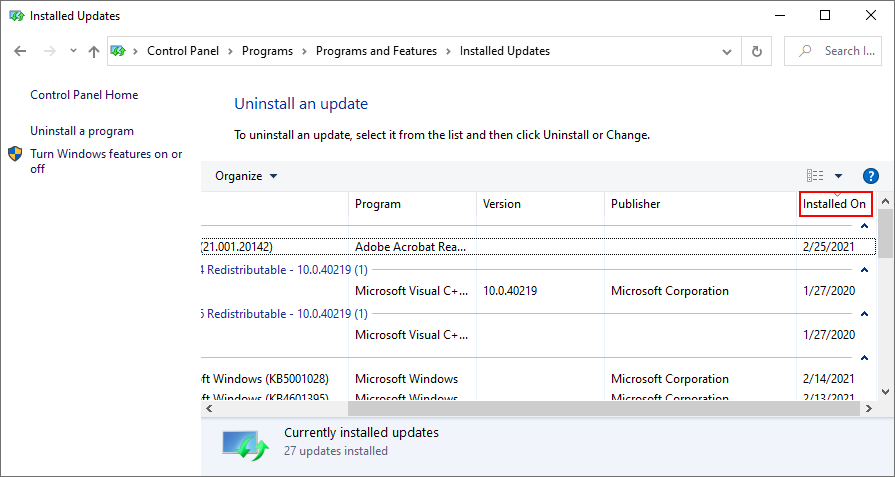
- Search for the Microsoft Windows category
- Double-click the first update in that group
- When asked to confirm its uninstall, click Yes
- Restart your computer
If you can’t boot Windows due to the The system cannot find the file specified error, you can interrupt the startup sequence three times in a row to start Windows troubleshooting mode. Then go to Troubleshoot > Advanced Options > Uninstall Updates.
21. Check your computer for malware
A malware agent could have infected system files, thus preventing you from opening any files or launching applications. To fix this issue, you can resort to Windows Defender:
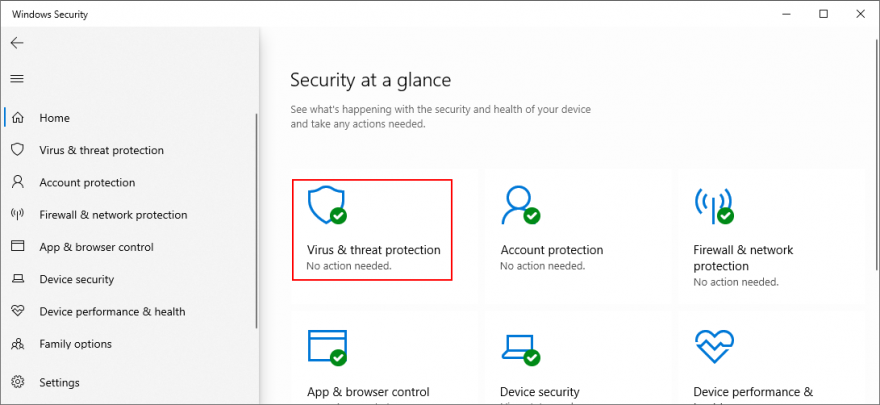
- Press the Win key, search for Windows Security, and open this app
- Select Virus & threat protection
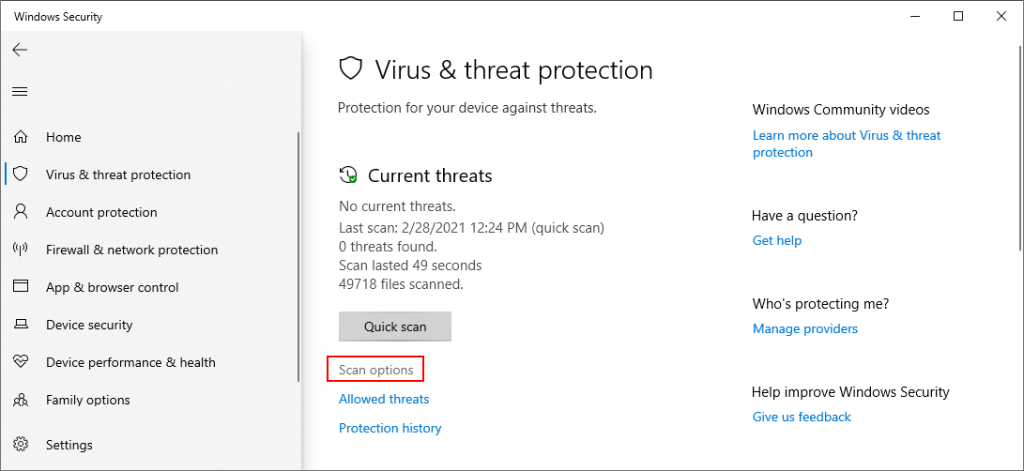
- Click Scan options
- Pick Quick scan and click Scan now
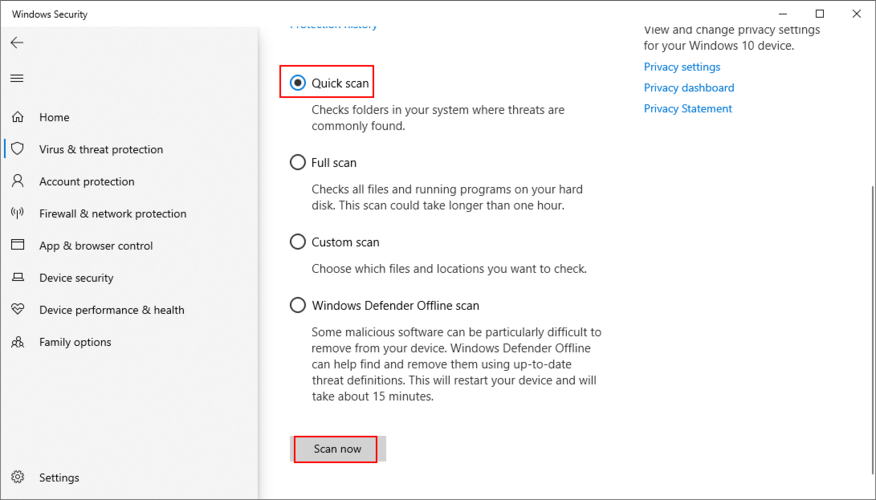
- If it doesn’t find any threats, choose Windows Defender Offline scan and click Scan now
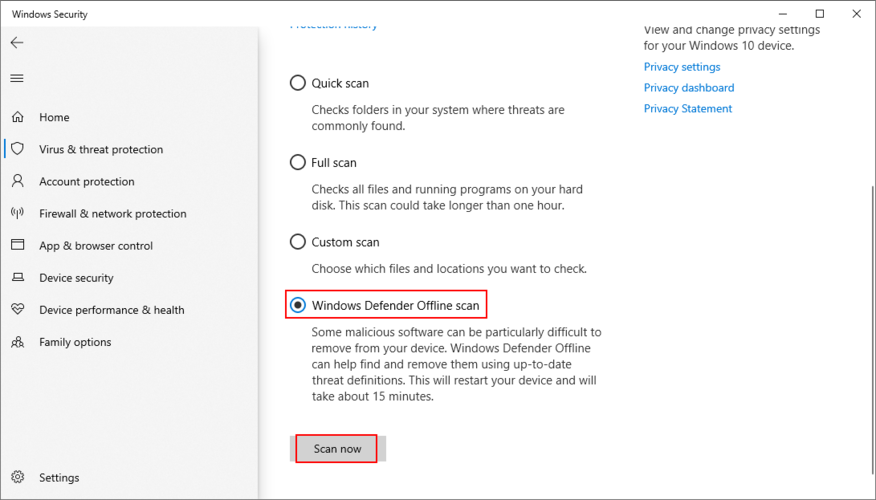
- Allow Windows to quarantine or remove any suspicious files. If you think some of those files are safe, make sure to add them to the whitelist, in order to exclude them from any upcoming scans
If you have a third-party security solution that you rely on, make sure to adjust the steps above.
22. Use a Linux live distro
You might think that your data will be lost forever due to this serious error. And it might be impossible to even perform a disk backup because Windows doesn’t recognize the selected files. If there’s a major problem with your OS that requires system reset, you can save your files with the help of a Linux live distro.
Simply put, you will be creating a USB flash drive that boots a Linux-based operating system (e.g. Ubuntu), in order to gain access to your files and copy them somewhere safe. Since it’s not Windows, you shouldn’t be getting the The system cannot find the file specified error anymore. Then, you can safely proceed with more dangerous scenarios that involve data loss, like disk formatting.
How to create a Linux live distro with Rufus:
- Download a Linux distro. If you can’t decide which, we suggest Ubuntu since it’s intuitive
- Connect a USB flash drive to your PC. Make sure it doesn’t contain any files you might need later since the disk will be formatted
- Download Rufus from the official website
- Install and run Rufus
- Choose the pen drive and set Boot section to Disk or ISO image
- Click SELECT and add the Ubuntu ISO
- Set Partition scheme to MBR
- At File system, select FAT32
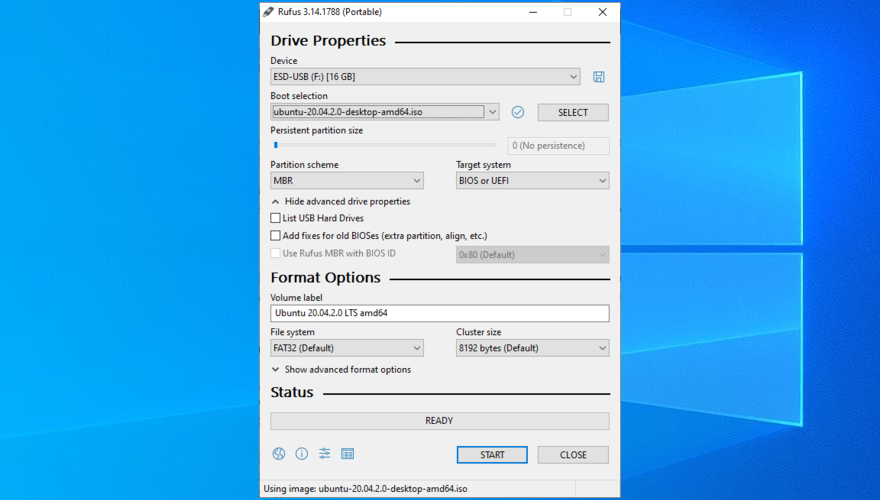
- Click OK and wait for Rufus to create your Linux live distro drive
How to boot Linux from the USB flash drive:
- Keep the flash drive plugged into your PC
- Restart Windows
- Right after your display turns on and before Windows boots, press the key shown on the screen to enter the boot startup menu (e.g. F12)
- Select the USB storage drive and hit Enter
- Once Ubuntu loads, create a backup of your files
23. Change drive letters
You might be experiencing file access errors due to your HDD or SSD. For instance, if it doesn’t have a partition letter assigned, or if it shares the letter with another drive, you should immediately fix this problem. The simplest way to do this is by using Disk Management.
How to assign drive letters with Disk Management:
- Press Win key + R, type diskmgmt.msc, and press Enter
- In Disk Management, select the drive that’s giving you trouble
- Right-click the drive and select Change Drive Letters and Paths
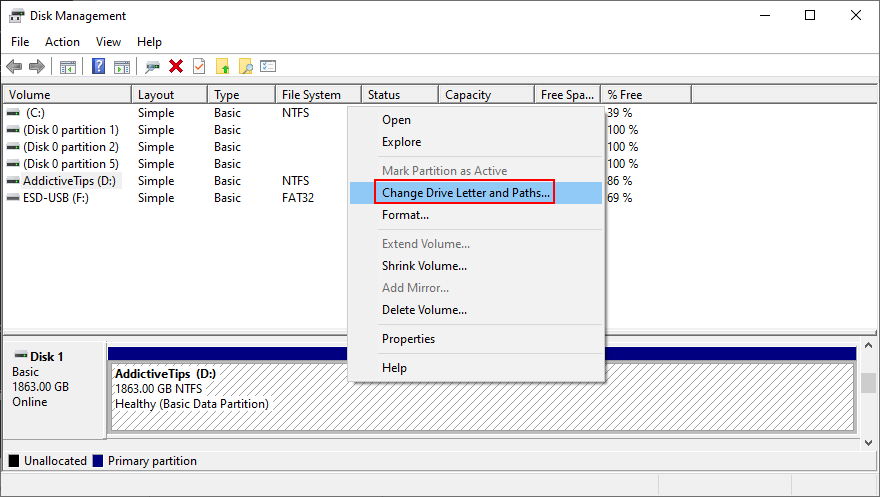
- If the drive already has a letter
- Click Change
- Set a new drive letter
- Click OK
- If the drive doesn’t have a letter
- Click Add
- At Mount in the following empty NTFS folder, click Browse
- Set the new drive path by selecting an empty NTFS folder and click OK
- Then, click OK to confirm
- Quit to the desktop
However, if you can’t access Disk Management or if it doesn’t identify your drive, you can turn to the console environment.
How to assign drive letters with Command Prompt:
- Press Windows key + R, type cmd, then press Ctrl + Shift + Enter to launch Command Prompt with elevated rights
- Type
diskpart and hit Enter to use the partition manager built into Windows
- Run
list volume to view all current drives
- Check out the number assigned to your disk or partition. Run
select volume # and use that number (e.g. select volume 4)
- Write
assign letter= and add the new drive letter (e.g. assign letter=e). Hit Enter
- Quit to the desktop
24. Format the partition
If changing the drive letter didn’t help get rid of the The system cannot find the file specified error, it’s time to format the partition. Keep in mind that it means losing everything saved there.
So, you should perform a backup before proceeding with this solution. If you can’t perform the backup in Windows, check out the previous solution on how to create a backup from a Linux distro.
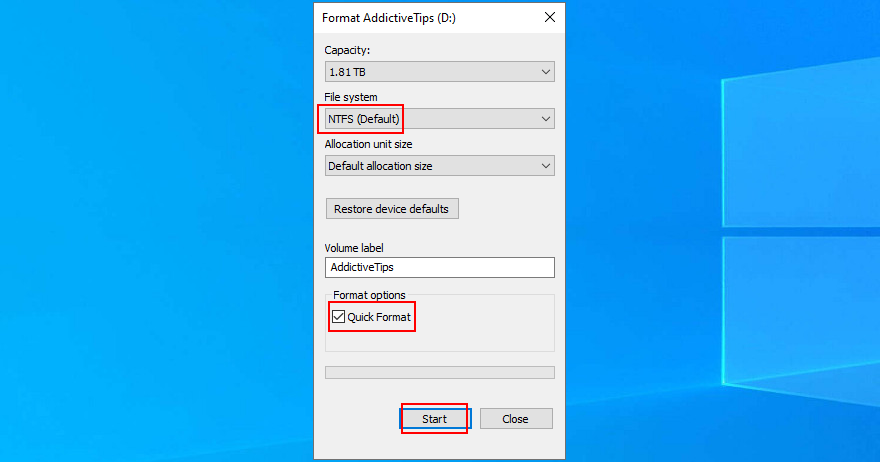
How to format a partition using Windows Explorer:
- Press Win key + E to open File Explorer on Windows 10
- Select the drive, right-click it, and choose Format
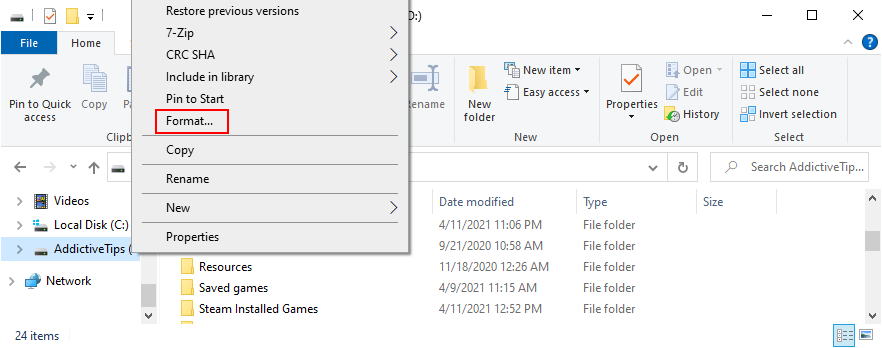
- At File system, select NTFS
- Leave Quick Format enabled
- Click Start
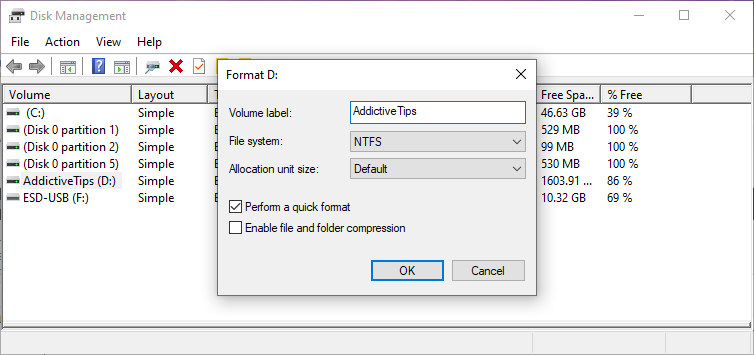
How to format a partition using Disk Management:
- Right-click the Start button and launch Disk Management
- Pick the partition, right-click it, and select Format
- Set File system to NTFS
- Leave Perform a quick format enabled
- Click OK
How to format a partition using Command Prompt:
- Press the Win key, search for Command Prompt, and click Run as administrator. If prompted by User Account Control, click Yes
- Type
diskpart and press Enter
- Run
list volume to view all volumes
- Identify the number of your partition and use it when entering
select volume # (e.g. select volume 5)
- Run
format fs=ntfs to format the partition as NTFS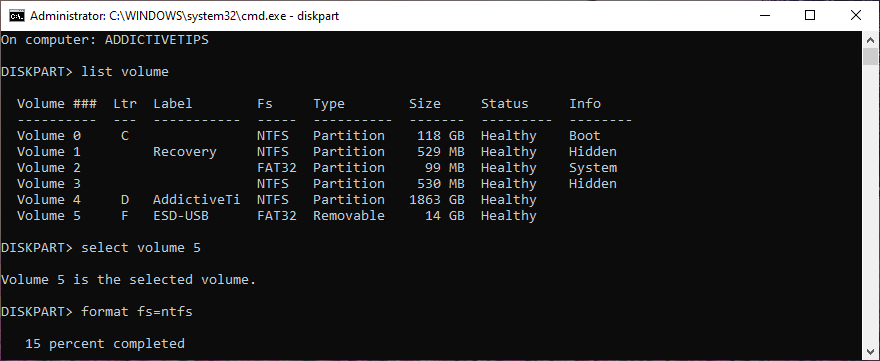
25. Roll back the operating system
You can roll back Windows 10 to a restore point that was recorded before you started experiencing the The system cannot find the file specified error, thanks to System Restore. It means undoing all software modifications made to your computer that you can’t detect and which somehow led to file access and application launch issues. However, it automatically means that all programs you installed after the restore point was recorded will no longer exist, so you will have to install them again.
How to use System Restore:
- Sign in to Windows 10 with an administrator account
- Click the Start button, find Control Panel, and open this app
- Select Recovery
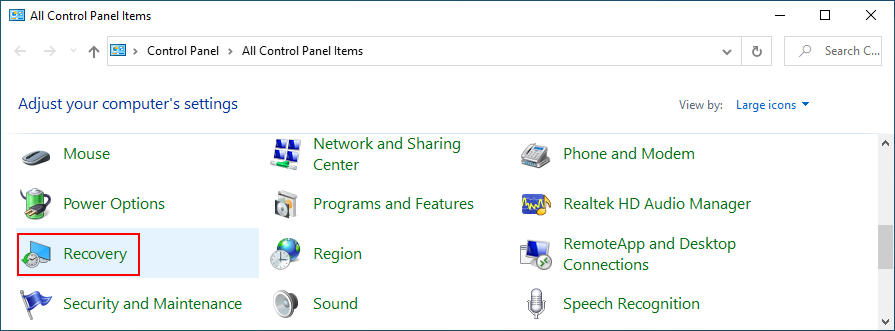
- Click Open System Restore
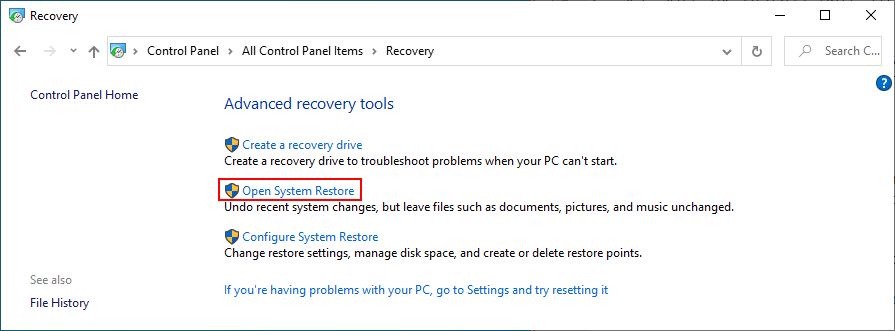
- Choose a restore point or click Show more restore points to get more options. Click Scan for affected programs to discover the exact applications you will have to reinstall
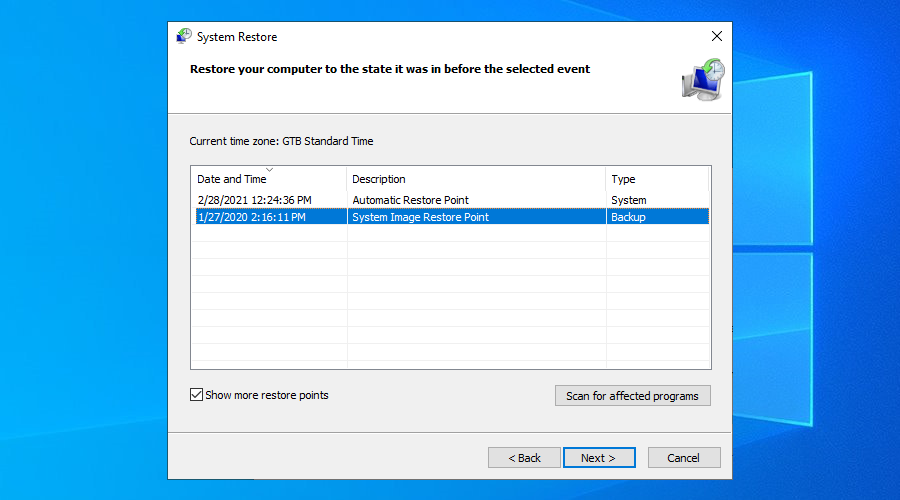
- After making a selection, click Next and follow the remaining steps
If you can’t boot Windows 10, interrupt the startup three times in a row to access system troubleshooting mode. Then, go to Troubleshoot > Advanced Options > System Restore.
26. Reset Windows 10
If you still can’t shake off the The system cannot find the file specified error or if System Restore didn’t work, there’s nothing left to do except restore Windows 10 to factory settings. It means uninstalling all your applications and reverting the system configuration to default. But you can keep your personal files, so it’s not necessary to perform a backup.
How to reset Windows 10:
- Right-click the Start button and select Settings
- Click Update & Security and select Recovery
- At Reset this PC, click Get started
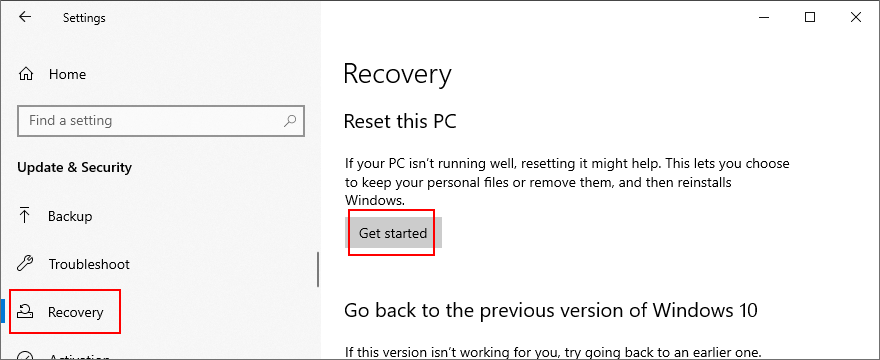
- Pick Keep my files and follow the remaining instructions
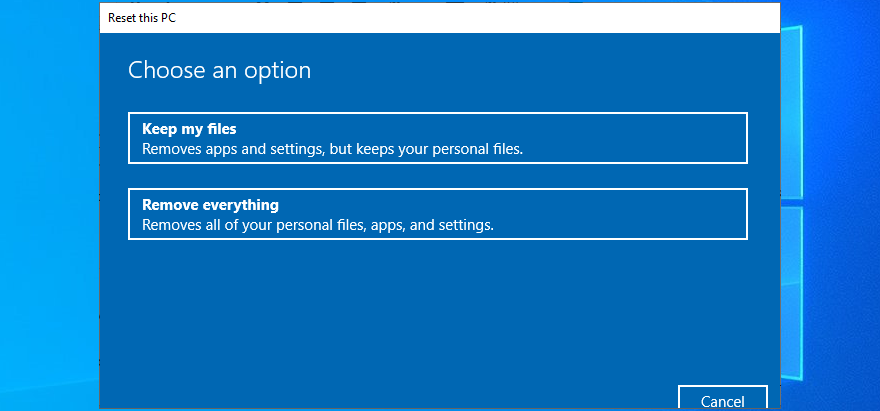
You can also turn your PC on and off three times to launch Advanced Startup mode before Windows boot. There, you can go to Troubleshoot > Reset your PC.
If you managed to get hold of your files by using the Linux live distro, we suggest performing a clean reset by selecting the Remove everything option instead of Keep my files.
Error The system cannot find the file specified can be fixed
To review, you can try to fix the The system cannot find the file specified error by restarting your PC, updating Windows 10, running the Windows Update troubleshooter, checking the Windows Update services, starting the OS in Safe Mode, disabling startup apps, running a clean boot, and uninstalling third-party applications.
It’s also a good idea to disconnect external devices, run CHKDSK, SFC and DISM, investigate the system log, reinstall devices, update or roll back drivers, reinstall programs, check registry settings or restore the registry to default, uninstall system updates, run a malware scan, use a Linux live distro, change drive letters, format partitions, use System Restore, and reset Windows 10.
How did you repair this error? Let us know in the comments below.


