Se sei un utente esperto di Windows, probabilmente sai e capisci come eseguire varie operazioni sul tuo PC può avere più di un solo approccio e che le app GUI specializzate sono spesso più limitanti (e meno soddisfacenti, siamo onesti) rispetto all'immissione di comandi in una riga di comando manualmente. C'è solo quella sensazione di soddisfazione quando vedi quel muro di testo aprirsi davanti a te, e se il risultato non è un errore, ne vale la pena.

Sui PC Windows, ci sono solo due modi per farlo: tramite CMD o PowerShell. Sebbene CMD sia un po' più popolare di PowerShell, è anche meno potente, dato che la sua controparte ti consente di eseguire molte più operazioni, comprese quelle che puoi eseguire tramite CMD. Si potrebbe dire che PowerShell combina la potenza del vecchio CMD con le capacità di scripting e cmdlet, offrendo una miriade di possibilità relative alle operazioni che è possibile eseguire con esso.
Tuttavia, l'enorme numero di possibili operazioni che è possibile eseguire utilizzando PowerShell può intimidire anche gli utenti esperti, per non parlare degli utenti che non hanno mai sentito parlare di CMD (per non parlare di PowerShell) prima. Non preoccuparti, tuttavia, cercheremo di insegnarti alcuni semplici trucchi che puoi eseguire con PowerShell e forse anche memorizzare a lungo termine. Sebbene questo nostro "corso accelerato" non serva come un manuale completo per PowerShell, si spera che ti aiuti a orientarti in PowerShell dandoti alcuni suggerimenti e spiegando una serie di comandi. Se sei pronto, cominciamo.
Cos'è PowerShell?
Come accennato in precedenza, PowerShell è uno strumento potente che puoi utilizzare per una vasta gamma di operazioni. Inoltre, PowerShell è una soluzione di automazione delle attività che comprende diversi potenti strumenti, inclusi, a titolo esemplificativo, una shell della riga di comando (come CMD), un linguaggio di scripting e un framework di gestione della configurazione.
A differenza di altre shell che possono accettare e restituire solo testo, PowerShell può anche accettare e restituire oggetti .NET grazie all'eccezionale quantità di funzionalità che racchiude. Alcune delle più importanti funzionalità relative alla shell di PowerShell sono le seguenti:
- Previsione dei comandi e completamento della scheda
- Supporto per parametri e alias di comando
- Cronologia completa della riga di comando
- La capacità di concatenare i comandi attraverso la pipeline
- Un sistema di aiuto nella console simile alle pagine man nei sistemi basati su Unix
Tuttavia, questo è solo un graffio sulla punta dell'iceberg poiché, come abbiamo detto prima, PowerShell è più di un semplice guscio; puoi usarlo come un potente linguaggio di scripting per automatizzare le operazioni di gestione del sistema, ma anche se vuoi creare, analizzare, testare e distribuire soluzioni in vari ambienti.
Dato che PowerShell è basato su .NET CLR (.NET Common Language Runtime), è facile capire perché tutti gli input e gli output con cui funziona PowerShell sono oggetti .NET. Inoltre, non è assolutamente necessario analizzare l'output di testo solo per consentire a PowerShell di estrarre informazioni da esso. Tra le funzionalità di scripting di PowerShell potresti trovare quanto segue:
- Un sistema di formattazione completo che garantisce un output semplice e pulito
- Crea tipi dinamici attraverso un ampio sistema di tipi
- Puoi estendere le capacità di PowerShell tramite classi, funzioni, moduli e script
- Supporto nativo per vari formati di dati, inclusi XML, JSON e CSV
Se sei più interessato a gestire e configurare la tua infrastruttura aziendale tramite codice, sarai felice di apprendere che PowerShell ti offre anche questa possibilità attraverso il suo framework di gestione Desired State Configuration (DSC). Tra le operazioni che potresti facilmente eseguire utilizzando il DSC di PowerShell, ti ricordiamo:
- Distribuire vari schemi di configurazione utilizzando modelli push o pull
- Progetta script personalizzati e configurazioni dichiarative che puoi utilizzare per distribuzioni ripetibili nel tuo ambiente
- Applicare vari schemi di configurazione
- Rapporto sulla deriva della configurazione
PowerShell ha una riga di comando proprietaria fornita con un linguaggio di programmazione proprietario in qualche modo simile a Perl. Si noti che all'inizio PowerShell è stato sviluppato per aiutare gli utenti a gestire gli oggetti sui propri computer, ma, come puoi immaginare, ha fatto molta strada e ora viene utilizzato per lavori più estesi e complessi.
Ad esempio, puoi utilizzare l'ampio ambiente di lavoro di PowerShell non solo per eseguire varie operazioni di gestione del sistema, ma anche per automatizzarle in modo da non dover svolgere attività noiose e ripetitive di tanto in tanto. È anche abbastanza importante ricordare che è possibile accedere a una pletora di risorse tramite un solo programma (ad esempio PowerShell), incluso, ma non limitato a:
- Strumentazione gestione Windows
- API .NET Framework
- Prompt dei comandi
- Modello a oggetti componente di Windows
- Comandi PowerShell
Al giorno d'oggi, uno degli scopi più popolari di PowerShell è aiutare gli utenti finali ad automatizzare le attività di gestione del sistema, aiutandoli così a evitare di impegnarsi in una serie di operazioni noiose e ripetitive. È stato dimostrato che eliminare il fattore umano dalle azioni ripetitive aumenta l'efficienza e riduce gli errori umani dovuti a vari motivi, quindi è davvero una vittoria per tutti.
Puoi usare PowerShell per emettere comandi semplici o più complessi, ma questo programma può anche aiutarti a creare script basati su quei comandi, che verranno eseguiti automaticamente da PowerShell. Inoltre, c'è una quantità eccezionale di comandi che puoi personalizzare ed emettere in seguito chiamati cmdlet.
Vale la pena ricordare che PowerShell è multipiattaforma e open-source, il che significa che puoi usarlo anche su altri sistemi come Mac o Linux in modo nativo, senza ricorrere a trucchi e strumenti di miglioramento della compatibilità come Wine o Boot Camp.
Elenco dei comandi di base di PowerShell
Comprendiamo che PowerShell possa sembrare un po' intimidatorio, soprattutto ora che hai scoperto che è più di un semplice prompt dei comandi sul tuo computer e che in realtà comprende le funzionalità CMD, ma anche un linguaggio di programmazione specifico e vari script che puoi usare per automatizzare operazioni di gestione del sistema.
Tuttavia, se ti senti determinato a padroneggiare PowerShell e tutto ciò che ha da offrire, ti consigliamo vivamente di iniziare con le sue funzionalità di base. In questo modo non dovrai tornare indietro su mesi di progressi quando scopri di aver usato accidentalmente la funzione sbagliata e tutto il lavoro che hai svolto nel frattempo inizia a sembrare più un lontano ricordo.
Questo è esattamente il motivo per cui abbiamo preparato un elenco di comandi di base che puoi utilizzare in sicurezza all'interno delle tue sessioni di PowerShell per testare le funzionalità di questo potente programma e vedere quale fa esattamente cosa. L'elenco seguente comprende i nomi dei comandi, i loro alias e una breve descrizione di ciò che fa ciascun comando.
Nota che puoi usare sia i nomi dei comandi che i loro alias, e il risultato sarà esattamente lo stesso. Il motivo per cui si preferisce usare gli alias è che sono molto più veloci da digitare e se riesci a ricordarli correttamente e ad associarli al nome del comando corrispondente, ha più senso se vuoi portare a termine il lavoro rapidamente.
| Nome del comando |
Alias |
Descrizione |
| Aggiungi contenuto |
AC |
Consente di aggiungere contenuto (ad es. parole o dati) a un file |
| Aggiungi-PSSnapIn |
asnp |
Ti aiuta ad aggiungere più snap-in di Windows PowerShell alla
sessione corrente |
| Cancella contenuto |
clc |
Cancella il contenuto di un elemento senza eliminare l'elemento effettivo |
| Cancellare la cronologia |
chy |
Cancella tutte le voci dalla cronologia dei comandi |
| Cancella-host |
chiaro |
Cancella il display del programma host |
| Cancella-host |
cls |
Fa la stessa cosa di chiaro |
| Cancella-elemento |
cli |
Rimuove il contenuto di un elemento senza eliminare l'elemento effettivo |
| Cancella-Proprietà oggetto |
clp |
Cancella il valore di una proprietà senza effettivamente eliminare la proprietà stessa |
| Cancella-Variabile |
clv |
Elimina il valore di una variabile |
| Confronta-oggetto |
confrontare |
Consente di confrontare due insiemi di oggetti |
| Confronta-oggetto |
differenza |
Fa la stessa cosa di confrontare |
| Connect-PSSession |
cnsn |
Ti consente di riconnetterti alle sessioni da cui ti sei disconnesso |
| Percorso di conversione |
cvpa |
Consente di convertire un percorso di Windows PowerShell in un
percorso del provider di Windows PowerShell |
| Copia-Oggetto |
copia |
Ti aiuta a copiare un elemento da una posizione specifica a un'altra |
| Copia-Oggetto |
cp |
Fa la stessa cosa della copia |
| Copia-Oggetto |
cpi |
Fa la stessa cosa di copy e cp |
| Copia-Proprietà oggetto |
cpp |
Consente di copiare un valore e una proprietà da una determinata posizione a
un'altra |
| Disabilita-PSBreakpoint |
dbp |
Ti aiuta a disabilitare i punti di interruzione nella console corrente |
| Disconnect-PSSession |
dnsn |
Ti disconnette dalla sessione corrente |
| Abilita-PSBreakpoint |
ebp |
Consente di abilitare i punti di interruzione nella console corrente |
| Invio-PSSession |
etsn |
Ti aiuta ad avviare una sessione interattiva con un dispositivo remoto |
| Esci-PSSession |
exsn |
Termina una sessione interattiva con un dispositivo remoto |
| Esporta-Alias |
epal |
Consente di esportare informazioni sugli alias attualmente definiti
in un file di output |
| Esporta-Csv |
epcsv |
Consente di convertire gli oggetti in più
stringhe separate da virgole (CSV) ed esporta le stringhe in un documento CSV |
| Export-PSSession |
epsn |
Importa i comandi da una sessione diversa e li esporta in un
modulo di Windows PowerShell |
| PerOgni-Oggetto |
% |
Esegue un'operazione specifica su ciascuno degli elementi contenuti
in una raccolta di oggetti di input |
| PerOgni-Oggetto |
per ciascuno |
Fa la stessa cosa di % |
| Formato-Personalizzato |
fc |
Ti aiuta a utilizzare una vista personalizzata per formattare l'output |
| Format-List |
fl |
Consente di formattare l'output come un elenco di proprietà in cui ogni proprietà
è posizionata su una nuova riga |
| Format-Table |
ft |
Consente di formattare l'output come tabella |
| A livello di formato |
fw |
Ti aiuta a formattare gli oggetti come tabelle larghe in cui
viene visualizzata solo una proprietà di ogni oggetto |
| Get-Alias |
ragazza |
Recupera gli alias per la tua sessione corrente |
| Get-ChildItem |
dir |
Recupera un elenco di tutti i file e le cartelle in un'unità del file system |
| Get-ChildItem |
gci |
Fa la stessa cosa di dir |
| Get-ChildItem |
ls |
Fa la stessa cosa di dir e gci |
| Get-Comando |
gcm |
Recupera un elenco di tutti i comandi che puoi usare |
| Ottieni-contenuto |
gatto |
Visualizza il contenuto di un file |
| Ottieni-contenuto |
gc |
Fa la stessa cosa del gatto |
| Ottieni-Cronologia |
ghhy |
Recupera un elenco di tutti i comandi immessi durante la sessione corrente |
| Ottieni-Cronologia |
h |
Fa la stessa cosa di ghy |
| Ottieni-Cronologia |
storia |
Fa la stessa cosa di ghy e h |
| Ottieni-Oggetto |
gi |
Consente di recuperare file e cartelle |
| Ottieni-Proprietà oggetto |
gp |
Recupera le proprietà dell'elemento specificato |
| Get-Job |
gjb |
Recupera un elenco di tutti i processi in background di Windows PowerShell
attualmente in esecuzione nella sessione |
| Ottieni-Posizione |
bello |
Recupera le informazioni sulla tua posizione attuale o sulla posizione di lavoro |
| Ottieni-Posizione |
pwd |
Fa la stessa cosa di gl |
| Ottieni-membro |
gm |
Recupera tutte le proprietà e i metodi degli oggetti specificati |
| Get-Modulo |
ogm |
Retrieves a list of imported modules or modules that can be imported into the
current session |
| Get-Process |
gps |
Fetches a list of all the processes that are running locally or on a remote
computer |
| Get-Process |
ps |
Does the same thing as gps |
| Get-PSBreakpoint |
gbp |
Retrieves all the breakpoints set in your current session |
| Get-PSCallStack |
gcs |
Displays your current call stack |
| Get-PSDrive |
gdr |
Fetches the drives in your current session |
| Get-PSSession |
gsn |
Retrieves a list of local and remote Windows PowerShell sessions |
| Get-PSSnapIn |
gsnp |
Fetches a list of all the Windows PowerShell snap-ins on the computer |
| Get-Service |
gsv |
Lists all the services on a local or remote computer |
| Get-Unique |
gu |
Retrieves unique items from a sorted list |
| Get-Variable |
gv |
Displays a list of all the variables in the current console |
| Get-WmiObject |
gwmi |
Fetches Windows Management Instrumentation (WMI) classes
instances or information about available classes |
| Group-Object |
group |
Lets you group objects that contain the same value for the properties
that you specify |
| help |
man |
Displays more details about Windows PowerShell commands and
concepts |
| Import-Alias |
ipal |
Allows you to import a list of aliases from a file |
| Import-Csv |
ipcsv |
Build table-like custom objects using all the items contained within
a CSV file |
| Import-Module |
ipmo |
Import modules to your current session |
| Import-PSSes sion |
ipsn |
Imports commands from a different session into your current session |
| Invoke-Command |
icm |
Lets you execute commands on local and remote computers |
| Invoke-Expression |
iex |
Lets you execute commands or expressions on the local computer |
| Invoke-History |
ihy |
Executes commands from your session history |
| Invoke-History |
r |
Does the same thing as ihy |
| Invoke-Item |
ii |
Performs the default action on a specified item |
| Invoke-RestMethod |
irm |
Sends either an HTTP or an HTTPS request to a RESTful web service |
| Invoke-WebRequest |
curl |
Retrieves content from a webpage on the Internet |
| Invoke-WebRequest |
iwr |
Does the same thing as curl |
| Invoke-WMIMethod |
iwmi |
Allows you to call Windows Management Instrumentation (WMI)
methods |
| Measure-Object |
measure |
Determines numeric properties of objects, as well as words,
lines, and characters in string objects |
| mkdir |
md |
Creates a new item (directory) |
| Move-Item |
mi |
Allows you to move an item from a specific location to a different one |
| Move-Item |
move |
Does the same thing as mi |
| Move-Item |
mv |
Does the same thing as mi and move |
| Move-ItemProperty |
mp |
Allows you to move a property from a specific location to a different one |
| New-Alias |
nal |
Allows you to create a new alias |
| New-Item |
ni |
Lets you create a new item |
| New-Module |
nmo |
Generates a new dynamic module that exists only in memory |
| New-PSDrive |
mount |
Allows you to create temporary and persistent mapped network drives |
| New-PSDrive |
ndr |
Does the same thing as mount |
| New-PSSession |
nsn |
Establishes a persistent connection to a local or remote computer |
| New-PSSessionConfigurationFile |
npssc |
Creates a session configuration file |
| New-Variable |
nv |
Lets you create a new variable |
| Out-GridView |
ogv |
Allows you to send output to an interactive table in a separate window |
| Out-Host |
oh |
Sends the output to the command line (CMD) |
| Out-Printer |
lp |
Lets you send the output to a printer |
| Pop-Location |
popd |
Modifies your current location to the location that was pushed to the
stack most recently. You can use the Push-Locationcmdlet (pushd) to
pop the location either its default stack or from a stack that you create. |
| powershell_ise.exe |
ise |
Displays an explanation on how you can use the PowerShell_ISE.exe
command-line tool |
| Push-Location |
pushd |
Appends the current location to the top of a location stack |
| Receive-Job |
rcjb |
Fetches the results of current session Windows PowerShell background
jobs |
| Receive-PSSession |
rcsn |
Retrieves results of commands from disconnected sessions |
| Remove-Item |
del |
Removes files and folders |
| Remove-Item |
erase |
Does the same thing as del |
| Remove-Item |
rd |
Does the same thing as del and erase |
| Remove-Item |
ri |
Does the same thing as del, erase and rd |
| Remove-Item |
rm |
Does the same thing as del, erase, rd, and ri |
| Remove-Item |
rmdir |
Deletes folders |
| Remove-ItemProperty |
rp |
Allows you to delete a property and its value from a given item |
| Remove-Job |
rjb |
Lets you delete a Windows PowerShell background job |
| Remove-Module |
rmo |
Helps you remove modules from your current session |
| Remove-PSBreakpoint |
rbp |
Lets you remove breakpoints from the current console |
| Remove-PSDrive |
rdr |
Removes temporary Windows PowerShell drives, as well as disconnects
mapped network drives |
| Remove-PSSession |
rsn |
Lets you close one or more Windows PowerShell sessions (PSSessions) |
| Remove-PSSnapin |
rsnp |
Enables you to remove Windows PowerShell snap-ins from your current
session |
| Remove-Variable |
rv |
Clears a variable and its value |
| Remove-WMIObject |
rwmi |
Lets you delete an instance of an existing Windows Management
Instrumentation (WMI) class |
| Rename-Item |
ren |
Helps you rename an item in a Windows PowerShell provider namespace |
| Rename-Item |
rni |
Does the same thing as ren |
| Rename-ItemProperty |
rnp |
Enables you to rename an item’s property |
| Resolve-Path |
rvpa |
Resolves wildcard characters in a path, as well as displays the contents
of the path |
| Resume-Job |
rujb |
Helps you restart a job that was suspended |
| Select-Object |
select |
Lets you select objects as well as their properties |
| Set-Alias |
sal |
Lets you create or change a cmdlet’s or command element’s alias
(alternate name) in the current Windows PowerShell session |
| Set-Content |
sc |
Allows you to replace a file’s contents with contents that you specify. |
| Set-Item |
si |
Changes an item’s value to a value that’s specified in the command |
| Set-Location |
cd |
Lets you set your current working location to a specified location (changes
the active location) |
| Set-Location |
chdir |
Does the same thing as cd |
| Set-PSBreakpoint |
sbp |
Lets you set a breakpoint on a command, variable, or line |
| Set-Variable |
set |
Enables you to set a variable’s value or generates a variable if one with
the requested name does not exist |
| Show-Command |
shcm |
Displays a list of Windows PowerShell commands in a graphical
command window |
| Start-Job |
sajb |
Starts a background job in Windows PowerShell |
| Start-Process |
saps |
Launches one or more local processes |
| Start-Service |
sasv |
Lets you start one or more stopped services |
| Stop-Process |
kill |
Helps you stop one or more running processes |
| Where-Object |
? |
Enables you to select certain objects from a collection based on their
property values |
| Write-Output |
echo |
Allows you to send an object to the next command in the pipeline. If it
reaches the last command in the pipeline, the command will display
the objects in the console |
Don’t let the sheer amount of basic PowerShell commands intimidate you. Although we called them basic, there’s absolutely no need for you to start memorizing them. In fact, that’s the exact reason why we created the table above so that you can go on about your work without worrying about having to remember each and every command we mentioned above.
You can use it as a quick refresher or even use your browser’s search feature to locate a specific command, its alias, and what it does if you’re confused. Although we already included this piece of information in the table above, if you’re ever confused while working in PowerShell, using the help command will display a few helpful details on how you can use this program and its commands more efficiently.
You can also pair the help command with another command or alias if you want more details about that specific command. For instance, this is what PowerShell displays when you type help Add-Computer:
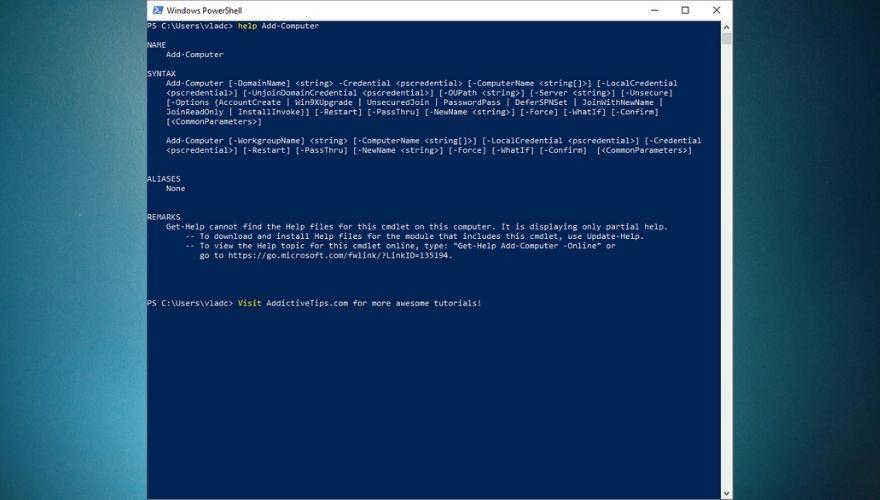
However, you can use help with any other of the commands or their aliases in our table above. Make sure you understand that the same command can have multiple aliases, which means that you can achieve the same result by using various aliases. Although this may sound confusing, it actually gives you plenty of flexibility in case you can’t remember one command alias, but you remember another one that can help you achieve the same goal.
Using PowerShell
Naturally, the first thing you’d want to do is locate PowerShell and launch it. One sure way to launch PowerShell from just about anywhere you are on your PC is to hold down the Shift button on your keyboard, right-click any empty spot on your screen (not a menu, icon, button, or similar object), and select Open PowerShell window here from the context menu.
In addition to giving you quick access to the PowerShell console anywhere on your PC, doing so will automatically switch the default working directory for PowerShell to the one you’re currently located at. If you’re on a Windows 10 PC, you can also launch PowerShell by pressing the Win key on your keyboard, typing PowerShell in the Start menu, and selecting PowerShell when it becomes visible in the list of results.
On older versions of Windows, you’ll need to manually locate the PowerShell executable, which you can either find in the Accessories or System folders in your Start menu. Furthermore, seeing how older systems (such as Windows 7) don’t provide you with PowerShell by default, you’ll also have to install it on your computer, along with all of its dependencies.
Notice how launching PowerShell from the Start menu will set your active working directory to C:\Users\[your username here]. By comparison, using the Shift + Right-click method we’ve presented above will set PowerShell’s active directory to the one you’re currently at when you spawn the console. For instance, if you use Shift + right-click and open PowerShell from your desktop, you’ll notice that the active directory will be C:\Users\[your username here]\Desktop. For obvious reasons, the [your username here] part will be different depending on your username.
Although you can keep PowerShell for home usage just fine, it’s better if you could make use of all that it has to offer. Incidentally, these features make PowerShell awesome for corporate usage, where you need to perform a large number of operations in a short time, and most likely on a huge number of devices.
Thus, instead of running each command manually on every single machine, you could simply create an automation script in PowerShell and receive the information you need automatically, without having to physically interact with the devices in case or even be near them. Just as CMD, PowerShell can be used through command lines. However, unlike its more rudimentary counterpart (i.e. the CMD), PowerShell also lets you summon scripts and cmdlets, which makes it more powerful, but also more complicated to use.
How to use cmdlets
We’ve used the term cmdlets quite a few times in our guide, so you’re probably left wondering whatever they mean. Well, to start at the beginning, it’s worth reminding you that CMD works with commands. A cmdlet, which is pronounced command-let, is also a command, but unlike traditional CMD commands, cmdlets are specific to PowerShell and let you perform single specific operations, such as copying files, moving items from one place to another, changing the active directory, or see the contents of an item.
Simply put, cmdlets are single function commands that you can type directly in PowerShell’s command line. If you have any prior experience with the CMD, you’ll find PowerShell somewhat intuitive to work with. One interesting thing about PowerShell is that it shares plenty of commands with CMD. Therefore, using CD with PowerShell will still change your active directory, DIR will still display the contents of the current folder, and CP will still let you copy an item from one place to another.
It’s quite worth mentioning that PowerShell is not case sensitive, unlike many other shells, which return errors if you miss using the correct case when typing your commands in them. Thus, copy-item will work just as well as Copy-Item, and if you remember neither one of them you can also use Copy, CP, and CPI (but also copy, COPY, cp, or cpi).
Most PowerShell cmdlets are written in C# and are specially built to perform operations that will return a .NET object as their result. At the time being, you could find more than a couple of hundred cmdlets you can use in PowerShell, which, let’s be fair, gives you more than just a little elbow room as far as performing operations goes.
Although it will be difficult to remember all the cmdlets you may have to work with (remember that you can use the table above), there are a few that you’ll use more frequently, which will make them incredibly easy to remember. Not to mention the fact that some of them are intuitive enough that their name actually gives away their purpose (e.g. copy is used to copy items, move can be used to move files, compare helps you compare sets of objects, etc).
However, if you’re not exactly in the mood to bookmark this article to use it later, you could also type in the Get-Command cmdlet in PowerShell, or gcm, if you want to keep things short. Doing so will display a full list of commands that are available to you, and you can use that list to plan ahead on whatever it is you’re trying to do.
Unlocking custom cmdlets
On the downside, Microsoft doesn’t just give you full access to the whole array of cmdlets that you can use in PowerShell by default, so you’ll have to jump through a bunch of extra hoops to unlock this feature and use it at your leisure. The good news is that the unlocking process doesn’t take long, and then there’s the fact that it can also be done through the PowerShell, which will make great practice for you. Without any further ado, let’s see how you can unlock custom cmdlets privileges in PowerShell.
- Log in to an Administrator account (it won’t work without Admin rights)
- Launch PowerShell with Administrator rights (Run as administrator)
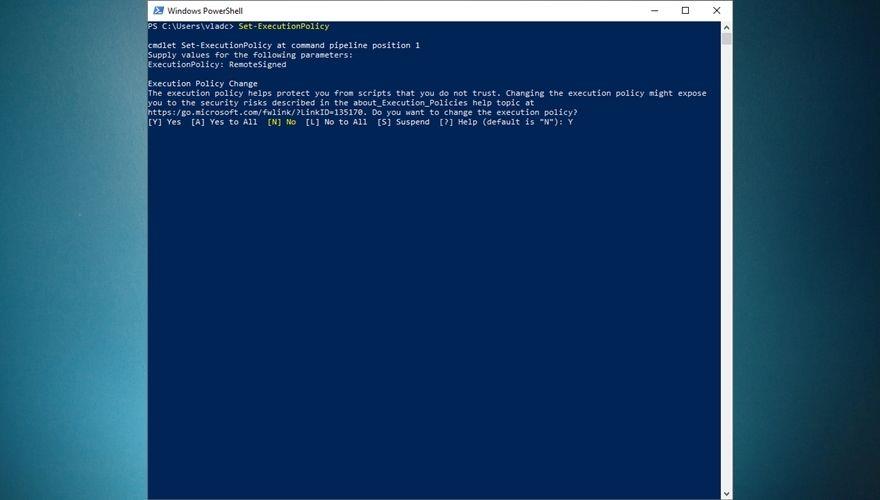
- Type the following command in PowerShell and press Enter:
- If done right, PowerShell will prompt you with a dialog, asking you for the new ExecutionPolicy value
- Type
RemoteSigned in the PowerShell command prompt and press Enter
- PowerShell will give you a heads up on the risks of modifying the value of the ExecutionPolicy
- Type Y and press the Enter key
- If you need to turn custom cmdlets off, just follow steps 1-4, and when PowerShell asks you to type the value, type
Restricted and confirm your choice as you did at step 7
If you want to streamline the whole process and not waste time typing everything down in PowerShell’s command prompt, you’ll be glad to learn that there’s an even simpler way to achieve the same result. Launch PowerShell with Administrator rights as you did at step one, and instead of typing each command and waiting for the prompt, you’re gonna pipeline everything up until the confirmation by typing this:
Set-ExecutionPolicy -ExecutionPolicy RemoteSigned
Naturally, you will still need to confirm your choice by typing Y and hitting Enter on your keyboard, but you just skipped a step and performed a series of operations at the same time. This is exactly why advanced PowerShell users create automation scripts to perform various management operations automatically: to save time and hassle. If you want, you can use the same command above to disable custom cmdlets on your system, but you’ll have to replace RemoteSigned with Restricted and also confirm your choice at the end.
You can also use AllSigned and Unrestricted to grant yourself even more privileges when it comes to running potentially unsafe scripts on your Windows PowerShell. The AllSigned option will let you run all scripts that were created by trusted publishers, whereas the Unrestricted option will enable PowerShell to run any script, regardless of its provenience and trustworthiness. Naturally, the Unrestricted option is also the most dangerous, so try to avoid it as best as you can, if possible, especially if you are a PC novice.
See? PowerShell is already starting to look a lot more accessible than it did just a few minutes back.
How to create and use scripts in PowerShell
As we’ve mentioned before and we’re positively sure you remember, you can use PowerShell to run automation scripts. However, you can’t just yell at PowerShell “Hey you, create this script for me!” and expect it to magically work, so you’ll have to put in some elbow grease and get it done yourself. However inconvenient this may sound right now, trust us, you’ll be thankful in the long run, considering all the work you won’t need to do anymore.
Although most of us rely on specialized software such as IDEs to create scripts or programs in a specific programming language, truth be told you can use any text editor as long as it can save files to the right extension. And even if it can’t, you can just navigate to the file you created and modify its extension manually by renaming it, but let’s get back to our sheep.
If you’re interested in creating a script that can work in PowerShell, you’ll be thrilled to learn that this script you’ve probably heard a lot of, is merely a text document with an extension that makes it compatible with PowerShell, PS1. Therefore, it’s easy to see why creating these scripts can be actually handled from within virtually any text editor, as long as you save it with the right (PS1) extension.
Write-host "Please enter your name:"
$Name = read-host
"Hello $Name! Visit TipsWebTech360.com for more awesome tutorials and guides!"
Now for the actual creation part:
- Launch Notepad (or any other text editor for that matter)
- Copy the code above (the script you’ll be creating and running)
- Paste it into your new Notepad document
- Use CTRL + S to save the document
- Type
script.ps1 as the file name
- Save the file somewhere accessible
- Open a PowerShell instance with administrator rights (very important)
- Make sure you’ve enabled custom scripts on your system (check sections above)
- Navigate to the location where you saved the script
- Type the full path of the script to run it
- For instance, if your script is in a Scripts folder on your C drive, your command will be
C:\Scripts\script.ps1
- Alternatively, you could simply navigate to the location of your script and use this command to run it:
.\script.ps1
If you can’t run the script and PowerShell returns an error, make sure you’ve enabled PowerShell to run custom scripts on your system, and that you’re running PowerShell as an administrator. Not doing any or both things that we’ve specified in our instructions will most likely result in an error and you won’t be able to run your script.
Remember that this is merely a basic script that is somewhat similar to the classic “Hello, world!” one. It puts a spin on it by interacting with you (i.e. asking what your name is) and letting you interact with it (i.e. typing your name which will be used to print a message for you). However, PowerShell is capable of running far more complex scripts, ranging from collecting data from an array of machines to intricate data management, advanced system configuration operations, and even creating backups of SQL databases in a blink of an eye.
How can I backup SQL databases with PowerShell?
We’re glad you asked. As we’ve mentioned countless times in our guide, there are almost endless possibilities when it comes to operations that PowerShell can help you perform. One of the most popular ones is backing up an SQL database without having to go great lengths or possess extraordinary database management capabilities. All you have to do is fire up an elevated instance of PowerShell (with Administrator privileges) and use the Backup-SqlDatabase command. However, things are a bit more complicated than that, but we’ll get to that in a few.
Backing up an SQL database isn’t as easy as simply copying files from your PC to a safe location and hope they stay safe for whenever you may need them to perform data restoration operations, but on the bright side, using PowerShell can make it look like a walk in the park. Although there are several ways to achieve this, using the command we’ve mentioned above is the fastest, simplest way to backup an SQL database.
Among the capabilities of the Backup-SqlDatabase command, it’s possible to find full database backups, database file backups, as well as transaction log backups, so you got the full package within a single command-line tool. By default, using this command will perform a full database backup, so you will need to specify if you want it to follow a certain set of rules by using the BackupFile parameter.
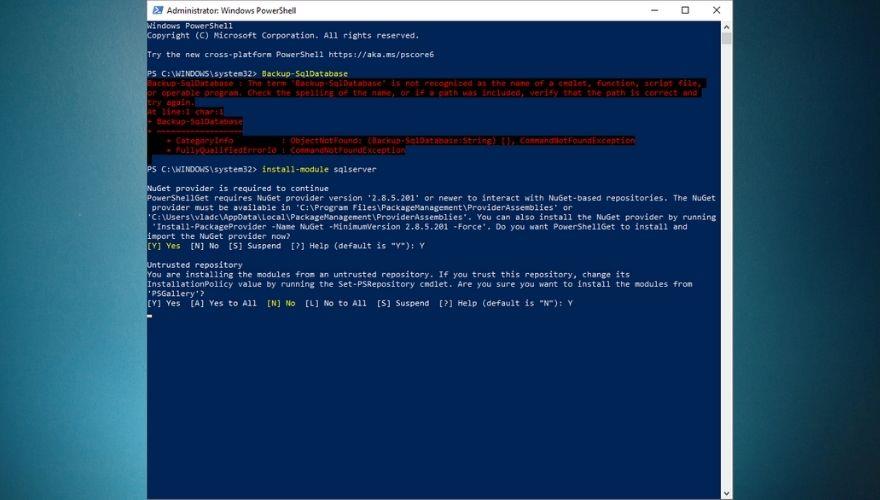
Note that some versions of PowerShell won’t feature this command by default, so you’ll either have to import it or install it. The good news is that installing the SQL module isn’t exactly rocket science and can be accomplished even by novices. Here’s what you’ll have to do if you can’t use the Backup-SqlDatabase command in your PowerShell session:
- Launch PowerShell with administrator rights
- Type the following command:
- When asked to confirm your actions, type Y and hit Enter on your keyboard
- Confirm the untrusted repository once more by typing Y and Enter
- Once the installation is complete, type the following command:
- Try running the Backup-SqlDatabase command by typing it in the PowerShell command-line
- If it works, you should see that PowerShell is asking you to supply values for some parameters
- If it doesn’t work, make sure that you’ve set PowerShell’s permission to allow it to run custom scripts
1. Complete SQL database backup
Backup-SqlDatabase -ServerInstance "Computer\Instance" -Database "Tips.WebTech360"
The command we’ve exemplified above will generate a full database backup of a database called TipsWebTech360 and save it to the default backup location of the “Computer\Instance” server instance as ‘Tips.WebTech360.bak’.
2. Perform a location-based database backup
Set-Location "SQLSERVER:\SQL\Computer\Instance"PS SQLSERVER:\SQL\Computer\Instance> Backup-SqlDatabase -Database "Tips.WebTech360"
The first command above will change your location to the active directory within the server instance on which the backup will occur. Essentially, this technique works almost like the full database backup we’ve exemplified above, but in this example, you get to change the working directory in order to locate the server instance where the backup occurs.
This operation will also create a full backup of a database called Tips.WebTech360 and export it as an ‘Tips.WebTech360.bak’ file in the default location of the server instance you’re connected to.
3. Perform a transaction log backup
Backup-SqlDatabase -ServerInstance "Computer\Instance" -Database "Tips.WebTech360" -BackupAction Log
If you only need to backup the transaction log of a specific database, PowerShell can also help you do that through a single command you can input straight in its command-line interface. The command above will generate a backup copy of the ‘Tips.WebTech360’ database’s transaction log and export it to the default location of the ‘Computer\Instance’ server instance as a file named ‘Tips.WebTech360.trn’.
4. Create an encrypted SQL database backup
$EncryptionOption = New-SqlBackupEncryptionOption -Algorithm Aes256 -EncryptorType ServerCertificate -EncryptorName "BackupCert"Backup-SqlDatabase -ServerInstance "." -Database "Tips.WebTech360" -BackupFile "Tips.WebTech360.bak" -CompressionOption On -EncryptionOption $EncryptionOption
If you’re worried that your database backup may fall in the wrong hands, PowerShell can also help you create ready-encrypted backup files. Naturally, you’ll have to specify some parameters such as the encryption algorithm, the encryption type (i.e. certificate), server instance, database name, backup file, and whether or not you want the output to be compressed.
The example above will create a backup of a certain ‘Tips.WebTech360’ database, encrypt it with AES-256 encryption and a server certificate, compress it, and save the resulting ‘Tips.WebTech360.bak’ file on the server instance’s default backup location. This is quite important if you plan a migration and have no surefire way to transport all backup files without risking estranging any single one of them.
5. Perform a backup on all databases in a server instance
Get-ChildItem "SQLSERVER:\SQL\Computer\Instance\Databases" | Backup-SqlDatabase
Un altro strumento che può tornare utile è la capacità di PowerShell di eseguire contemporaneamente il backup di tutti i database su un'istanza del server. Indipendentemente dal loro numero, è sufficiente avviare PowerShell, digitare un adattamento del comando sopra e attendere la fine del processo di backup. Nota che poiché questo eseguirà il backup di tutti i database all'interno dell'istanza del server, potresti dover attendere un po', quindi sii paziente.
Il comando precedente eseguirà il backup di tutti i database situati nell'istanza del server "Computer\Instance" ed esporterà i file risultanti nella posizione di backup predefinita sulla stessa istanza del server. I nomi dei file di backup verranno generati automaticamente in base al database corrispondente di ciascuno seguito dall'estensione BAK (es. .bak).
Sebbene ci siano molti altri metodi per eseguire il backup SQL con PowerShell in vari modi, ne abbiamo presentati solo alcuni che ritenevamo più importanti. Nota che è improbabile che i comandi che abbiamo usato nei nostri esempi sopra funzionino nel tuo ambiente nella loro forma attuale, quindi dovrai adattarli alla tua situazione attuale.
Ad esempio, dovrai modificare il parametro "Computer\Istanza" in modo che corrisponda alla tua istanza del server e modificare il nome del tuo database in modo che rifletta il nome del tuo database. Ricorda che puoi sempre rivolgerti al comando di aiuto in PowerShell se ritieni che il comando che stai cercando di eseguire sia confuso o non funzioni come dovrebbe.
Comandi PowerShell da conoscere
1. Ottieni-aiuto
Non possiamo sottolinearlo abbastanza, ma il comando Get-Help dovrebbe essere il primo che impari, in quanto può seriamente tirarti fuori da numerose situazioni difficili in cui non sei esattamente sicuro di utilizzare il comando corretto, o esattamente cosa puoi ottenere con il comando che stai cercando di distribuire.
Ora che hai installato il modulo sqlserver sul tuo sistema, puoi provare il comando Get-Help ora e vedere come funziona Backup-SqlDatabase . Basta digitare Get-Help Backup-SqlDatabase nella riga di comando di PowerShell e rispolverare le tue capacità di backup del database SQL di PowerShell.
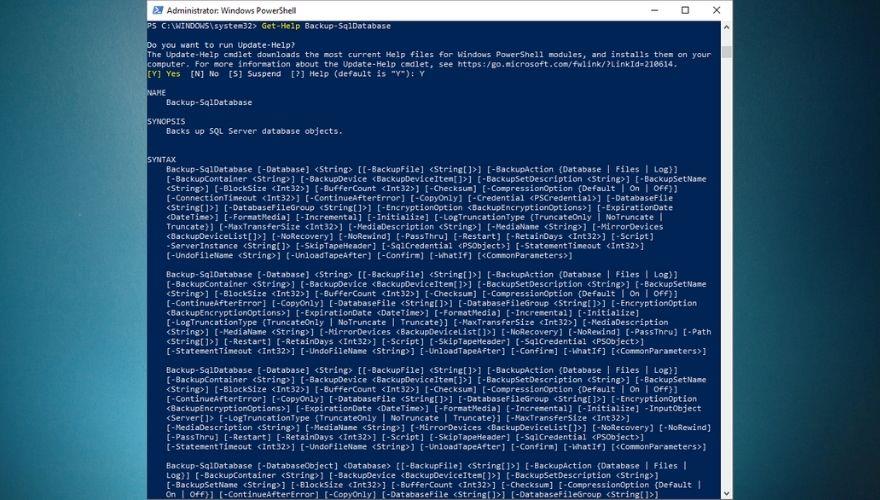
Nota che se hai appena installato il modulo sqlserver sul tuo sistema, il database della Guida potrebbe essere ancora obsoleto e potresti dover eseguire un aggiornamento su di esso in modo che possa recuperare eventuali nuovi script. Per impostazione predefinita, PowerShell rileverà che il contenuto che stai cercando di raggiungere è disponibile online, ma non puoi accedervi localmente e ti offrirà persino di aggiornare il database per te. In questo caso, tutto ciò che devi fare è digitare Y quando richiesto e premere il tasto Invio sulla tastiera.
Tuttavia, se PowerShell ti richiede solo un errore che indica che non è disponibile alcun manuale di aiuto per il comando che ti interessa, puoi aggiornarlo manualmente digitando Update-Help e premendo il tasto Invio sulla tastiera. Al termine del processo di aggiornamento, dovresti essere in grado di controllare la documentazione di aiuto disponibile per il comando che ti interessa.
2. Get-Process
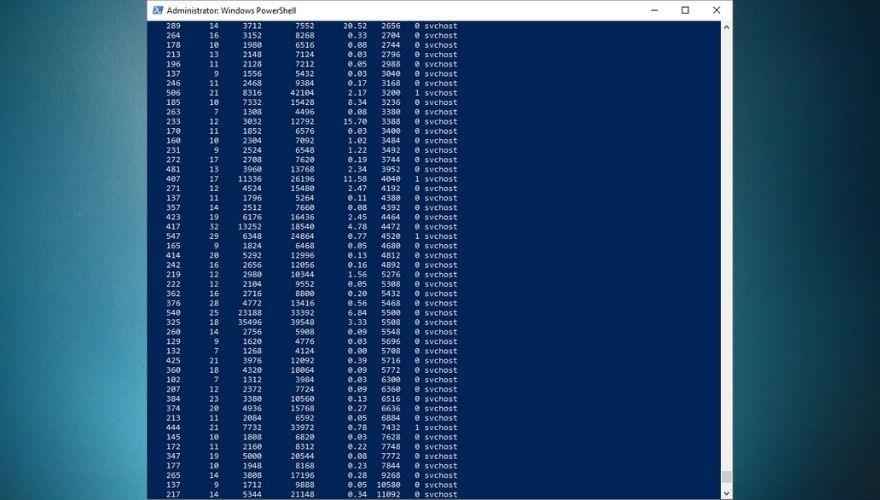
Get-Process è fondamentale se vuoi scoprire di più sul sistema su cui stai lavorando. Per essere più precisi, anche se potresti aver già intuito cosa fa questo comando semplicemente guardandolo, Get-Process ti fornirà un elenco di tutti i processi attualmente in esecuzione sul sistema su cui stai lavorando.
Per impostazione predefinita, Get-Process recupererà un elenco di tutti i processi in esecuzione sul sistema corrente su cui stai lavorando, quindi potresti dover aggiungere alcuni parametri extra a questo comando se desideri informazioni più specifiche e restringere l'elenco dei risultati. Controlla negli screenshot qui sotto cosa ottieni quando esegui il comando Get-Process da solo rispetto a come appare se sei più specifico e formatta i risultati.
Get-Process explorer | Format-List *
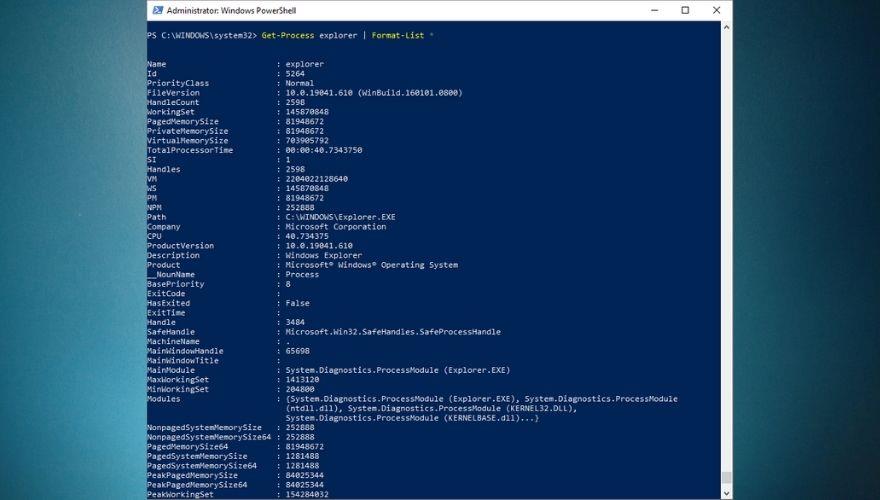
Il secondo comando può essere personalizzato per visualizzare ulteriori dettagli su qualsiasi processo attivo nel sistema. Puoi sostituire explorer con svchost o Chrome o qualsiasi altro processo attivo sul tuo sistema che ti interessa. Come accennato in precedenza, l'utilizzo di Get-Processes da solo può aiutarti (ovvero trovare un elenco di tutti i processi in esecuzione ).
3. Stop-Processo
Questo comando è praticamente autoesplicativo, poiché potresti già aver capito che può aiutarti a fermare i processi attualmente in esecuzione sul tuo sistema. Il motivo più comune per farlo da PowerShell e non utilizzando il Task Manager di Windows è che a volte i processi possono bloccarsi e rendere le app della GUI a malapena utilizzabili.
Gli utenti di PowerShell possono facilmente identificare un processo problematico utilizzando il comando Get-Process che abbiamo spiegato in precedenza, quindi utilizzando Stop-Process per terminarlo, sbloccando così il sistema. L'esecuzione di Stop-Process da sola (senza alcun parametro aggiuntivo) nell'interfaccia della riga di comando di PowerShell ti chiederà di inserire l'ID del processo che stai tentando di terminare.
Tuttavia, puoi anche terminare un processo con il suo nome (se lo conosci) aggiungendo il parametro -Name al cmdlet, come nell'esempio seguente:
Stop-Process -Name "explorer"
Il comando sopra terminerà il processo Explorer, che può essere utile soprattutto se si blocca o si blocca su di te e si rifiuta di caricarsi correttamente. Nota che dovrai usare le virgolette quando specifichi il nome del processo che stai tentando di terminare. Se un processo è testardo e si rifiuta di terminare (di solito i processi di autorizzazione più elevati lo fanno), puoi "convincerlo" aggiungendo un parametro -Force al tuo comando. Diciamo, ad esempio, che non puoi terminare il tuo processo di Explorer. In questo caso, puoi semplicemente digitare il comando seguente:
Stop-Process -Force -Name "explorer"
Inoltre, vale la pena ricordare che l'utilizzo del parametro -Force nel comando Stop-Process non richiederà conferma, invece di eseguire il comando senza questa opzione. Se vuoi saperne di più su questo cmdlet, assicurati di usare il comando Get-Help .
4. Ottieni un servizio
Questo comando è nell'elenco dei comandi essenziali per una buona ragione: può fornirti un elenco di tutti i servizi attualmente installati sul sistema su cui stai lavorando, indipendentemente dal fatto che siano in esecuzione o meno. Come con molti altri cmdlet, è possibile personalizzare Get-Service per fornire informazioni più specifiche, relative a un determinato servizio o persino visualizzando un elenco di tutti i servizi in esecuzione (o arrestati) sul computer.
Puoi andare avanti e digitare Get-Service nella riga di comando di PowerShell. In questo modo dovresti fornire un elenco di tutti i servizi disponibili sul tuo computer, nonché i loro nomi visualizzati e gli stati. Se aggiungi un comando aggiuntivo al cmdlet originale, puoi modificare l'output, in modo che visualizzi solo i risultati che ti interessano.
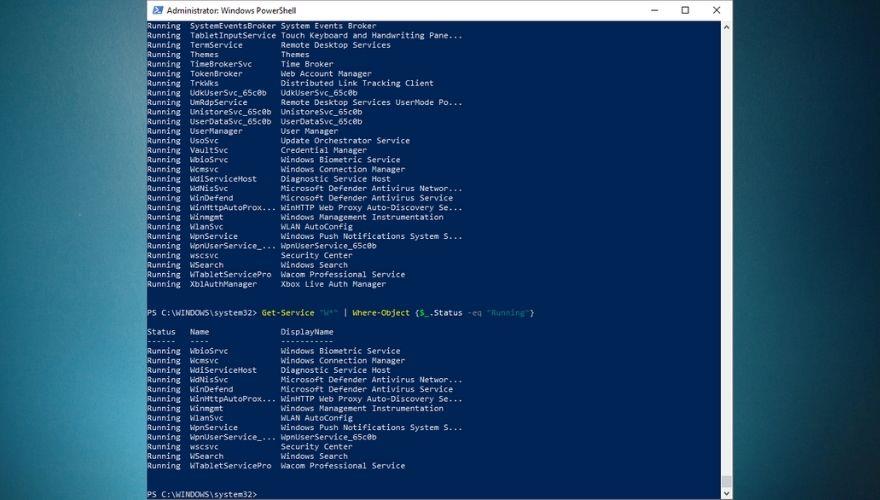
Ad esempio, digitando il comando sopra dovrebbe restituire un elenco di tutti i servizi disponibili sul tuo computer che iniziano con la lettera "W". Tuttavia, puoi andare ancora oltre e personalizzare il tuo comando per restringere ulteriormente l'elenco dei risultati.
Get-Service | Where-Object {$_.Status -eq “Running”}
Il comando sopra ti permetterà di vedere un elenco di tutti i servizi disponibili sul tuo computer che sono anche in esecuzione nel momento in cui stai eseguendo il cmdlet. Aggiungendo la "W*" come abbiamo fatto nell'esempio precedente verrà visualizzato un elenco di tutti i servizi in esecuzione sul computer che iniziano con la lettera "W" e il comando dovrebbe essere simile a questo:
Get-Service "W*" | Where-Object {$_.Status -eq "Running"}
5. Get-EventLog
Ogni amministratore di sistema responsabile dovrebbe sapere come lavorare con i registri degli eventi, visto che questi documenti possono fornirti informazioni utili su ciò che è successo sul tuo sistema, a che ora si è verificato e talvolta anche su cosa ha attivato quell'evento specifico.
Pertanto, possiamo tranquillamente presumere che il comando Get-EventLog di PowerShell non sia qualcosa che vuoi che manchi dalla tua cintura degli strumenti, specialmente se hai intenzione di affinare le tue capacità di amministrazione del sistema. Se sai tutto quello che c'è da sapere sui registri eventi e sui loro nomi, puoi andare avanti e digitare Get-EventLog direttamente nella riga di comando di PowerShell. Tieni presente che PowerShell ti chiederà di inserire il nome del registro che stai cercando di visualizzare.
Se si digita il nome di un registro eventi vuoto (uno senza voci), PowerShell visualizzerà un messaggio di errore e tornerà all'interfaccia della riga di comando. Pertanto, sarebbe più semplice se utilizzassi semplicemente il comando seguente, che ti fornirà un elenco di registri eventi sul tuo sistema, insieme a dettagli aggiuntivi su ciascuno di essi, come l'azione di overflow predefinita e il numero di voci.
Uno dei casi d'uso più popolari per i registri eventi è il controllo degli errori, soprattutto se si sono verificati in silenzio, sono stati seguiti a breve da un arresto anomalo del sistema o hanno portato a un BSOD, che sappiamo tutti quanto possa essere criptico. Tuttavia, sarà necessario essere più specifici con il cmdlet Get-EventLog se si desidera restringere l'elenco dei risultati, che spesso può essere enorme.
Get-EventLog -LogName Security -EntryType Error
Digitare il comando sopra nell'interfaccia della riga di comando di PowerShell dovrebbe fornire un elenco di tutti gli errori registrati nel registro eventi di sicurezza. Tieni presente che puoi utilizzare il parametro -List per vedere tutti i tipi di registro nel tuo sistema e sostituirlo Securitynel comando sopra con qualsiasi altro tipo di registro che trovi nell'elenco, purché contenga più di zero voci.
Se vuoi saperne di più sull'uso del comando Get-EventLog in PowerShell, sentiti libero di usare il comando Get-Help di cui abbiamo parlato nella prima sezione di questo sottocapitolo.
6. Converti in HTML
A volte, quando si utilizza PowerShell, è possibile imbattersi in determinate informazioni che si desidera estrarre e conservare per riferimento futuro, creare report o semplicemente importarle da un'applicazione diversa. Uno dei modi più utilizzati per estrarre questi dati da PowerShell ed esportarli in un file esterno sul computer è il comando ConvertTo-HTML .
L'utilizzo di questo comando ti aiuterà a creare report completi che possono aiutarti ad analizzare le informazioni estratte e gli approfondimenti in modo più efficace fornendoti tabelle HTML che puoi personalizzare in seguito aggiungendo stili personalizzati e dati codificati a colori. Come con molti altri comandi PowerShell, ConvertTo-HTML non funziona da solo e dovrai associarlo a un comando aggiuntivo che utilizzerà come input (o come fonte di dati).
Ad esempio, se stai cercando di stampare un rapporto composto da ogni servizio che inizia con la lettera "W" ed è attualmente in esecuzione sul tuo computer, puoi digitare il comando seguente:
Get-Service "W*" | Where-Object {$_.Status -eq "Running"} | ConvertTo-HTML
Questo ti fornirà un codice HTML dei dati che hai fornito alla funzione ConvertTo-HTML, che puoi semplicemente copiare direttamente dall'interfaccia della riga di comando di PowerShell, incollarlo nel tuo editor di testo preferito e salvarlo come file HTML, che è possibile utilizzare per visualizzare il risultato in qualsiasi browser web.
Puoi utilizzare ConvertTo-HTML praticamente con qualsiasi comando PowerShell, a condizione che il comando che stai utilizzando come origine dati generi un output. Puoi provarlo con altri cmdlet, come Get-Process , Get-EventLog o Get-Help . Tieni presente che, oltre alle conversioni HTML, il cmdlet ConvertTo può essere utilizzato anche per generare file JSON, CSV e XML. Devi solo sostituire HTML nella sintassi del comando con il formato che ti interessa.
7. Esporta-CSV
Se stai lavorando con vari oggetti che ritieni possano adattarsi molto meglio in una tabella, puoi utilizzare PowerShell per convertire gli elementi che stai attualmente gestendo in una serie di stringhe CSV (valori separati da virgola) ed esportare le stringhe in un file con un rapido movimento tramite il cmdlet Export-CSV.
Come con ConvertTo-HTML, Export-CSV necessita di un input che può convertire in stringhe CSV, poiché non può funzionare da solo. Pertanto, dovrai abbinarlo a un comando che può essere utilizzato per generare dati, come quelli Get-Service o Get-Process che abbiamo spiegato in precedenza.
In sostanza, Export-CSV fa quasi la stessa cosa del cmdlet ConvertTo-HTML di cui abbiamo discusso sopra, a parte un aspetto importante che non dovrebbe essere trascurato: questo cmdlet genera effettivamente un file e lo salva sul tuo computer, al contrario di il comando ConvertTo, che ti dà solo l'output e ti permette di creare il file da solo.
Supponiamo, ad esempio, che desideri trasformare l'elenco dei servizi in esecuzione sul tuo computer in un file CSV in modo da poter elaborare ulteriormente il file con software di terze parti o inserirlo in un foglio di calcolo per ulteriori riferimenti. Tutto quello che dovresti fare è digitare il comando Get-Service seguito da quello Export-CSV e menzionare una posizione in cui desideri che venga generato il file CSV, come nell'esempio seguente:
Get-Service | Export-CSV c:\Tips.WebTech360.csv
Il comando sopra recupererà un elenco di tutti i servizi disponibili sul tuo computer, in esecuzione o meno, li convertirà in una serie di stringhe CSV e salverà il risultato come file CSV denominato "Tips.WebTech360" nella radice dell'unità C . È quindi possibile aprire il file in una soluzione software di terze parti, convertirlo in una tabella completa o semplicemente archiviarlo per un utilizzo futuro.
Cheatsheet di PowerShell – CONCLUSIONE
Sebbene ci siano ancora molte persone che sostengono CMD, a dire il vero PowerShell è più versatile, molto più potente, ma allo stesso tempo più complicato da utilizzare rispetto alla sua controparte CMD tradizionale. L'enorme quantità di funzionalità, combinata con il fatto che è possibile creare script di automazione in PowerShell ed eseguire complicate operazioni di gestione del sistema, lascia CMD in un cono d'ombra.
Se stai appena iniziando a scoprire PowerShell e stai lottando per capire cosa fa ogni comando, come eseguire la pipeline di diversi comandi o come creare ed eseguire semplici script PowerShell da solo, la nostra guida è un ottimo punto di partenza. Ci siamo presi il nostro tempo per spiegare alcuni dei comandi più importanti che dovresti conoscere in PowerShell, abbiamo creato alcuni brevi tutorial e incluso anche un elenco di comandi di base di PowerShell, i loro alias e brevi descrizioni per ogni elemento, solo per semplificare il tuo viaggio alla scoperta di PowerShell.


