Nếu bạn là người dùng thành thạo Windows, bạn có thể biết và hiểu cách thực hiện các hoạt động khác nhau trên PC của mình có thể có nhiều hơn một cách tiếp cận và các ứng dụng GUI chuyên dụng đôi khi bị hạn chế hơn (và ít thỏa mãn hơn, hãy trung thực) so với việc nhập lệnh vào một dòng lệnh theo cách thủ công. Chỉ có cảm giác hài lòng khi bạn nhìn thấy bức tường văn bản đó mở ra trước mặt bạn, và nếu kết quả không phải là lỗi, nó làm cho nó trở nên đáng giá hơn.

Trên PC Windows, chỉ có hai cách bạn có thể đạt được điều này: thông qua CMD hoặc PowerShell. Mặc dù CMD phổ biến hơn PowerShell một chút, nhưng nó cũng kém mạnh mẽ hơn, vì đối tác của nó cho phép bạn thực hiện nhiều thao tác hơn, bao gồm cả những thao tác mà bạn có thể chạy qua CMD. Bạn có thể nói rằng PowerShell kết hợp sức mạnh của CMD cũ với khả năng viết kịch bản và lệnh ghép ngắn, mang lại cho bạn rất nhiều khả năng liên quan đến các hoạt động mà bạn có thể thực hiện với nó.
Tuy nhiên, số lượng tuyệt đối các thao tác bạn có thể thực hiện bằng cách sử dụng PowerShell có thể khá đáng sợ ngay cả đối với những người dùng dày dạn kinh nghiệm, chưa kể những người dùng chưa bao giờ nghe nói về CMD (chưa nói đến PowerShell) trước đây. Tuy nhiên, đừng lo lắng, chúng tôi sẽ thử và dạy bạn một số thủ thuật đơn giản mà bạn có thể thực hiện với PowerShell và thậm chí có thể ghi nhớ về lâu dài. Mặc dù “khóa học về sự cố” này của chúng tôi sẽ không phục vụ như một hướng dẫn toàn diện cho PowerShell, nhưng hy vọng nó sẽ giúp bạn tìm ra cách sử dụng PowerShell bằng cách cung cấp cho bạn một vài gợi ý và giải thích một loạt các lệnh. Nếu bạn đã sẵn sàng, hãy bắt đầu.
PowerShell là gì?
Như chúng tôi đã đề cập ngắn gọn ở trên, PowerShell là một công cụ mạnh mẽ mà bạn có thể sử dụng cho một loạt các hoạt động. Hơn thế nữa, PowerShell là một giải pháp tự động hóa tác vụ bao gồm một số công cụ mạnh mẽ, bao gồm nhưng không giới hạn ở trình bao dòng lệnh (chẳng hạn như CMD), ngôn ngữ kịch bản, cũng như khung quản lý cấu hình.
Trái ngược với các trình bao khác chỉ có thể chấp nhận và trả về văn bản, PowerShell cũng có thể chấp nhận và trả về các đối tượng .NET nhờ vào số lượng tính năng vượt trội mà nó bao gồm. Một số tính năng quan trọng nhất liên quan đến trình bao của PowerShell như sau:
- Dự đoán lệnh và hoàn thành tab
- Hỗ trợ bí danh lệnh và tham số
- Lịch sử dòng lệnh toàn diện
- Khả năng chuỗi lệnh thông qua đường ống
- Hệ thống trợ giúp trong bảng điều khiển tương tự như các trang nam trong hệ thống dựa trên Unix
Tuy nhiên, đó chỉ là phần nổi của tảng băng trôi vì, như chúng tôi đã đề cập trước đây, PowerShell không chỉ là một cái vỏ; bạn có thể sử dụng nó như một ngôn ngữ kịch bản mạnh mẽ để tự động hóa các hoạt động quản lý hệ thống, nhưng cũng có thể nếu bạn muốn xây dựng, phân tích, kiểm tra và triển khai các giải pháp trong các môi trường khác nhau.
Cho rằng PowerShell dựa trên .NET CLR (.NET Common Language Runtime), thật dễ hiểu tại sao tất cả các đầu vào và đầu ra mà PowerShell hoạt động với đều là các đối tượng .NET. Ngoài ra, hoàn toàn không cần phân tích cú pháp đầu ra văn bản chỉ để PowerShell có thể trích xuất thông tin từ nó. Trong số các tính năng tập lệnh của PowerShell, bạn có thể tìm thấy những tính năng sau:
- Hệ thống định dạng toàn diện đảm bảo đầu ra sạch sẽ, dễ dàng
- Tạo các kiểu động thông qua một hệ thống kiểu mở rộng
- Bạn có thể mở rộng khả năng của PowerShell thông qua các lớp, chức năng, mô-đun và tập lệnh
- Hỗ trợ riêng cho các định dạng dữ liệu khác nhau, bao gồm XML, JSON và CSV
Nếu bạn quan tâm hơn đến việc quản lý và định cấu hình cơ sở hạ tầng doanh nghiệp của mình thông qua mã, bạn sẽ vui mừng khi biết rằng PowerShell cũng cung cấp cho bạn khả năng này thông qua khung quản lý Cấu hình trạng thái mong muốn (DSC). Trong số các thao tác bạn có thể dễ dàng thực hiện bằng cách sử dụng DSC của PowerShell, chúng tôi nhắc bạn về:
- Triển khai các sơ đồ cấu hình khác nhau bằng cách sử dụng mô hình đẩy hoặc kéo
- Thiết kế các tập lệnh tùy chỉnh và cấu hình khai báo mà bạn có thể sử dụng cho các triển khai có thể lặp lại trong môi trường của mình
- Thực thi các lược đồ cấu hình khác nhau
- Báo cáo về sai lệch cấu hình
PowerShell có một dòng lệnh độc quyền đi kèm với ngôn ngữ lập trình độc quyền hơi giống với Perl. Lưu ý rằng ban đầu, PowerShell được phát triển để giúp người dùng quản lý các đối tượng trên máy tính của họ, nhưng, như bạn có thể hình dung, nó đã trải qua một chặng đường dài và hiện được sử dụng cho các công việc phức tạp hơn.
Ví dụ: bạn có thể sử dụng môi trường làm việc mở rộng của PowerShell không chỉ để thực hiện các hoạt động quản lý hệ thống khác nhau mà còn để tự động hóa chúng để bạn không phải tham gia vào các tác vụ lặp đi lặp lại tẻ nhạt liên tục. Cũng khá quan trọng khi đề cập rằng bạn có thể truy cập rất nhiều tài nguyên chỉ thông qua một chương trình (tức là PowerShell), bao gồm, nhưng không giới hạn ở:
- Hướng dẫn quản trị window
- .NET Framework API
- Dấu nhắc lệnh
- Mô hình đối tượng thành phần Windows
- Lệnh PowerShell
Ngày nay, một trong những mục đích phổ biến nhất của PowerShell là giúp người dùng cuối tự động hóa các tác vụ quản lý hệ thống, do đó giúp họ tránh tham gia vào một loạt các hoạt động lặp đi lặp lại nhàm chán. Việc loại bỏ yếu tố con người khỏi các hành động lặp đi lặp lại đã được chứng minh là giúp tăng hiệu quả và giảm thiểu sai sót của con người do nhiều nguyên nhân khác nhau, vì vậy đây thực sự là một lợi ích chung cho tất cả mọi người.
Bạn có thể sử dụng PowerShell để đưa ra các lệnh đơn giản hoặc phức tạp hơn, nhưng chương trình này cũng có thể giúp bạn tạo các tập lệnh dựa trên các lệnh đó, các tập lệnh này sẽ được PowerShell chạy tự động. Hơn nữa, có một lượng lớn lệnh mà bạn có thể tùy chỉnh và phát hành sau đó được gọi là lệnh ghép ngắn.
Điều đáng nói là PowerShell là mã nguồn mở và đa nền tảng, có nghĩa là bạn cũng có thể sử dụng nó trên các hệ thống khác như Mac hoặc Linux nguyên bản m�� không cần dùng đến các thủ thuật và các công cụ nâng cao khả năng tương thích như Wine hoặc Boot Camp.
Danh sách các lệnh PowerShell cơ bản
Chúng tôi hiểu rằng PowerShell có thể cảm thấy hơi đáng sợ, đặc biệt là bây giờ bạn đã phát hiện ra rằng nó không chỉ đơn giản là một dấu nhắc lệnh khác trên máy tính của bạn và nó thực sự bao gồm các tính năng CMD, mà còn có một ngôn ngữ lập trình cụ thể và các tập lệnh khác nhau mà bạn có thể sử dụng để tự động hóa các hoạt động quản lý hệ thống.
Tuy nhiên, nếu bạn cảm thấy quyết tâm sử dụng PowerShell và tất cả những gì nó cung cấp, chúng tôi thực sự khuyên bạn nên bắt đầu với các tính năng cơ bản nhất của nó. Bằng cách đó, bạn sẽ không phải quay lại tiến độ hàng tháng trời khi phát hiện ra rằng mình đã vô tình sử dụng sai chức năng và tất cả công việc bạn đã thực hiện trong thời gian này bắt đầu giống như một ký ức xa xăm.
Đó chính là lý do tại sao chúng tôi đã chuẩn bị một danh sách các lệnh cơ bản mà bạn có thể sử dụng một cách an toàn trong các phiên PowerShell của mình để kiểm tra các tính năng của chương trình mạnh mẽ này và xem cái nào thực hiện chính xác những gì. Danh sách bên dưới bao gồm tên lệnh, bí danh của chúng và mô tả ngắn gọn về chức năng của mỗi lệnh.
Lưu ý rằng bạn có thể sử dụng tên lệnh hoặc bí danh của chúng và kết quả sẽ hoàn toàn giống nhau. Lý do tại sao người ta thích sử dụng bí danh là chúng gõ nhanh hơn rất nhiều và nếu bạn có thể nhớ chính xác chúng và liên kết chúng với tên lệnh tương ứng của chúng, sẽ có ý nghĩa hơn nếu bạn muốn hoàn thành công việc nhanh chóng.
| Tên lệnh |
Bí danh |
Sự miêu tả |
| Nội dung bổ sung |
AC |
Cho phép bạn nối nội dung (ví dụ: từ hoặc dữ liệu) vào một tệp |
| Add-PSSnapIn |
asnp |
Giúp bạn thêm nhiều snap-in Windows PowerShell vào
phiên hiện tại |
| Nội dung rõ ràng |
clc |
Xóa nội dung của một mục mà không xóa mục thực tế |
| Xóa lịch sử |
vón cục |
Xóa bất kỳ và tất cả các mục khỏi lịch sử lệnh |
| Clear-Host |
thông thoáng |
Xóa màn hình của chương trình chủ nhà |
| Clear-Host |
cls |
Điều tương tự như rõ ràng |
| Clear-Item |
cli |
Xóa nội dung của một mục mà không xóa mục thực tế |
| Clear-ItemProperty |
clp |
Xóa sạch giá trị của thuộc tính mà không thực sự xóa chính thuộc tính đó |
| Clear-Variable |
clv |
Xóa giá trị của một biến |
| Đối tượng so sánh |
đối chiếu |
Cho phép bạn so sánh hai bộ đối tượng |
| Đối tượng so sánh |
khác biệt |
Có điều tương tự như so sánh |
| Connect-PSSession |
cnsn |
Cho phép bạn kết nối lại với các phiên bạn đã ngắt kết nối |
| Convert-Path |
cvpa |
Cho phép bạn chuyển đổi đường dẫn Windows
PowerShell thành đường dẫn nhà cung cấp Windows PowerShell |
| Copy-Item |
sao chép |
Giúp bạn sao chép một mục từ một vị trí cụ thể sang một vị trí khác |
| Copy-Item |
cp |
Có tương tự như bản sao không |
| Copy-Item |
cpi |
Làm điều tương tự như bản sao và cp |
| Copy-ItemProperty |
cpp |
Cho phép bạn sao chép một giá trị và một thuộc tính từ một vị trí nhất định sang một vị trí
khác |
| Disable-PSBreakpoint |
dbp |
Giúp bạn vô hiệu hóa các điểm ngắt trong bảng điều khiển hiện tại |
| Ngắt kết nối-PSSession |
dnsn |
Ngắt kết nối bạn khỏi phiên hiện tại |
| Enable-PSBreakpoint |
ebp |
Cho phép bạn bật các điểm ngắt trong bảng điều khiển hiện tại |
| Enter-PSSession |
etsn |
Giúp bạn khởi chạy một phiên tương tác với một thiết bị từ xa |
| Exit-PSSession |
exsn |
Kết thúc phiên tương tác bằng thiết bị từ xa |
| Xuất-Bí danh |
sử thi |
Cho phép bạn xuất thông tin về bí danh hiện được xác định
sang tệp đầu ra |
| Export-Csv |
epcsv |
Cho phép bạn chuyển đổi các đối tượng thành nhiều chuỗi được phân tách bằng dấu phẩy (CSV)
và xuất các chuỗi đó sang tài liệu CSV |
| Export-PSSession |
epsn |
Nhập các lệnh từ một phiên khác và xuất chúng sang
mô-đun Windows PowerShell |
| ForEach-Object |
% |
Thực hiện một thao tác cụ thể đối với từng mục có
trong tập hợp các đối tượng đầu vào |
| ForEach-Object |
cho mỗi |
Làm điều tương tự như % |
| Định dạng-Tùy chỉnh |
fc |
Giúp bạn sử dụng chế độ xem tùy chỉnh để định dạng đầu ra |
| Định dạng-Danh sách |
fl |
Cho phép bạn định dạng đầu ra dưới dạng danh sách thuộc tính trong đó mỗi thuộc tính
được đặt trên một dòng mới |
| Định dạng-Bảng |
ft |
Cho phép bạn định dạng đầu ra dưới dạng bảng |
| Định dạng rộng |
fw |
Giúp bạn định dạng các đối tượng dưới dạng bảng rộng, nơi chỉ một thuộc tính của
mỗi đối tượng được hiển thị |
| Get-Alias |
gal |
Tìm nạp bí danh của bạn cho phiên hiện tại của bạn |
| Get-ChildItem |
dir |
Tìm nạp danh sách tất cả các tệp và thư mục trong ổ đĩa hệ thống tệp |
| Get-ChildItem |
gci |
Làm điều tương tự như dir |
| Get-ChildItem |
ls |
Làm điều tương tự như dir và gci |
| Nhận lệnh |
gcm |
Tìm nạp danh sách tất cả các lệnh bạn có thể sử dụng |
| Có được nội dung |
con mèo |
Hiển thị nội dung của một tệp |
| Có được nội dung |
gc |
Làm điều tương tự như mèo |
| Get-History |
ghy |
Tìm nạp danh sách tất cả các lệnh bạn đã nhập trong phiên hiện tại của mình |
| Get-History |
h |
Có tương tự như ghy không |
| Get-History |
Môn lịch sử |
Có tương tự như ghy và h |
| Get-Item |
gi |
Cho phép bạn tìm nạp các tệp và thư mục |
| Get-ItemProperty |
gp |
Tìm nạp các thuộc tính của mục bạn đã chỉ định |
| Nhận việc làm |
gjb |
Truy xuất danh sách tất cả các công việc nền Windows PowerShell
hiện đang chạy trong phiên của bạn |
| Nhận-Vị trí |
gl |
Tìm nạp thông tin về ngăn xếp vị trí hiện tại hoặc vị trí làm việc của bạn |
| Nhận-Vị trí |
pwd |
Làm điều tương tự như gl |
| Nhận thành viên |
gm |
Tìm nạp tất cả các thuộc tính và phương thức của các đối tượng được chỉ định |
| Nhận mô-đun |
gmo |
Truy xuất danh sách các mô-đun đã nhập hoặc mô-đun có thể được nhập vào
phiên hiện tại |
| Nhận-Xử lý |
gps |
Tìm nạp danh sách tất cả các quy trình đang chạy cục bộ hoặc trên
máy tính từ xa |
| Nhận-Xử lý |
ps |
Làm điều tương tự như gps |
| Get-PSBreakpoint |
gbp |
Truy xuất tất cả các điểm ngắt được đặt trong phiên hiện tại của bạn |
| Get-PSCallStack |
gcs |
Hiển thị ngăn xếp cuộc gọi hiện tại của bạn |
| Get-PSDrive |
gdr |
Tìm nạp các ổ đĩa trong phiên hiện tại của bạn |
| Get-PSSession |
gsn |
Truy xuất danh sách các phiên Windows PowerShell cục bộ và từ xa |
| Get-PSSnapIn |
gsnp |
Tìm nạp danh sách tất cả các snap-in Windows PowerShell trên máy tính |
| Nhận dịch vụ |
gsv |
Liệt kê tất cả các dịch vụ trên máy tính cục bộ hoặc máy tính từ xa |
| Độc đáo |
gu |
Lấy các mục duy nhất từ danh sách đã sắp xếp |
| Nhận-Biến |
gv |
Hiển thị danh sách tất cả các biến trong bảng điều khiển hiện tại |
| Get-WmiObject |
gwmi |
Tìm nạp các
cá thể của lớp Công cụ quản lý Windows (WMI) hoặc thông tin về các lớp có sẵn |
| Nhóm-Đối tượng |
tập đoàn |
Cho phép bạn nhóm các đối tượng có cùng giá trị cho các thuộc tính
mà bạn chỉ định |
| Cứu giúp |
Đàn ông |
Hiển thị thêm chi tiết về các lệnh và
khái niệm Windows PowerShell |
| Nhập-Bí danh |
ipal |
Cho phép bạn nhập danh sách các bí danh từ một tệp |
| Nhập-Csv |
ipcsv |
Tạo các đối tượng tùy chỉnh giống như bảng bằng cách sử dụng tất cả các mục có trong
tệp CSV |
| Mô-đun nhập khẩu |
ipmo |
Nhập mô-đun vào phiên hiện tại của bạn |
| Nhập-PSSes sion |
ipsn |
Nhập các lệnh từ một phiên khác vào phiên hiện tại của bạn |
| Gọi-Lệnh |
icm |
Cho phép bạn thực hiện các lệnh trên máy tính cục bộ và máy tính từ xa |
| Gọi-Biểu thức |
iex |
Cho phép bạn thực hiện các lệnh hoặc biểu thức trên máy tính cục bộ |
| Lịch sử gọi |
ihy |
Thực thi các lệnh từ lịch sử phiên của bạn |
| Lịch sử gọi |
r |
Có điều tương tự như ihy không |
| Gọi-Mục |
ii |
Thực hiện hành động mặc định trên một mục được chỉ định |
| Invoke-RestMethod |
irm |
Gửi yêu cầu HTTP hoặc HTTPS tới dịch vụ web RESTful |
| Gọi-WebRequest |
Xoăn |
Lấy nội dung từ một trang web trên Internet |
| Gọi-WebRequest |
I WR |
Làm điều tương tự như cuộn tóc |
| Gọi-WMIMethod |
iwmi |
Cho phép bạn gọi
các phương thức của Công cụ quản lý Windows (WMI) |
| Đối tượng đo lường |
đo lường |
Xác định các thuộc tính số của các đối tượng, cũng như các từ,
dòng và ký tự trong các đối tượng chuỗi |
| mkdir |
md |
Tạo một mục mới (thư mục) |
| Vật phẩm di chuyển |
mi |
Cho phép bạn di chuyển một mục từ một vị trí cụ thể đến một vị trí khác |
| Vật phẩm di chuyển |
di chuyển |
Làm điều tương tự như mi |
| Vật phẩm di chuyển |
mv |
Làm điều tương tự như mi và di chuyển |
| Move-ItemProperty |
mp |
Cho phép bạn di chuyển thuộc tính từ một vị trí cụ thể đến một địa điểm khác |
| Bí danh mới |
nal |
Cho phép bạn tạo bí danh mới |
| Vật phẩm mới |
ni |
Cho phép bạn tạo một mục mới |
| Mô-đun mới |
nmo |
Tạo một mô-đun động mới chỉ tồn tại trong bộ nhớ |
| New-PSDrive |
gắn kết |
Cho phép bạn tạo các ổ đĩa mạng được ánh xạ tạm thời và liên tục |
| New-PSDrive |
ndr |
Làm điều tương tự như gắn kết |
| New-PSSession |
nsn |
Thiết lập kết nối liên tục với máy tính cục bộ hoặc máy tính từ xa |
| New-PSSessionConfigurationFile |
npssc |
Tạo tệp cấu hình phiên |
| Biến mới |
nv |
Cho phép bạn tạo một biến mới |
| Out-GridView |
ogv |
Cho phép bạn gửi kết quả đến một bảng tương tác trong một cửa sổ riêng biệt |
| Máy chủ bên ngoài |
ồ |
Gửi đầu ra tới dòng lệnh (CMD) |
| Máy in ngoài |
lp |
Cho phép bạn gửi đầu ra đến máy in |
| Vị trí cửa sổ bật lên |
popd |
Sửa đổi vị trí hiện tại của bạn thành vị trí đã được đẩy lên
ngăn xếp gần đây nhất. Bạn có thể sử dụng Push-Locationcmdlet ( pushd ) để
bật vị trí hoặc ngăn xếp mặc định của nó hoặc từ ngăn xếp mà bạn tạo. |
| powershell_ise.exe |
ise |
Hiển thị giải thích về cách bạn có thể sử dụng
công cụ dòng lệnh PowerShell_ISE.exe |
| Vị trí đẩy |
pushd |
Nối vị trí hiện tại vào đầu ngăn xếp vị trí |
| Nhận công việc |
rcjb |
Tìm nạp kết quả của các
công việc nền Windows PowerShell phiên hiện tại |
| Nhận-PSSession |
rcsn |
Truy xuất kết quả của các lệnh từ các phiên bị ngắt kết nối |
| Loại bỏ mục |
del |
Xóa các tệp và thư mục |
| Loại bỏ mục |
tẩy xóa |
Làm điều tương tự như del |
| Loại bỏ mục |
rd |
Làm điều tương tự như del và xóa |
| Loại bỏ mục |
ri |
Làm tương tự như del , xóa và rd |
| Loại bỏ mục |
rm |
Làm tương tự như del , delete , rd và ri |
| Loại bỏ mục |
rmdir |
Xóa các thư mục |
| Loại bỏ-ItemProperty |
rp |
Cho phép bạn xóa một thuộc tính và giá trị của nó khỏi một mục nhất định |
| Xóa công việc |
rjb |
Cho phép bạn xóa công việc nền Windows PowerShell |
| Loại bỏ mô-đun |
rmo |
Giúp bạn xóa các mô-đun khỏi phiên hiện tại của bạn |
| Xóa-PSBreakpoint |
rbp |
Cho phép bạn xóa các điểm ngắt khỏi bảng điều khiển hiện tại |
| Xóa-PSDrive |
rdr |
Loại bỏ các ổ Windows PowerShell tạm thời, cũng như ngắt kết nối
các ổ đĩa mạng được ánh xạ |
| Xóa-PSSession |
rsn |
Cho phép bạn đóng một hoặc nhiều phiên Windows PowerShell (PSSessions) |
| Remove-PSSnapin |
rsnp |
Cho phép bạn xóa phần đính kèm Windows PowerShell khỏi
phiên hiện tại của bạn |
| Loại bỏ-Biến |
rv |
Xóa một biến và giá trị của nó |
| Loại bỏ WMIObject |
rwmi |
Cho phép bạn xóa một phiên bản của
lớp Công cụ quản lý Windows (WMI) hiện có |
| Đổi tên-Mục |
ren |
Giúp bạn đổi tên một mục trong không gian tên nhà cung cấp Windows PowerShell |
| Đổi tên-Mục |
rni |
Làm điều tương tự như ren |
| Đổi tên-ItemProperty |
rnp |
Cho phép bạn đổi tên thuộc tính của một mục |
| Giải quyết-Đường dẫn |
rvpa |
Giải quyết các ký tự đại diện trong một đường dẫn, cũng như hiển thị nội dung
của đường dẫn |
| Resume-Job |
rujb |
Giúp bạn khởi động lại công việc đã bị tạm ngừng |
| Chọn-Đối tượng |
lựa chọn |
Cho phép bạn chọn các đối tượng cũng như thuộc tính của chúng |
| Đặt-Bí danh |
sal |
Lets you create or change a cmdlet’s or command element’s alias
(alternate name) in the current Windows PowerShell session |
| Set-Content |
sc |
Allows you to replace a file’s contents with contents that you specify. |
| Set-Item |
si |
Changes an item’s value to a value that’s specified in the command |
| Set-Location |
cd |
Lets you set your current working location to a specified location (changes
the active location) |
| Set-Location |
chdir |
Does the same thing as cd |
| Set-PSBreakpoint |
sbp |
Lets you set a breakpoint on a command, variable, or line |
| Set-Variable |
set |
Enables you to set a variable’s value or generates a variable if one with
the requested name does not exist |
| Show-Command |
shcm |
Displays a list of Windows PowerShell commands in a graphical
command window |
| Start-Job |
sajb |
Starts a background job in Windows PowerShell |
| Start-Process |
saps |
Launches one or more local processes |
| Start-Service |
sasv |
Lets you start one or more stopped services |
| Stop-Process |
kill |
Helps you stop one or more running processes |
| Where-Object |
? |
Enables you to select certain objects from a collection based on their
property values |
| Write-Output |
echo |
Allows you to send an object to the next command in the pipeline. If it
reaches the last command in the pipeline, the command will display
the objects in the console |
Don’t let the sheer amount of basic PowerShell commands intimidate you. Although we called them basic, there’s absolutely no need for you to start memorizing them. In fact, that’s the exact reason why we created the table above so that you can go on about your work without worrying about having to remember each and every command we mentioned above.
You can use it as a quick refresher or even use your browser’s search feature to locate a specific command, its alias, and what it does if you’re confused. Although we already included this piece of information in the table above, if you’re ever confused while working in PowerShell, using the help command will display a few helpful details on how you can use this program and its commands more efficiently.
You can also pair the help command with another command or alias if you want more details about that specific command. For instance, this is what PowerShell displays when you type help Add-Computer:
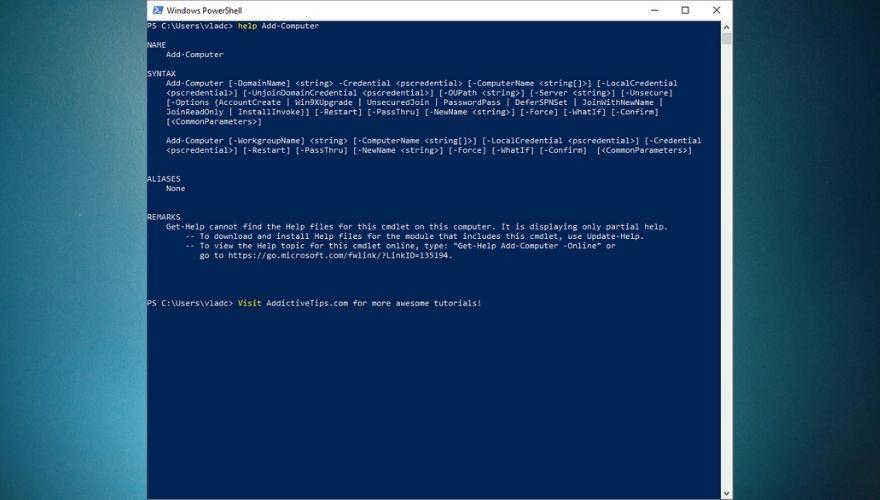
However, you can use help with any other of the commands or their aliases in our table above. Make sure you understand that the same command can have multiple aliases, which means that you can achieve the same result by using various aliases. Although this may sound confusing, it actually gives you plenty of flexibility in case you can’t remember one command alias, but you remember another one that can help you achieve the same goal.
Using PowerShell
Naturally, the first thing you’d want to do is locate PowerShell and launch it. One sure way to launch PowerShell from just about anywhere you are on your PC is to hold down the Shift button on your keyboard, right-click any empty spot on your screen (not a menu, icon, button, or similar object), and select Open PowerShell window here from the context menu.
In addition to giving you quick access to the PowerShell console anywhere on your PC, doing so will automatically switch the default working directory for PowerShell to the one you’re currently located at. If you’re on a Windows 10 PC, you can also launch PowerShell by pressing the Win key on your keyboard, typing PowerShell in the Start menu, and selecting PowerShell when it becomes visible in the list of results.
On older versions of Windows, you’ll need to manually locate the PowerShell executable, which you can either find in the Accessories or System folders in your Start menu. Furthermore, seeing how older systems (such as Windows 7) don’t provide you with PowerShell by default, you’ll also have to install it on your computer, along with all of its dependencies.
Notice how launching PowerShell from the Start menu will set your active working directory to C:\Users\[your username here]. By comparison, using the Shift + Right-click method we’ve presented above will set PowerShell’s active directory to the one you’re currently at when you spawn the console. For instance, if you use Shift + right-click and open PowerShell from your desktop, you’ll notice that the active directory will be C:\Users\[your username here]\Desktop. For obvious reasons, the [your username here] part will be different depending on your username.
Although you can keep PowerShell for home usage just fine, it’s better if you could make use of all that it has to offer. Incidentally, these features make PowerShell awesome for corporate usage, where you need to perform a large number of operations in a short time, and most likely on a huge number of devices.
Thus, instead of running each command manually on every single machine, you could simply create an automation script in PowerShell and receive the information you need automatically, without having to physically interact with the devices in case or even be near them. Just as CMD, PowerShell can be used through command lines. However, unlike its more rudimentary counterpart (i.e. the CMD), PowerShell also lets you summon scripts and cmdlets, which makes it more powerful, but also more complicated to use.
How to use cmdlets
We’ve used the term cmdlets quite a few times in our guide, so you’re probably left wondering whatever they mean. Well, to start at the beginning, it’s worth reminding you that CMD works with commands. A cmdlet, which is pronounced command-let, is also a command, but unlike traditional CMD commands, cmdlets are specific to PowerShell and let you perform single specific operations, such as copying files, moving items from one place to another, changing the active directory, or see the contents of an item.
Simply put, cmdlets are single function commands that you can type directly in PowerShell’s command line. If you have any prior experience with the CMD, you’ll find PowerShell somewhat intuitive to work with. One interesting thing about PowerShell is that it shares plenty of commands with CMD. Therefore, using CD with PowerShell will still change your active directory, DIR will still display the contents of the current folder, and CP will still let you copy an item from one place to another.
It’s quite worth mentioning that PowerShell is not case sensitive, unlike many other shells, which return errors if you miss using the correct case when typing your commands in them. Thus, copy-item will work just as well as Copy-Item, and if you remember neither one of them you can also use Copy, CP, and CPI (but also copy, COPY, cp, or cpi).
Most PowerShell cmdlets are written in C# and are specially built to perform operations that will return a .NET object as their result. At the time being, you could find more than a couple of hundred cmdlets you can use in PowerShell, which, let’s be fair, gives you more than just a little elbow room as far as performing operations goes.
Although it will be difficult to remember all the cmdlets you may have to work with (remember that you can use the table above), there are a few that you’ll use more frequently, which will make them incredibly easy to remember. Not to mention the fact that some of them are intuitive enough that their name actually gives away their purpose (e.g. copy is used to copy items, move can be used to move files, compare helps you compare sets of objects, etc).
However, if you’re not exactly in the mood to bookmark this article to use it later, you could also type in the Get-Command cmdlet in PowerShell, or gcm, if you want to keep things short. Doing so will display a full list of commands that are available to you, and you can use that list to plan ahead on whatever it is you’re trying to do.
Unlocking custom cmdlets
On the downside, Microsoft doesn’t just give you full access to the whole array of cmdlets that you can use in PowerShell by default, so you’ll have to jump through a bunch of extra hoops to unlock this feature and use it at your leisure. The good news is that the unlocking process doesn’t take long, and then there’s the fact that it can also be done through the PowerShell, which will make great practice for you. Without any further ado, let’s see how you can unlock custom cmdlets privileges in PowerShell.
- Log in to an Administrator account (it won’t work without Admin rights)
- Launch PowerShell with Administrator rights (Run as administrator)
- Type the following command in PowerShell and press Enter:
- If done right, PowerShell will prompt you with a dialog, asking you for the new ExecutionPolicy value
- Type
RemoteSigned in the PowerShell command prompt and press Enter
- PowerShell will give you a heads up on the risks of modifying the value of the ExecutionPolicy
- Type Y and press the Enter key
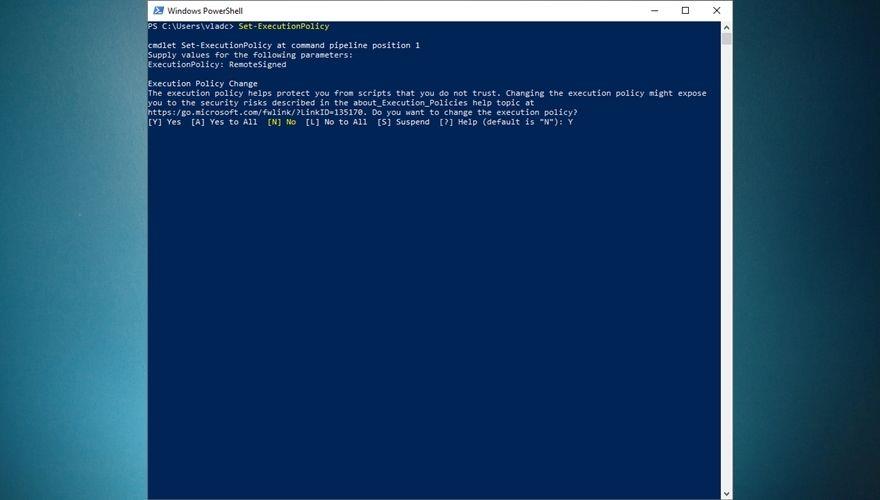
- If you need to turn custom cmdlets off, just follow steps 1-4, and when PowerShell asks you to type the value, type
Restricted and confirm your choice as you did at step 7
If you want to streamline the whole process and not waste time typing everything down in PowerShell’s command prompt, you’ll be glad to learn that there’s an even simpler way to achieve the same result. Launch PowerShell with Administrator rights as you did at step one, and instead of typing each command and waiting for the prompt, you’re gonna pipeline everything up until the confirmation by typing this:
Set-ExecutionPolicy -ExecutionPolicy RemoteSigned
Naturally, you will still need to confirm your choice by typing Y and hitting Enter on your keyboard, but you just skipped a step and performed a series of operations at the same time. This is exactly why advanced PowerShell users create automation scripts to perform various management operations automatically: to save time and hassle. If you want, you can use the same command above to disable custom cmdlets on your system, but you’ll have to replace RemoteSigned with Restricted and also confirm your choice at the end.
You can also use AllSigned and Unrestricted to grant yourself even more privileges when it comes to running potentially unsafe scripts on your Windows PowerShell. The AllSigned option will let you run all scripts that were created by trusted publishers, whereas the Unrestricted option will enable PowerShell to run any script, regardless of its provenience and trustworthiness. Naturally, the Unrestricted option is also the most dangerous, so try to avoid it as best as you can, if possible, especially if you are a PC novice.
See? PowerShell is already starting to look a lot more accessible than it did just a few minutes back.
How to create and use scripts in PowerShell
As we’ve mentioned before and we’re positively sure you remember, you can use PowerShell to run automation scripts. However, you can’t just yell at PowerShell “Hey you, create this script for me!” and expect it to magically work, so you’ll have to put in some elbow grease and get it done yourself. However inconvenient this may sound right now, trust us, you’ll be thankful in the long run, considering all the work you won’t need to do anymore.
Although most of us rely on specialized software such as IDEs to create scripts or programs in a specific programming language, truth be told you can use any text editor as long as it can save files to the right extension. And even if it can’t, you can just navigate to the file you created and modify its extension manually by renaming it, but let’s get back to our sheep.
If you’re interested in creating a script that can work in PowerShell, you’ll be thrilled to learn that this script you’ve probably heard a lot of, is merely a text document with an extension that makes it compatible with PowerShell, PS1. Therefore, it’s easy to see why creating these scripts can be actually handled from within virtually any text editor, as long as you save it with the right (PS1) extension.
Write-host "Please enter your name:"
$Name = read-host
"Hello $Name! Visit TipsWebTech360.com for more awesome tutorials and guides!"
Now for the actual creation part:
- Launch Notepad (or any other text editor for that matter)
- Copy the code above (the script you’ll be creating and running)
- Paste it into your new Notepad document
- Use CTRL + S to save the document
- Type
script.ps1 as the file name
- Save the file somewhere accessible
- Open a PowerShell instance with administrator rights (very important)
- Make sure you’ve enabled custom scripts on your system (check sections above)
- Navigate to the location where you saved the script
- Type the full path of the script to run it
- For instance, if your script is in a Scripts folder on your C drive, your command will be
C:\Scripts\script.ps1
- Alternatively, you could simply navigate to the location of your script and use this command to run it:
.\script.ps1
If you can’t run the script and PowerShell returns an error, make sure you’ve enabled PowerShell to run custom scripts on your system, and that you’re running PowerShell as an administrator. Not doing any or both things that we’ve specified in our instructions will most likely result in an error and you won’t be able to run your script.
Remember that this is merely a basic script that is somewhat similar to the classic “Hello, world!” one. It puts a spin on it by interacting with you (i.e. asking what your name is) and letting you interact with it (i.e. typing your name which will be used to print a message for you). However, PowerShell is capable of running far more complex scripts, ranging from collecting data from an array of machines to intricate data management, advanced system configuration operations, and even creating backups of SQL databases in a blink of an eye.
How can I backup SQL databases with PowerShell?
We’re glad you asked. As we’ve mentioned countless times in our guide, there are almost endless possibilities when it comes to operations that PowerShell can help you perform. One of the most popular ones is backing up an SQL database without having to go great lengths or possess extraordinary database management capabilities. All you have to do is fire up an elevated instance of PowerShell (with Administrator privileges) and use the Backup-SqlDatabase command. However, things are a bit more complicated than that, but we’ll get to that in a few.
Backing up an SQL database isn’t as easy as simply copying files from your PC to a safe location and hope they stay safe for whenever you may need them to perform data restoration operations, but on the bright side, using PowerShell can make it look like a walk in the park. Although there are several ways to achieve this, using the command we’ve mentioned above is the fastest, simplest way to backup an SQL database.
Among the capabilities of the Backup-SqlDatabase command, it’s possible to find full database backups, database file backups, as well as transaction log backups, so you got the full package within a single command-line tool. By default, using this command will perform a full database backup, so you will need to specify if you want it to follow a certain set of rules by using the BackupFile parameter.
Note that some versions of PowerShell won’t feature this command by default, so you’ll either have to import it or install it. The good news is that installing the SQL module isn’t exactly rocket science and can be accomplished even by novices. Here’s what you’ll have to do if you can’t use the Backup-SqlDatabase command in your PowerShell session:
- Launch PowerShell with administrator rights
- Type the following command:
- When asked to confirm your actions, type Y and hit Enter on your keyboard
- Confirm the untrusted repository once more by typing Y and Enter
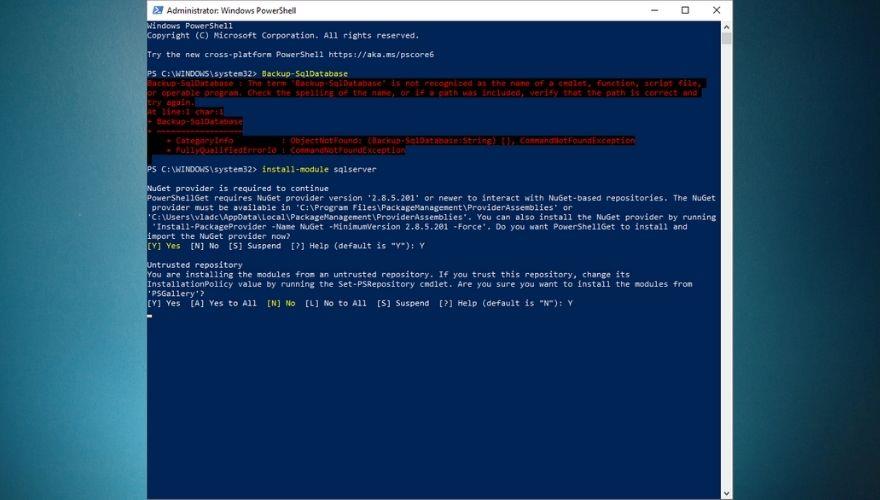
- Once the installation is complete, type the following command:
- Try running the Backup-SqlDatabase command by typing it in the PowerShell command-line
- If it works, you should see that PowerShell is asking you to supply values for some parameters
- If it doesn’t work, make sure that you’ve set PowerShell’s permission to allow it to run custom scripts
1. Complete SQL database backup
Backup-SqlDatabase -ServerInstance "Computer\Instance" -Database "Tips.WebTech360"
The command we’ve exemplified above will generate a full database backup of a database called TipsWebTech360 and save it to the default backup location of the “Computer\Instance” server instance as ‘Tips.WebTech360.bak’.
2. Perform a location-based database backup
Set-Location "SQLSERVER:\SQL\Computer\Instance"PS SQLSERVER:\SQL\Computer\Instance> Backup-SqlDatabase -Database "Tips.WebTech360"
The first command above will change your location to the active directory within the server instance on which the backup will occur. Essentially, this technique works almost like the full database backup we’ve exemplified above, but in this example, you get to change the working directory in order to locate the server instance where the backup occurs.
This operation will also create a full backup of a database called Tips.WebTech360 and export it as an ‘Tips.WebTech360.bak’ file in the default location of the server instance you’re connected to.
3. Perform a transaction log backup
Backup-SqlDatabase -ServerInstance "Computer\Instance" -Database "Tips.WebTech360" -BackupAction Log
If you only need to backup the transaction log of a specific database, PowerShell can also help you do that through a single command you can input straight in its command-line interface. The command above will generate a backup copy of the ‘Tips.WebTech360’ database’s transaction log and export it to the default location of the ‘Computer\Instance’ server instance as a file named ‘Tips.WebTech360.trn’.
4. Create an encrypted SQL database backup
$EncryptionOption = New-SqlBackupEncryptionOption -Algorithm Aes256 -EncryptorType ServerCertificate -EncryptorName "BackupCert"Backup-SqlDatabase -ServerInstance "." -Database "Tips.WebTech360" -BackupFile "Tips.WebTech360.bak" -CompressionOption On -EncryptionOption $EncryptionOption
If you’re worried that your database backup may fall in the wrong hands, PowerShell can also help you create ready-encrypted backup files. Naturally, you’ll have to specify some parameters such as the encryption algorithm, the encryption type (i.e. certificate), server instance, database name, backup file, and whether or not you want the output to be compressed.
The example above will create a backup of a certain ‘Tips.WebTech360’ database, encrypt it with AES-256 encryption and a server certificate, compress it, and save the resulting ‘Tips.WebTech360.bak’ file on the server instance’s default backup location. This is quite important if you plan a migration and have no surefire way to transport all backup files without risking estranging any single one of them.
5. Perform a backup on all databases in a server instance
Get-ChildItem "SQLSERVER:\SQL\Computer\Instance\Databases" | Backup-SqlDatabase
Another tool that may come in handy is PowerShell’s ability to backup all the databases on a server instance at the same time. Regardless of their number, you just fire up PowerShell, type an adaptation of the command above, and wait for the backup process to come to an end. Note that since this will backup all the databases within the server instance, you may have to wait for a while, so be patient.
The command above will back up all the databases located on the ‘Computer\Instance’ server instance and export the resulting files to the default backup location on the same server instance. The names of the backup files will be generated automatically according to each one’s corresponding database followed by the BAK extension (i.e. .bak).
Although there are several more methods to perform SQL backup with PowerShell in various ways, we’ve only presented a few that we felt were more important. Note that the commands we used in our examples above are not likely to work on your environment in their current form, so you will have to adapt them to your current situation.
For instance, you will have to change the ‘Computer\Instance’ parameter to match your own server instance and modify the name of your database to reflect the name of your own database. Remember that you can always turn to the help command in PowerShell if you ever feel that the command you’re trying to run is confusing or doesn’t work as it should.
Must-know PowerShell commands
1. Get-Help
We can’t stress this enough, but the Get-Help command should be the first one you ever learn, as it can seriously get you out of numerous sticky situations where you’re not exactly sure if you’re using the correct command, or exactly what you can achieve with the command that you’re trying to deploy.
Now that you’ve installed the sqlserver module on your system, you can try the Get-Help command now and see how Backup-SqlDatabase works. Just type Get-Help Backup-SqlDatabase in the command-line of PowerShell and brush up your PowerShell SQL database backup skills.
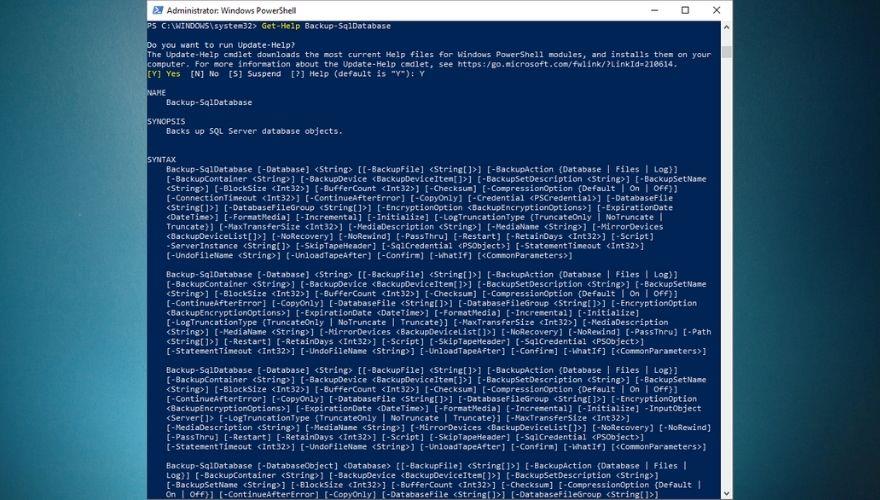
Note that if you just recently installed the sqlserver module on your system, the Help database may still be outdated, and you may need to run an update on it so that it can catch up on any new scripts. By default, PowerShell will detect that the content you’re trying to reach is available online, but you can’t access it locally, and even offer to update the database for you. In this case, all you need to do is type Y when prompted and hit the Enter key on your keyboard.
However, if PowerShell just prompts you with an error stating that there’s no help manual available for the command you’re interested in, you can update it manually by typing Update-Help and hitting the Enter key on your keyboard. After the update process comes to an end, you should be able to check available help documentation for the command you’re interested in.
2. Get-Process
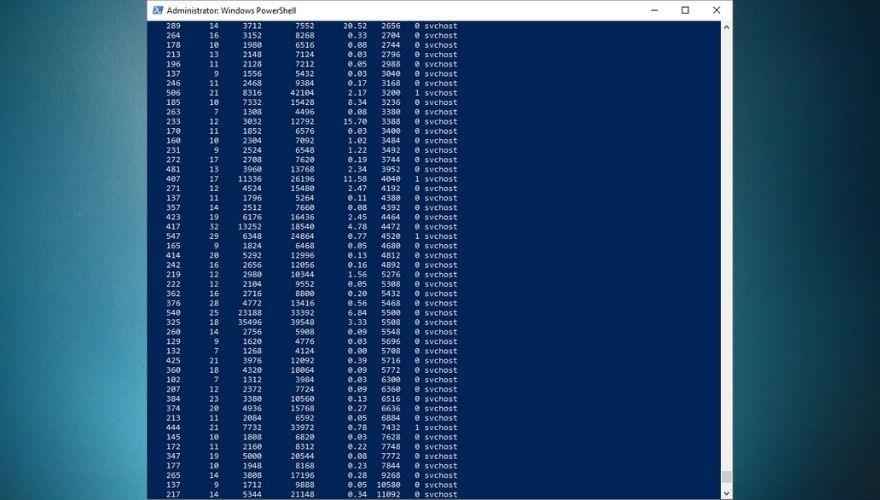
Get-Process is paramount if you want to discover more about the system you’re currently working on. To be more specific, although you might’ve guessed what this command does already by merely looking at it, Get-Process will provide you with a list of all the processes that are currently running on the system you’re working on.
By default, Get-Process will retrieve a list of every process running on the current system you’re working on, so you may need to append some extra parameters to this command if you want more specific information and narrow the list of results. Check out in the screenshots below what you get when you run the Get-Process command by itself versus how it looks if you’re more specific and format the results.
Get-Process explorer | Format-List *
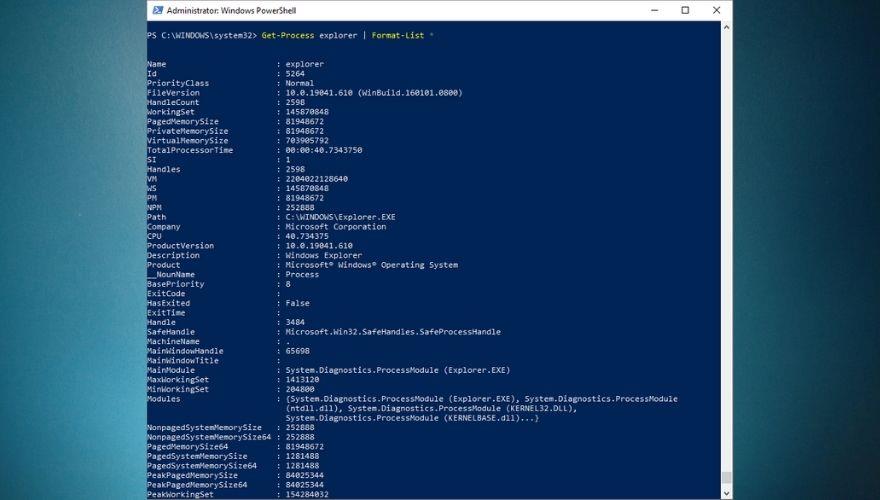
The second command can be customized to display additional details about any active process on your system. You can replace explorer with svchost or Chrome or any other active process on your system that you’re interested in. As we’ve mentioned above, using Get-Processes by itself can help you with that (i.e. finding a list of all running processes).
3. Stop-Process
This command is pretty much self-explanatory, as you may already have figured out that it can help you stop processes that are currently running on your system. The most common reason for doing that from PowerShell and not by using the Windows Task Manager is that sometimes processes can freeze and make GUI apps barely usable.
PowerShell users can easily identify a troublesome process using the Get-Process command we’ve previously explained, then using Stop-Process to terminate it, thus unclogging the system. Running Stop-Process by itself (without any additional parameter) in your PowerShell command-line interface will prompt you to input the ID of the process you’re trying to terminate.
However, you can also terminate a process by its name (if you know it) by appending the -Name parameter to the cmdlet, like in the example below:
Stop-Process -Name "explorer"
The command above will terminate the Explorer process, which can be useful especially if it freezes or crashes on you and refuses to load properly. Note that you’ll need to use quotes when specifying the name of the process you’re trying to terminate. If a process is stubborn and refuses to terminate (usually higher clearance processes do that), you can “convince” it by appending a -Force parameter to your command. Say, for instance, that you can’t terminate your Explorer process. In this case, you can simply type the command below:
Stop-Process -Force -Name "explorer"
Furthermore, it’s worth mentioning that using the -Force parameter in your Stop-Process command won’t ask for confirmation, as opposed to running the command without this option. If you want to find out more about this cmdlet, make sure to use the Get-Help command.
4. Get-Service
This command is among the essential command list for a good reason: it can provide you with a list of all the services that are currently installed on the system you’re working on, regardless of whether they’re running or not. As with many other cmdlets, you can customize Get-Service to provide you with more specific information, either regarding a certain service or even displaying a list of all running (or stopped) services on your machine.
You can go ahead and type Get-Service in your PowerShell command line. Doing so should provide you with a list of all the services available on your computer, as well as their display names and statuses. If you append an additional command to the original cmdlet, you can change the output, making it display only results that you’re interested in.
For instance, typing the command above should return a list of all services available on your computer that start with the letter ‘W’. However, you can go even further and customize your command in order to narrow the list of results even more.
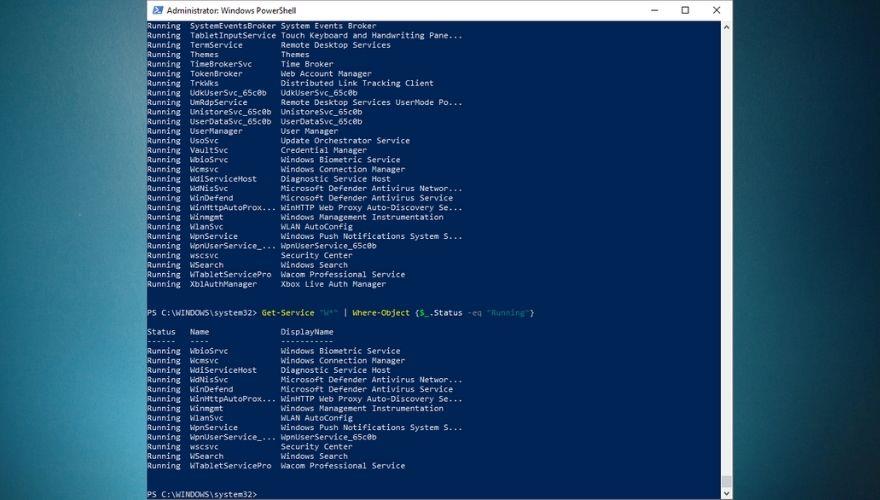
Get-Service | Where-Object {$_.Status -eq “Running”}
The command above will let you see a list of all the available services on your computer that are also running at the time you’re running the cmdlet. Appending the “W*” as we did in the previous example will display a list of all the running services on your computer that start with the letter ‘W’, and the command should look like this:
Get-Service "W*" | Where-Object {$_.Status -eq "Running"}
5. Get-EventLog
Every responsible system administrator should know its way around working with event logs, seeing that these documents can provide you with useful knowledge about what happened on your system, at what time did it occur, and sometimes even what triggered that specific event.
Therefore, we can safely assume that PowerShell’s Get-EventLog command is not something you want to be missing from your toolbelt, especially if you plan on honing your system administration skills. If you know everything there is to know about event logs and their names, you can go ahead and type Get-EventLog directly in your PowerShell’s command line. Note that PowerShell will prompt you to input the name of the log you’re trying to view.
If you type the name of an empty event log (one with no entries), PowerShell will prompt you with an error and return you to the command-line interface. Therefore, it would be easier if you just used the command below, which will provide you with a list of Event Logs on your system, along with additional details about each one, such as the default overflow action, and the number of entries.
One of the most popular use cases for event logs is checking for errors, especially if they occurred silently, were shortly followed by a system crash, or lead to a BSOD, which we all know how cryptic can be. However, you will need to be more specific with the Get-EventLog cmdlet if you want to narrow down the list of results, which oftentimes can be huge.
Get-EventLog -LogName Security -EntryType Error
Typing the command above in your PowerShell’s command-line interface should provide you with a list of all the errors registered in your Security event log. Note that you can use the -List parameter to see all the log types in your system and replace Security in the command above with any other log type that you find on your list, just as long as it has more than zero entries.
If you want to learn more about using the Get-EventLog command in PowerShell, feel free to use the Get-Help command we’ve talked about in the first section of this subchapter.
6. ConvertTo-HTML
Sometimes when you’re using PowerShell, you may stumble upon certain information that you want to extract and keep for future reference, create reports, or simply import it from a different application. One of the most frequently-used ways to extract this data from PowerShell and export it to an external file on your computer is the ConvertTo-HTML command.
Using this command will help you build comprehensive reports that can help you analyze extracted information and insights in a more effective manner by providing you with HTML tables that you can customize later by adding custom styles and color-coded data. As with many other PowerShell commands, ConvertTo-HTML doesn’t work by itself, and you’ll need to pair it up with an additional command which it will use as an input (or a source of data).
For instance, if you’re trying to print a report consisting of every service that starts with the letter ‘W’ and is currently running on your computer, you can type the command below:
Get-Service "W*" | Where-Object {$_.Status -eq "Running"} | ConvertTo-HTML
This will provide you with an HTML code of the data you fed to the ConvertTo-HTML function, which you can simply copy directly from the PowerShell’s command-line interface, paste it in your favorite text editor and save it as an HTML file, which you can use to view the result in any web browser.
You can use ConvertTo-HTML with virtually any PowerShell command, as long as the command you’re using as a data source will generate output. You can try it with other cmdlets, such as Get-Process, Get-EventLog, or Get-Help. Note that aside from HTML conversions, the ConvertTo cmdlet can also be used to generate JSON, CSV, and XML files. You just have to replace HTML in the command syntax with the format you’re interested in.
7. Export-CSV
If you’re working with various objects that you feel may fit way better in a table, you can use PowerShell to convert the items you’re currently handling into a series of CSV (comma-separated value) strings and export the strings to a file in one swift motion through the Export-CSV cmdlet.
As with ConvertTo-HTML, Export-CSV needs an input that it can convert to CSV strings, as it can’t just work on its own. Thus, you will need to pair it with a command that can be used to generate data, such as the Get-Service or Get-Process ones we’ve explained earlier.
Essentially, Export-CSV does almost the same thing as the ConvertTo-HTML cmdlet we’ve discussed above, aside from one important aspect that shouldn’t be overlooked: this cmdlet actually generates a file and saves it on your computer, as opposed to the ConvertTo command, which only gives you the output and lets you create the file on your own.
Let’s assume, for instance, that you’d like to turn the list of services running on your computer into a CSV file so that you can process the file further with third-party software, or put it in a spreadsheet for further reference. All you’d have to do is type the Get-Service command followed by the Export-CSV one, and mention a location where you’d like the CSV file to be generated, like in the example below:
Get-Service | Export-CSV c:\Tips.WebTech360.csv
The command above will fetch a list of all the services that are available on your computer, running or not, convert them into a series of CSV strings, and save the result as a CSV file named ‘Tips.WebTech360’ in the root of your C drive. You can then open the file in a third-party software solution, convert it into a fully-fledged table, or just store it for future usage.
PowerShell cheatsheet – CONCLUSION
Although there’s still a lot of people advocating for CMD, truth be told PowerShell is more versatile, way more powerful, but at the same time more complicated to work with than its traditional CMD counterpart. The sheer amount of features, combined with the fact that you can create automation scripts in PowerShell and perform complicated system management operations just leaves CMD in a cone of shadow.
Nếu bạn mới bắt đầu khám phá PowerShell và bạn đang loay hoay tìm hiểu chức năng của mỗi lệnh, cách chuyển một số lệnh hoặc cách tự tạo và chạy các tập lệnh PowerShell đ��n giản, thì hướng dẫn của chúng tôi là một điểm khởi đầu tuyệt vời. Chúng tôi đã dành thời gian giải thích một số lệnh quan trọng nhất mà bạn nên biết trong PowerShell, tạo một vài hướng dẫn ngắn và cũng bao gồm danh sách các lệnh PowerShell cơ bản, bí danh của chúng và mô tả ngắn cho từng mục, chỉ để đơn giản hóa hành trình khám phá PowerShell của bạn.


