Are you tired of handing over your Windows 11 PC to friends or family, only to worry about what they might access or change? 😊 Setting up a Windows 11 guest account is the perfect solution for safe, limited sharing. It lets others use your computer without touching your personal files, apps, or settings. In this guide, we'll walk you through how to setup Windows 11 guest account correctly, ensuring everything is secure and hassle-free. By the end, you'll feel confident enabling guest access like a pro.
Why Bother with a Windows 11 Guest Account?
Before diving in, let's quickly highlight the perks. A guest account in Windows 11 acts as a temporary user profile with restricted permissions. This means:
- 🛡️ No access to your private folders or admin tools.
- 📱 Easy logins for visitors without creating permanent accounts.
- 🔒 Automatic cleanup of changes when they log out—keeping your system pristine.
Microsoft designed this feature for households, offices, or public setups, and with the latest Windows 11 updates, it's more reliable than ever. Ready to get started? Let's jump into the steps.
Prerequisites: What You Need Before Setup
To setup Windows 11 guest account smoothly, ensure you're running the most recent Windows 11 version. Head to Settings > Windows Update and check for updates. You'll also need admin privileges on your PC—simple if you're the primary user.
Pro tip: Back up important data just in case. While guest accounts are safe, it's always smart to be prepared. Now, onto the main event!
Step-by-Step: How to Enable and Setup Windows 11 Guest Account
Windows 11 makes creating a guest account straightforward, but note that the classic "Guest" account is disabled by default for security. We'll enable it properly. Follow these steps carefully for a correct setup.
- Access User Accounts Settings
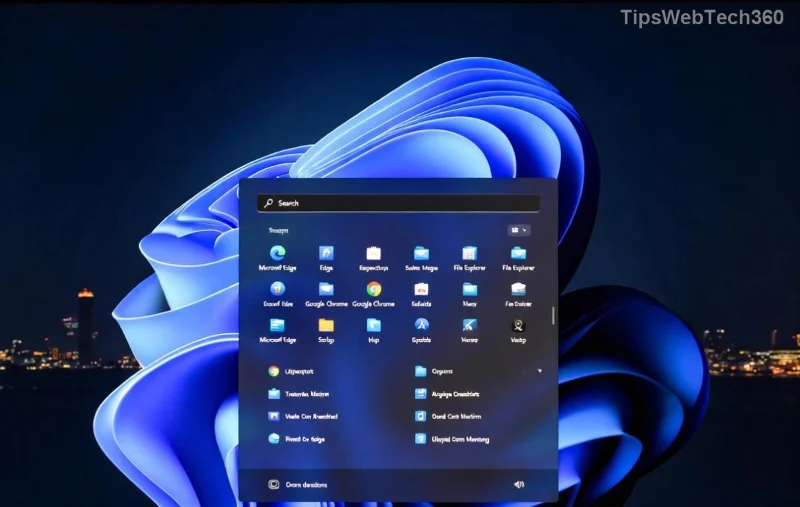
Press the Windows key + I to open Settings. Navigate to Accounts > Family & other users (or Other users in some builds). This is your hub for managing Windows 11 guest accounts.
- Add a New User
Click "Add account" under Other users. When prompted, select "I don't have this person's sign-in information" > "Add a user without a Microsoft account." This creates a local account ideal for guests.
- Configure as Guest
Enter a username like "Guest" and leave the password blank for easy access (or set a simple one). Click Next. The new account appears in the list—now limit its privileges.
- Restrict Permissions
Select the new account and click "Change account type." Choose "Standard User" instead of Administrator. This ensures the guest account in Windows 11 can't install software or alter system files.
- Enable Guest Mode via Command Prompt (Advanced Security Step)
For the true guest experience, open Command Prompt as admin (search for cmd, right-click > Run as administrator). Type: net user guest /active:yes and press Enter. This activates the built-in Guest account. To disable later, use net user guest /active:no.
- Customize Restrictions
Back in Settings > Accounts, go to the new user and manage what they can access. Under "More settings," block Microsoft Store purchases or app installations for extra safety.
That's it! Log out and test the Windows 11 guest account by signing in as the guest. You'll notice limited desktop icons and no access to your documents—exactly as intended. 👏
Common Pitfalls and How to Avoid Them in Windows 11 Guest Setup
Setting up a guest account Windows 11 isn't rocket science, but mistakes happen. Here's a quick table of pitfalls and fixes to keep things smooth:
| Issue |
Solution |
| Guest account not appearing at login |
Ensure it's enabled via Command Prompt. Restart your PC if needed. |
| Guest can access admin features |
Double-check account type in Settings—set to Standard User only. |
| Slow performance in guest mode |
Limit background apps in Task Manager before logging in as guest. |
| Can't disable after use |
Use net user guest /active:no in admin Command Prompt. |
Avoid these, and your setup Windows 11 guest will be flawless. If you're dealing with multiple users, consider Family Safety features for added parental controls.
Enhancing Security for Your Windows 11 Guest Account
Security is key when enabling create guest account Windows 11. Beyond basic setup:
- 🛡️ Use Windows Defender to scan for threats—guest sessions are isolated but vigilance matters.
- 🔐 Enable BitLocker if your drive isn't encrypted, protecting data from unauthorized peeks.
- 📵 Set up automatic logoff after inactivity via Power Options in Settings.
For more on Windows 11 security best practices, check Microsoft's official guide: Manage User Accounts in Windows.
![Command Prompt enabling guest account in Windows 11]()
Testing and Troubleshooting Your New Guest Account
Once set up, test thoroughly. Log in as guest and try browsing, opening apps, and saving files (they should be temporary). If issues arise, like login failures, run the System File Checker: Open Command Prompt as admin and type sfc /scannow.
Remember, the Windows 11 guest account is temporary by design—changes don't persist, so your main profile stays untouched. Feeling empowered? Great! This setup not only secures your PC but also makes sharing a breeze.
Final Thoughts: Share Safely with Confidence
Setting up a guest account in Windows 11 correctly transforms how you share your device, blending convenience with ironclad security. Whether for a quick demo or family use, these steps ensure peace of mind. If you run into unique scenarios, like enterprise environments, explore Group Policy Editor for advanced tweaks.
Stick around our site for more Windows 11 tips—next up, optimizing performance for multi-user setups. You've got this! 🚀