Home
» INTERNET
»
How to Get Sticker Residue Off Clothes Without Setting the Adhesive
How to Get Sticker Residue Off Clothes Without Setting the Adhesive
Sticker residue on clothing is usually easier to remove when you treat it as two separate problems: first remove the paper or plastic sticker material, then deal with the thin adhesive film left in the fibers. The safest method depends on the garment, so the care label comes before any solvent, soaking step, or wash temperature.
Illustrative example: imagine a light blue cotton-polyester sweatshirt that went through the washer with a volunteer name-tag sticker still attached. The paper face is partly gone, but a tacky rectangle remains. Its care label allows machine washing in cold water. This is a hypothetical example used only to show how the decisions fit together; it is not a real test, testimonial, or measured result.
What a good result should look like
The goal is not simply to make the sticky area look lighter. A successful treatment should leave no loose paper, no tacky film that grabs your fingertip, no obvious oily ring from a cleaning product, and no new color loss or roughened fabric. If the garment is still sticky while damp, treat it again before exposing it to dryer or iron heat.
That last point matters because adhesive and glue stains can become harder to remove after heat. Tide's current glue-stain guidance advises repeating treatment before drying when a stain remains. The garment's own care label still controls how the item may be washed and dried. In the United States, those labels are governed by the FTC Care Labeling Rule.
Choose the least aggressive method that fits the fabric
Garment situation
Reasonable starting point
When to change course
Washable cotton, polyester, or common blends
Lift loose sticker material, gently scrape, then use detergent; spot-tested rubbing alcohol can be an escalation step.
Stop if color transfers, the surface becomes fuzzy, or the fabric coating changes.
Dry-clean-only or highly delicate item
Remove only loose material that comes away without force.
Use a professional cleaner instead of experimenting with solvents or washing.
Printed, coated, embellished, or unknown fabric
Test any treatment on an inconspicuous spot first.
If the print softens, dulls, bleeds, or feels tacky, rinse if permitted and stop.
Residue already exposed to dryer heat
Expect more than one treatment cycle; start gently.
If repeated home treatment risks the fabric, switch to professional care.
Clorox publishes a clothing-specific method for sticker residue that combines soaking, an alcohol-based product when needed, machine washing, and air drying. Tide's broader adhesive guidance also recommends testing solvents on a hidden area before treating the stain. These sources support a gradual approach rather than jumping straight to the strongest chemical available. See Clorox's sticker-residue guidance for clothes and Tide's glue and adhesive stain guidance.
How to get sticker residue off clothes step by step
1. Read the care label before you wet or treat the spot
Check whether the garment is machine washable, hand wash only, dry-clean only, or restricted to a specific water temperature. Also note warnings about bleach, drying, or ironing. For the hypothetical sweatshirt, the label says machine wash cold, so every later wash step stays within that limit.
If the item is silk, leather, suede, velvet, a delicate structured garment, or dry-clean-only, do not assume a method that works on a cotton T-shirt will be safe. Mechanical removal of loose paper may still be possible, but solvent treatment is a different decision.
2. Peel away the sticker face and loose paper
Work slowly from an edge. Do not yank at the fabric or pull hard enough to stretch knit material. If the sticker tears, remove the pieces that release easily and leave stubborn adhesive for the next steps. The point is to reduce the amount of material before adding liquid.
Start by lifting away as much of the sticker face and loose paper as you can without stretching the fabric.
3. If the residue is soft and smearing, cool it briefly
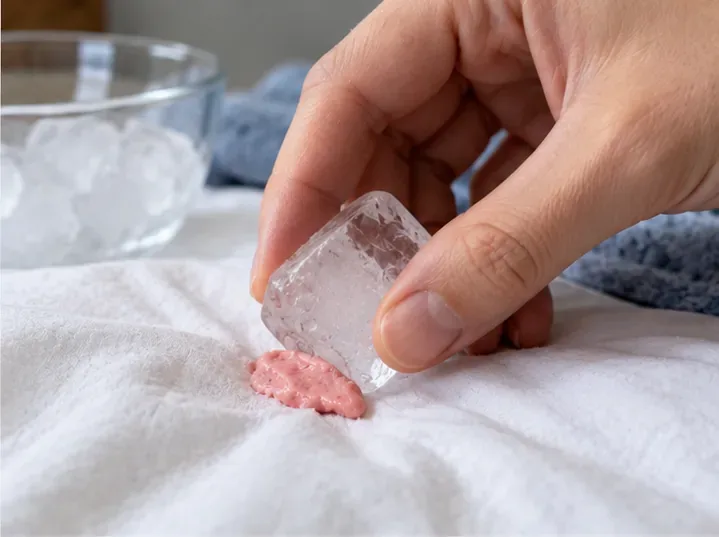
This is an optional physical aid, not a requirement. If the adhesive is gummy and spreads when touched, press an ice cube inside a small bag against the area for a short time. Cooling can make some sticky residues firmer and easier to lift. Tide discusses freezing as a mechanical aid for some tougher adhesives; sticker formulas vary, so judge the result rather than assuming it will always work.
If chilling has no effect, move on. Do not soak a garment that should not be exposed to water, and do not rub the ice directly across delicate fibers.
If soft residue keeps smearing, brief chilling can make it easier to lift mechanically; skip this if the garment care instructions do not allow moisture.
4. Lift the loosened residue with a dull edge
Lay the garment flat on a clean towel. Use the edge of a plastic card, spoon, or another smooth dull tool to push residue away from the fibers. Work from the outside of the sticky patch toward the center so you do not spread it over a larger area.
A sharp knife or razor can nick threads, especially on knits, fleece, and thin synthetic fabrics. If you have to press hard enough to deform the cloth, the adhesive is not ready to scrape and you should switch to a compatible pretreatment instead.
Use a dull edge such as a plastic card to lift loosened residue; avoid sharp blades that can cut threads.
5. Spot-test rubbing alcohol before using it on the visible residue
Rubbing alcohol can loosen some adhesive stains, but it should not be treated as universally fabric-safe. Put a small amount on a cotton swab or white cloth and touch it to an inconspicuous area such as an inside seam allowance. Wait briefly, then blot with a clean white cloth.
Do not proceed if dye transfers, the finish changes, the fabric feels weakened, or the area develops a ring. Tide specifically recommends a colorfastness test before solvent treatment. For the illustrative sweatshirt, suppose the hidden test shows no color transfer; only then would the example move on to the visible residue.
Before treating the visible spot, test the chosen solvent on a hidden area and stop if color transfers or the fabric changes.
6. Blot the remaining adhesive instead of flooding the fabric
Apply a small amount of the tested alcohol to a white cotton pad or cloth and dab the sticky area. Give it a moment to loosen the adhesive, then lift softened residue with a fresh part of the cloth or the dull scraper. Repeat with modest amounts rather than soaking the garment.
If the residue begins to spread, stop and blot from the outer edge toward the center. If the fabric changes color or texture, stop immediately. An alcohol treatment is an escalation step, not something every sticker stain needs.
For a washable, colorfast garment, a small amount of spot-tested rubbing alcohol can help loosen remaining adhesive.
7. Pretreat the area with laundry detergent
Once most of the adhesive has been removed, apply a small amount of liquid laundry detergent that is appropriate for the garment. Work it gently into the stained area with your fingers or a very soft brush if the weave can tolerate it. Avoid aggressive scrubbing, which can create a fuzzy or abraded patch even after the glue is gone.
This detergent step also helps remove oily traces that may remain after an adhesive treatment. If you choose a commercial adhesive remover instead of alcohol, follow that product's label exactly and check whether it is approved for the garment material before use.
After the sticky residue is loosened, pretreat the area with laundry detergent and work it in gently rather than scrubbing aggressively.
8. Wash according to the care label
Wash the garment using the method and temperature allowed by its label. For the hypothetical sweatshirt, that means a cold machine wash, not a hotter cycle simply because heat sounds more powerful. The FTC rule requires care labels to communicate washing and drying methods that can be used for normal care, so the garment-specific instructions deserve priority over a generic stain-removal tip.
If you used a strong specialty adhesive remover, follow its label for whether the item should be washed separately. Do not mix products casually, and do not add bleach unless both the care label and the cleaning product instructions permit it.
Wash the garment according to its care label, using the permitted water temperature and cycle.
9. Inspect before applying dryer or iron heat
When the wash cycle ends, check the area while the garment is still damp. Feel for tackiness and look at the fabric from an angle under good light. If you can still see or feel residue, repeat the compatible pretreatment rather than putting the garment in the dryer.
Air drying is the conservative choice while you are still evaluating the stain. Clorox's sticker-residue instructions specifically end with air drying and repeating treatment if needed. After the residue is gone, return to the normal drying method permitted by the garment's label.
Inspect the treated area before using heat; air-dry first if you are not sure the residue is completely gone.
Applying the method to the illustrative sweatshirt
Return to the hypothetical name-tag residue. First, the care label is checked: machine wash cold is permitted. Loose sticker paper is peeled off. Because the adhesive smears slightly, the area is cooled briefly and then gently scraped with a plastic card. A rubbing-alcohol spot test on an inside seam shows no visible dye transfer in this example, so a small amount is blotted onto the residue.
After the tacky layer lifts, a little liquid detergent is worked into the spot, and the sweatshirt is washed cold as directed by its label. When the cycle ends, the area is inspected before heat. If it is still tacky, the correct next step is another treatment cycle, not a victory lap through the dryer. If it is clean and non-sticky, it can be dried according to the care label.
Again, this sequence is an illustration of decision-making, not evidence that every cotton-poly blend or every sticker adhesive will respond identically.
When to stop home treatment
Change methods or hand the garment to a professional cleaner if the fabric starts to lose color, the surface becomes rough or fuzzy, a print or coating softens, or the care label does not support washing. The same applies when the adhesive is from an industrial label, patch, transfer film, or unknown specialty product rather than an ordinary sticker.
You should also reconsider the approach if repeated alcohol treatment is making little progress. More solvent is not automatically better. At that point, a fabric-safe commercial adhesive remover may be appropriate if its manufacturer specifically lists the fabric as compatible, or a professional cleaner may be the lower-risk choice for a valuable garment.
Common mistakes that make sticker residue harder to remove
Using the dryer too early: inspect first and repeat treatment before heat when residue remains.
Skipping the care label: a method can remove adhesive and still damage the garment.
Scraping with a sharp blade: this can cut yarns or leave permanent abrasion.
Soaking the stain with solvent: use the smallest effective amount after a hidden-area test.
Assuming all fabrics tolerate alcohol: color, coatings, prints, and fiber finishes can react differently.
Mixing stain removers: follow one compatible treatment path at a time and rinse or wash as directed before changing products.
Frequently asked questions
Can I use rubbing alcohol on sticker residue on clothes?
It can be useful on some washable, colorfast fabrics, and Tide includes rubbing alcohol among solvent options for certain adhesive stains. Test it on a hidden area first. Do not use that recommendation to override a dry-clean-only label or a fabric-specific warning.
Will vinegar remove sticker residue from fabric?
Vinegar is often suggested online, but it is not necessary for the method above, and effectiveness varies with the adhesive. A care-label-safe detergent route, followed by a spot-tested adhesive treatment when needed, is easier to control and is better supported by the manufacturer guidance cited here.
What if the sticker went through the dryer?
Start with the same gentle sequence, but expect the residue to require more than one treatment. Avoid adding more heat until the adhesive is gone. If the fabric is valuable, delicate, or beginning to show damage, stop rather than escalating indefinitely.
Can I use acetone or nail-polish remover?
Acetone is used for some strong glues, but it is more aggressive than necessary for many sticker residues and can be unsuitable for some fabrics, dyes, trims, or finishes. For an ordinary sticker stain, begin with the gentler options above. If a specialty adhesive requires a stronger solvent, follow the adhesive manufacturer's removal guidance and the garment's care instructions.
Bottom line
The reliable way to get sticker residue off clothes is to escalate gradually: check the label, remove loose material, lift what you can mechanically, spot-test any solvent, pretreat with detergent, wash within the garment's limits, and inspect before heat. That sequence gives you clear stop points if the fabric starts reacting badly, which matters more than forcing every sticker stain through the same recipe.
Source note: Guidance was checked against official manufacturer and U.S. care-label sources in September 2026, including the Clorox clothing sticker-residue instructions, Tide adhesive-stain guidance, and the FTC Care Labeling Rule. Product formulas, garment finishes, and care instructions can differ, so the garment label and any treatment product label remain the controlling instructions for a specific item.