Home
» WINDOWS
»
Driver Sweeper: Remove Leftover Driver Files and Registry Entries
Driver Sweeper: Remove Leftover Driver Files and Registry Entries
Driver Sweeper was a Windows utility for removing leftover driver files, folders, and registry entries after a driver was uninstalled. It can help troubleshoot a stubborn driver conflict, but it is not a routine PC speed booster, and the original application is no longer the current download offered by its publisher. For Windows 10 or 11, start with Windows' built-in removal tools; use a specialized cleaner only when you have a specific, identified problem.
What happened to Driver Sweeper?
The original Driver Sweeper let users select a hardware-driver category, scan for remnants, review individual file and Registry matches, and clean the selected items. It was associated with older Windows releases, including XP, Vista, and 7. Its original download link is no longer a working standalone download page. The publisher's Driver Sweeper site now directs visitors to Driver Fusion, Treexy's actively offered replacement.
Driver Fusion includes a Driver cleaner feature, but it is a different application with different licensing and compatibility. Treexy says its cleaner can remove device-related software and driver entries; cleaning protected or in-use entries requires Premium. See the official Driver Fusion product page and driver-cleaner manual rather than downloading an old installer from an unverified mirror.
Before cleaning: protect your installation
Driver leftovers are not automatically harmful. Some driver packages are shared by several devices, while others are deliberately retained so Windows can reinstall hardware. Deleting the wrong files or Registry entries can disable audio, networking, display output, or even normal startup.
Make sure you know the exact device and driver vendor you intend to remove.
Download a known-good replacement driver from the PC or hardware manufacturer if you will need one.
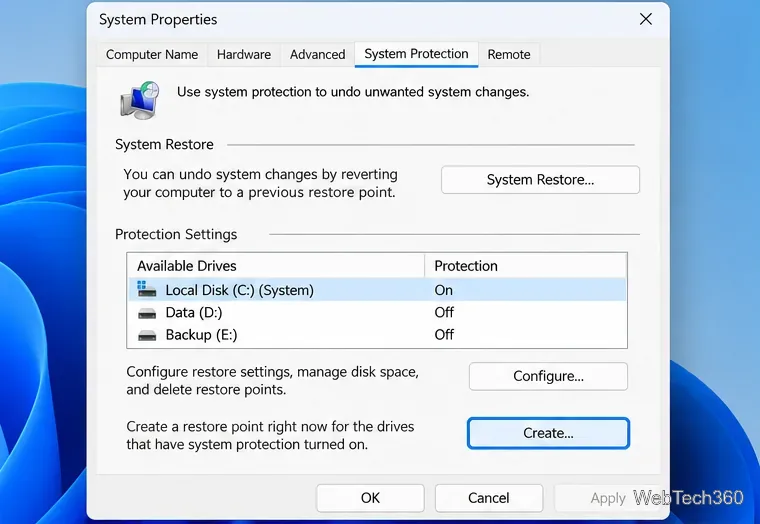
Back up important files and create a restore point. In Start, search Create a restore point, enable protection for the system drive if needed, then select Create.
Disconnect removable hardware first, when practical, to reduce immediate driver reinstallation.
Create a restore point before changing driver packages or cleaning registry entries.
Microsoft explains how to enable System Protection in its System Protection instructions. A restore point is a recovery measure, not a substitute for a complete backup.
Step 1: Uninstall the unwanted driver first
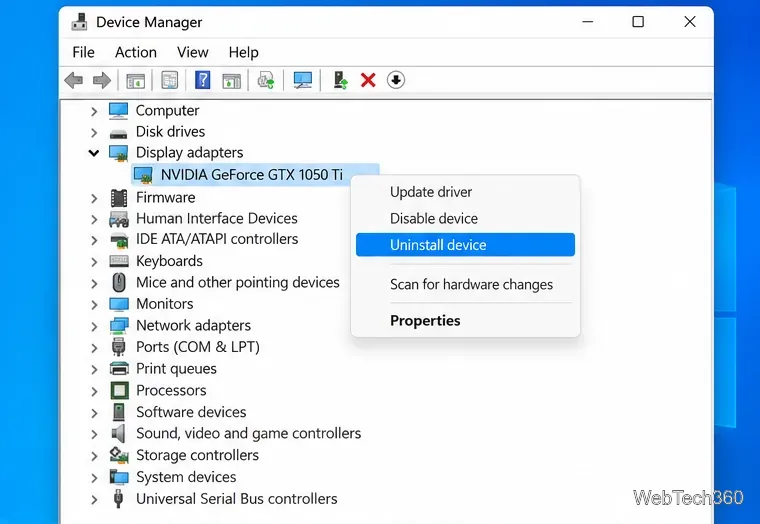
Driver Sweeper was meant to address remnants, not replace the normal uninstall process. On Windows 10 or 11, remove the vendor's driver application under Settings > Apps if it is listed. Otherwise, open Device Manager, select View > Show hidden devices, find the relevant hardware, right-click it, and select Uninstall device. If Windows offers an option to remove the associated driver software/package, use it only when you intend to remove that package too.
Use Device Manager to remove the intended device; do not uninstall unrelated hardware.
Restart if Windows requests it. A device can reappear if it is still connected or if Windows Update installs a matching driver. Microsoft documents these details in its Device Manager removal guide.
Step 2: Review leftovers in the original Driver Sweeper
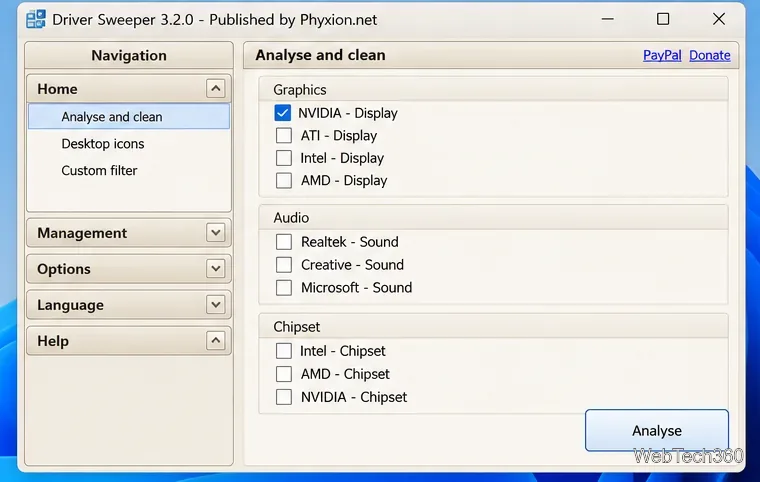
If you already have the legacy utility on an older supported PC, its historical workflow is straightforward. Open Analyse and clean, select only the driver family you uninstalled (such as an old graphics or sound driver), and click Analyse. Examine the results before using Clean. Uncheck anything whose purpose or owner you cannot establish.
The legacy workflow begins by choosing a specific driver family to analyze.
Do not select multiple unrelated manufacturers just because they appear in the list. A scan result is not proof that every listed item is safe to delete. If the software cannot distinguish a current driver from an obsolete one, stop and use the device manufacturer's removal instructions.
Step 3: Use the modern cleaner only when appropriate
For current Windows releases, Driver Fusion offers a similar concept under Driver cleaner: choose a driver/device category, wait for entries to populate, deselect anything you want to keep, then choose Clean. Its official manual describes that selection-and-review flow. Not every entry can be removed with the free edition. You do not need to install Driver Fusion if the normal Windows uninstall resolved your problem.
Step 4: If a driver package remains, check the Driver Store
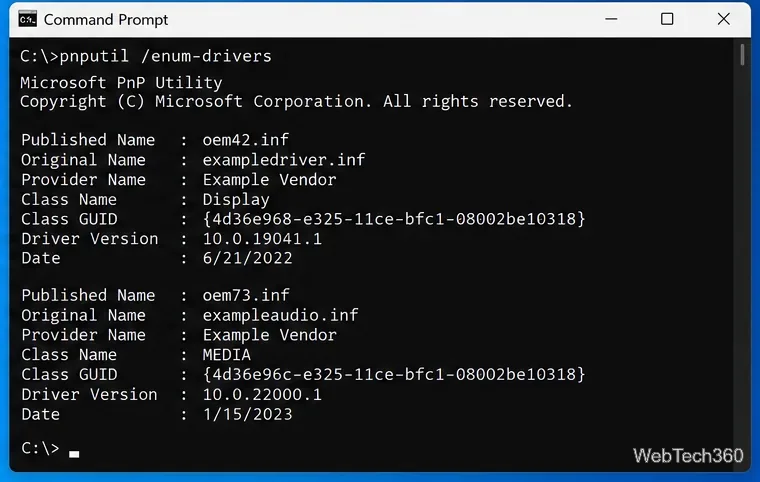
Deleting stray folders is different from removing a driver package from Windows' Driver Store. On Windows 10 version 1607 and later, PnPUtil is Microsoft's built-in tool for this job. In an Administrator Command Prompt, first list third-party driver packages:
pnputil /enum-drivers
Review each package's published INF name and provider before considering removal; the entries shown are examples.
Confirm the Published Name (for example, oem42.inf) and verify it belongs to the driver you mean to remove. Only then, if removal is necessary, run:
pnputil /delete-driver oem42.inf /uninstall
Replace oem42.inf with the verified name from your own PC. This command can uninstall the package from devices using it, leaving hardware without a working driver. Avoid the /force switch as a casual workaround and never delete files manually from the Driver Store folder. See Microsoft's PnPUtil reference for supported syntax.
When should you leave leftovers alone?
If your device works normally after a driver update, there is usually no reason to sweep the Registry. Unused entries do not necessarily consume meaningful resources or reduce performance. Targeted cleanup makes sense when you can trace a repeatable installation failure, device conflict, or vendor-recommended reinstall procedure to a particular driver. After any cleanup, restart, verify the device works, and reinstall a trusted driver if needed.
Bottom line: Driver Sweeper explains a useful legacy cleanup technique, but modern Windows users should prefer the built-in uninstall process and use driver-specific cleanup only for a real problem. For a maintained cleaner, check Driver Fusion's official documentation and review every item before deleting it.