How to Screenshot on Mac: A Comprehensive Guide

Learn how to screenshot on Mac with shortcuts for the full screen, an area, or a window, plus the Screenshot app, clipboard, editing, and save-location tips.
To enable file sharing on a Mac, open Apple menu > System Settings > General > Sharing, select the Info button beside File Sharing, and turn it on. Then choose which folders to share and who can access them. If you want Windows computers to connect, enable SMB and select the Mac user accounts they may use.
The steps below follow the current macOS System Settings layout. On older macOS versions that use System Preferences, open Apple menu > System Preferences > Sharing; the wording and layout may differ.
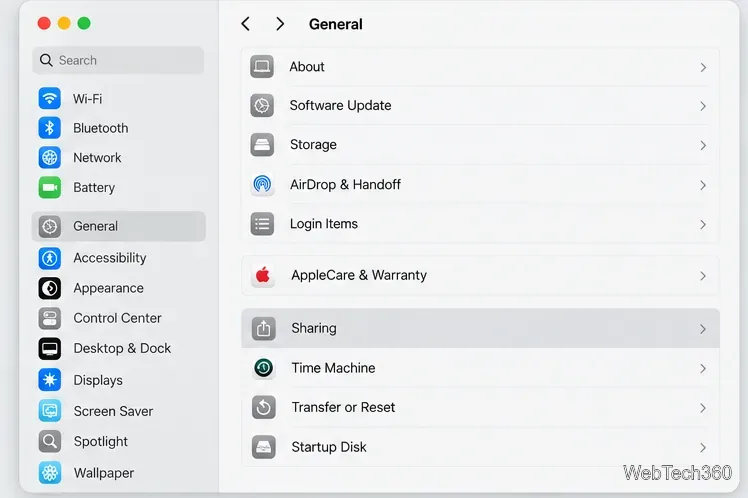
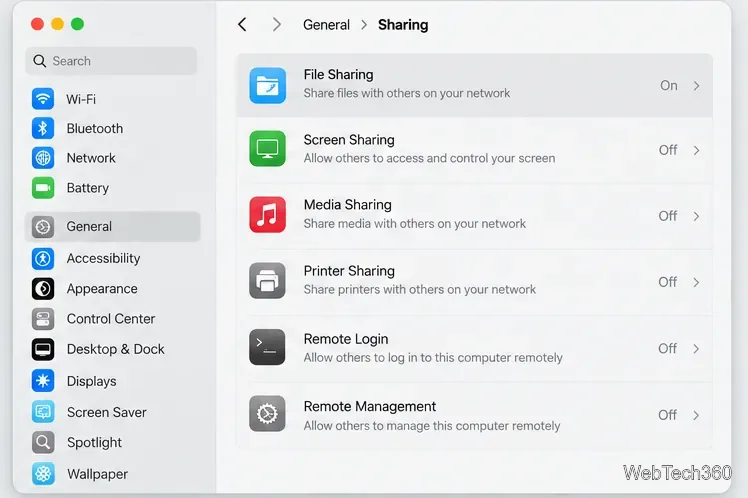
File Sharing is a separate service from Screen Sharing and Media Sharing. You do not need to enable either of those to exchange files. Apple’s file-sharing setup guide documents the current controls.
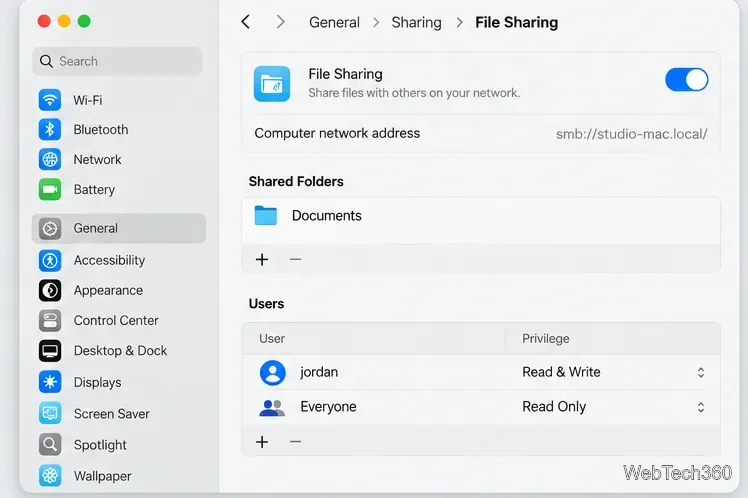
In the File Sharing details, review the Shared Folders list before connecting another device. macOS shares each user’s Public folder automatically. To stop sharing one, select it and click the minus button. To share a specific folder, click the plus button, choose the folder, and click Open.
Select a shared folder to edit its Users list. You can add a Mac user, a network user or group, or create a sharing-only account for someone in Contacts. Assign only the access that person needs:
By default, Mac user accounts can connect over the network, and an administrator can access the entire Mac. For a limited share, use a dedicated folder and named accounts instead of enabling Allow full disk access for all users. These folder and privilege controls are described in Apple’s File Sharing settings guide.
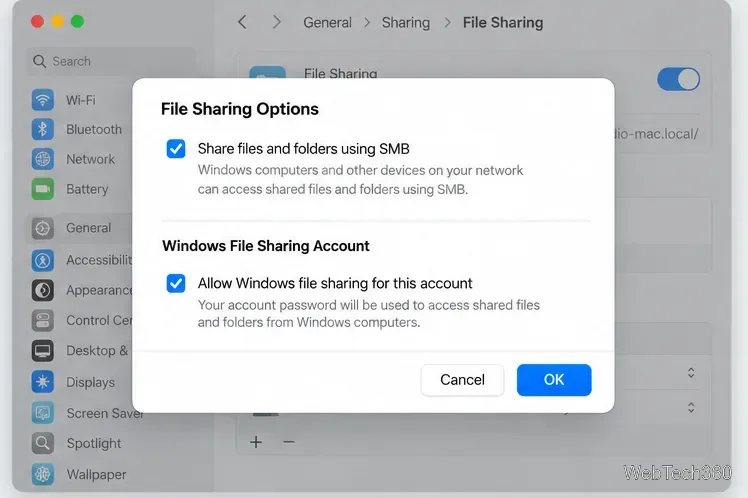
For a Windows PC to access a Mac share, turn on SMB in File Sharing options. Click Options, select Share files and folders using SMB, then select the checkbox beside each Mac account that needs Windows access. Enter that account’s Mac password when prompted and confirm the dialog.
SMB is also used by many non-Apple devices. If all you need is sharing between Macs, first try connecting with the account allowed in the Users list; you do not need to enable every option. For Windows-specific steps, see Apple’s guide to sharing Mac files with Windows users.
Apple notes that passwords for accounts enabled for Windows file sharing may be stored less securely. Select only accounts that need Windows access, and deselect their Windows-sharing checkboxes when you no longer need them.
In the File Sharing details, note the network address shown beneath the File Sharing status. It may use your Mac’s name or its IP address. Share that address and the username with the person connecting; do not send the password in a public channel.
smb://studio-mac.local/), and click Connect. Choose Registered User and sign in with an account that has access, then select the shared folder.For more connection options, see Apple’s instructions for connecting a Mac to shared computers and servers and connecting to a Mac from Windows.
When the transfer is finished, turn File Sharing off in System Settings > General > Sharing if you no longer need it. If Windows accounts were enabled, first clear their Windows File Sharing checkboxes, then turn off SMB. This removes those account credentials from the Windows-sharing configuration.
Learn how to screenshot on Mac with shortcuts for the full screen, an area, or a window, plus the Screenshot app, clipboard, editing, and save-location tips.
Combine multiple images into a single PDF on macOS using Finder or Preview. Control page order, avoid cropping, and fix missing pages without extra software.
Learn how to show FPS on a Mac with Steam’s performance overlay or Apple’s Metal Performance HUD, plus fixes when the counter does not appear.
Use Option–Command–Esc to force quit an unresponsive Mac app, or close it from the Apple menu, Dock, Activity Monitor, or Terminal.
Set up Split View, resize or replace a pane, use Mission Control, and learn when desktop window tiling is a better fit on your Mac.
Learn how to remove EXIF data from photos on macOS, hide location in Photos, clean exported JPEG copies with ExifTool, and verify the result.
Sync two folders on a Mac with SyncTwoFolders, choose a one-way or two-way update, and preview changes before files are replaced or removed.
Back up a Tumblr blog on your Mac with Tumblr’s web export. Download and unpack the ZIP, keep its posts and media safe, and know what the archive leaves out.
Use Google Maps on your Mac in Safari or Chrome, find places and routes, switch map layers, and add a Safari web app to your Dock on macOS Sonoma 14 or later.
Compare five free WAV-to-MP3 converters for Windows and macOS, including online file limits, local batch tools, and practical export settings.